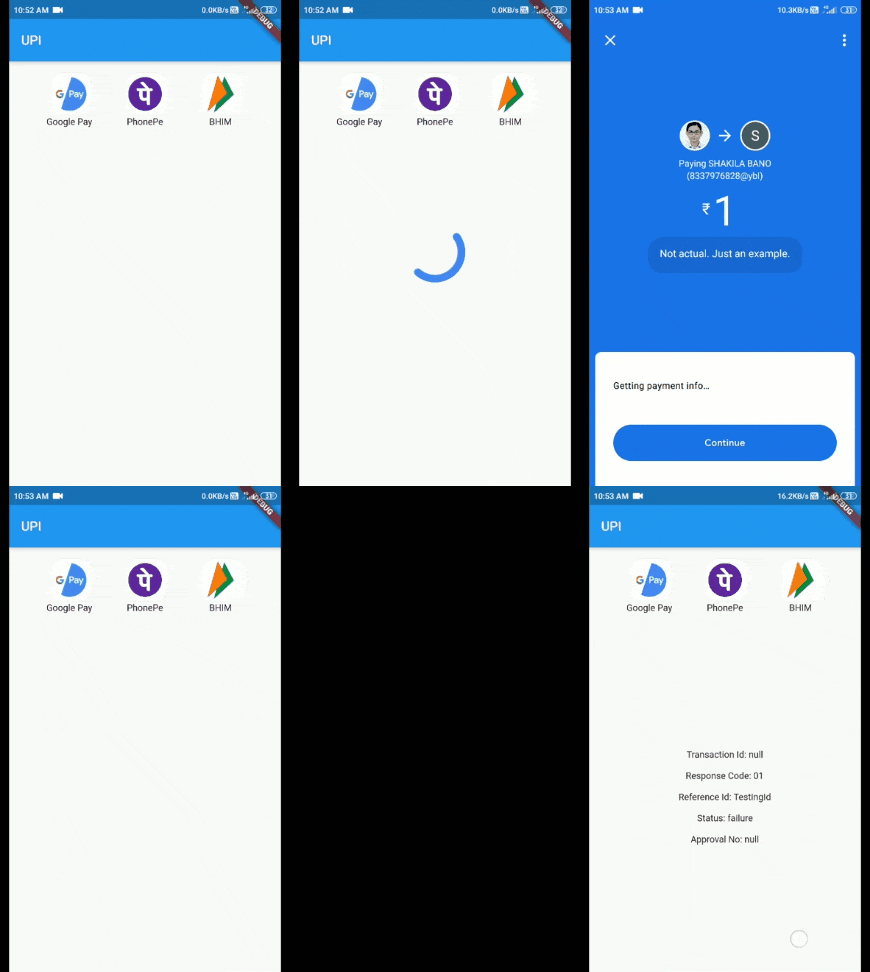
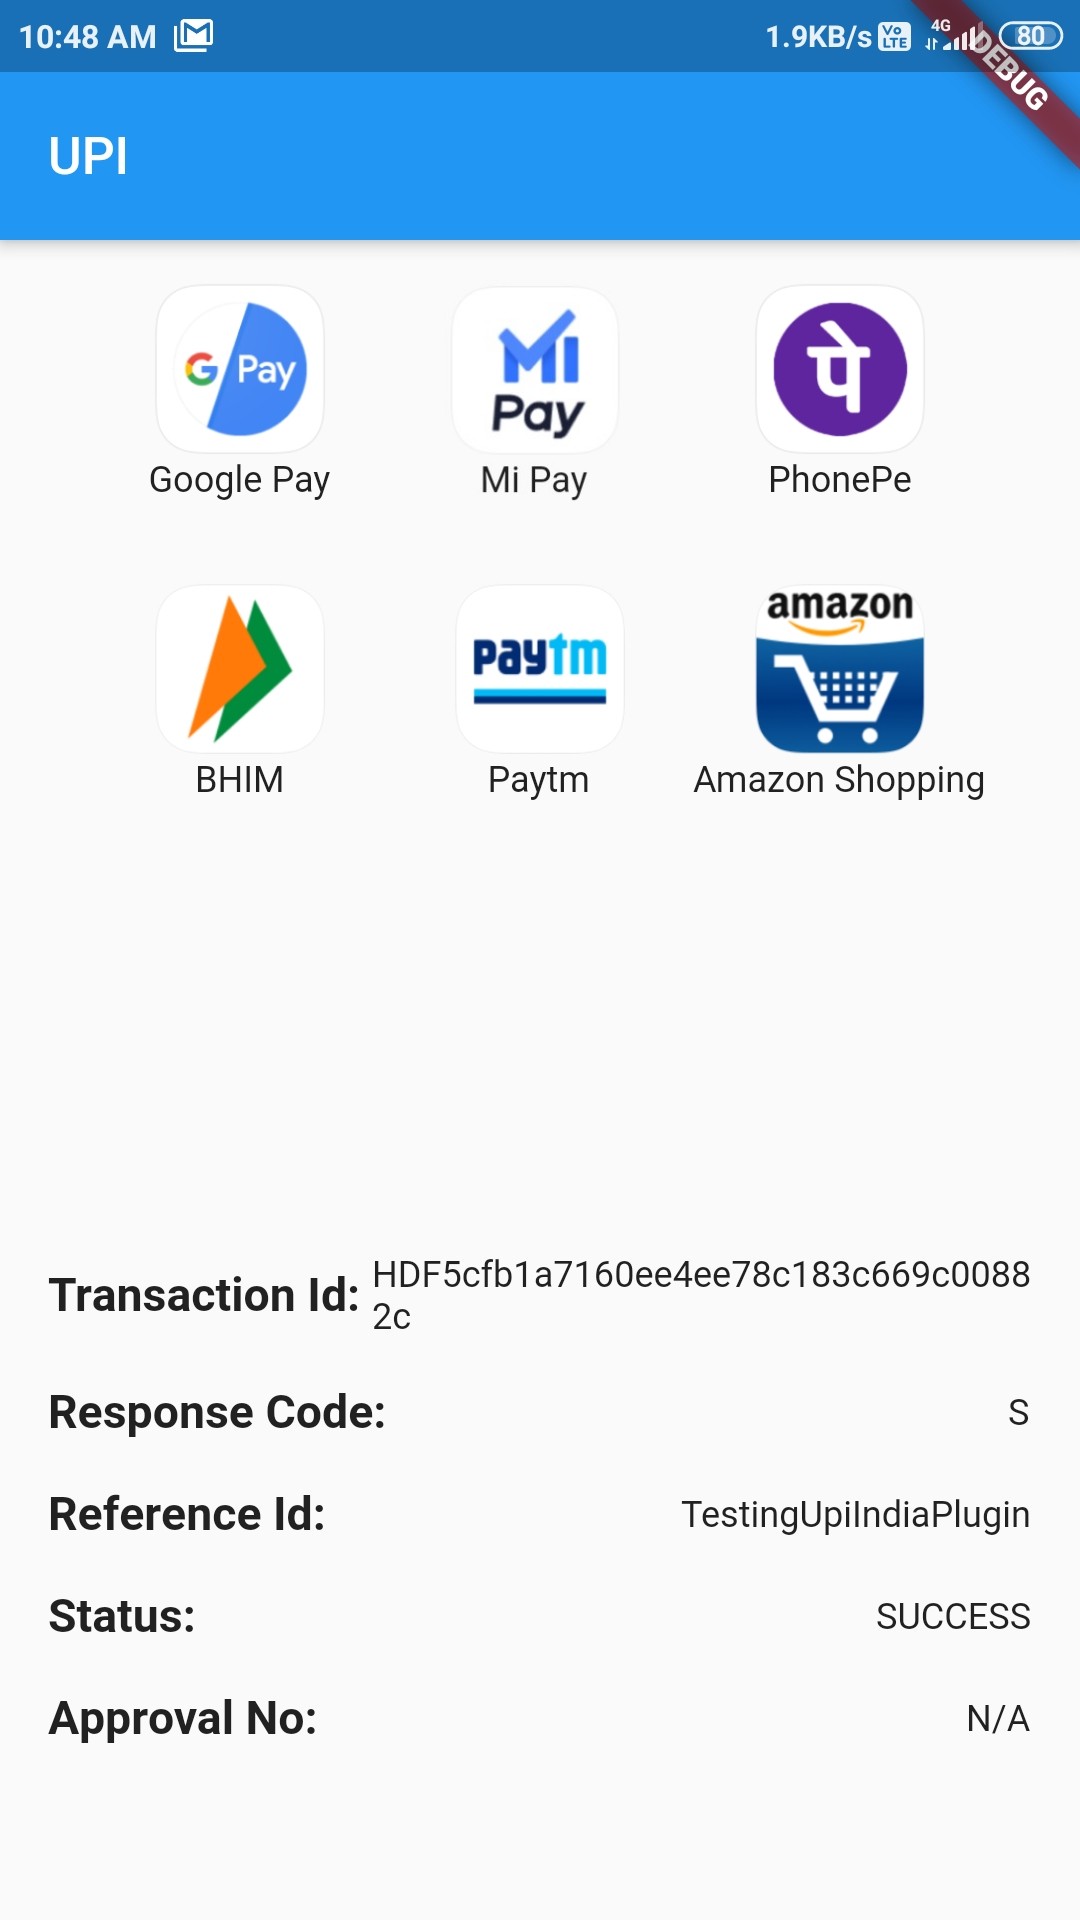
Flutter印度统一支付接口插件upi_india的使用
Flutter印度统一支付接口插件upi_india的使用
UPI India (仅限Android)
此插件用于在您的Android应用程序中集成UPI选项。您可以使用此插件向任何UPI ID或账户号码发起交易。


重要提示!
一些应用如Google Pay、PhonePe、Paytm目前无法处理交易,显示“最大限额已超过”或“风险阈值已超过”的错误。原因尚不清楚。
需要帮助
如果您可以帮忙将此插件扩展到iOS,请查看此问题。 如果您可以帮助验证不同UPI应用的兼容性,请查看此问题。
感谢您!:)
主要类介绍
-
UpiIndia
- 包含两个方法:
getAllUpiApps():获取所有支持UPI的应用列表- 参数:
bool allowNonVerifiedApps:是否包含未验证的应用List<UpiApp> includeOnly:仅显示这些应用并隐藏其他应用bool mandatoryTransactionId:是否包含不返回交易ID的应用
- 参数:
startTransaction():启动交易- 参数:
double amount:转账金额(以卢比计)UpiApp app:使用的应用String currency:目前仅支持INRbool flexibleAmount:允许用户填写金额String merchantId:商家代码(如果有)String receiverId:收款人IDString receiverName:收款人姓名String transactionNote:交易备注String transactionRefId:交易参考IDString url:额外信息
- 参数:
- 包含两个方法:
-
UpiApp
- 包含支持的应用,并作为
getAllUpiApps()返回的应用模型类。
- 包含支持的应用,并作为
-
UpiResponse
- 用于获取请求应用的响应。
-
UpiPaymentStatus
- 用于检查交易是否成功。
自定义异常
UpiIndiaAppNotInstalledExceptionUpiIndiaUserCancelledExceptionUpiIndiaNullResponseExceptionUpiIndiaInvalidParametersExceptionUpiIndiaActivityMissingExceptionUpiIndiaAppsGetException
如何开始交易?
步骤1:导入包
import 'package:upi_india/upi_india.dart';
步骤2:创建UpiIndia对象
UpiIndia _upiIndia = UpiIndia();
步骤3:获取设备上所有支持UPI的应用列表
List<UpiApp>? apps;

@override
void initState() {
  _upiIndia.getAllUpiApps(mandatoryTransactionId: false).then((value) {
    setState(() {
      apps = value;
    });
  }).catchError((e) {
    apps = [];
  });
  super.initState();
}
或者直接使用预定义的应用:
UpiApp app = UpiApp.googlePay;
步骤4:创建启动交易的方法
Future<UpiResponse> initiateTransaction(UpiApp app) async {
  return _upiIndia.startTransaction(
    app: app,
    receiverUpiId: "9078600498@ybl",
    receiverName: 'Md Azharuddin',
    transactionRefId: 'TestingUpiIndiaPlugin',
    transactionNote: 'Not actual. Just an example.',
    amount: 1.00,
  );
}
步骤5:调用此方法以启动交易
如何处理响应?
步骤1:检查是否有错误
if (snapshot.hasError) {
  switch (snapshot.error.runtimeType) {
    case UpiIndiaAppNotInstalledException:
      print("Requested app not installed on device");
      break;
    case UpiIndiaUserCancelledException:
      print("You cancelled the transaction");
      break;
    case UpiIndiaNullResponseException:
      print("Requested app didn't return any response");
      break;
    case UpiIndiaInvalidParametersException:
      print("Requested app cannot handle the transaction");
      break;
    default:
      print("An Unknown error has occurred");
      break;
  }
}
步骤2:从snapshot.data中获取UpiResponse并提取参数
- 交易ID
- 响应码
- 批准参考号
- 交易参考ID
- 状态
步骤3:检查状态属性
UpiPaymentStatus.SUCCESSUpiPaymentStatus.SUBMITTEDUpiPaymentStatus.FAILURE
如果状态为SUCCESS,恭喜你!你已经成功使用了这个插件。
支持的应用
已验证的应用
- All Bank
- Amazon Pay
- Axis Pay
- Baroda Pay
- BHIM
- Cent UPI
- Cointab
- Corp UPI
- DCB UPI
- Fino BPay
- Freecharge
- Google Pay
- iMobile ICICI
- Indus Pay
- Khaali Jeb
- Maha UPI
- Mobikwik
- Oriental Pay
- Paytm
- Paywiz
- PhonePe
- PSB
- SBI Pay
- Yes Pay
不返回交易ID的应用(需设置mandatoryTransactionId: false)
- MiPay(Play Store和GetApps版本)
- HSBC Simply Pay
未验证的应用(需设置allowNonVerifiedApps: true)
- True Caller
- BOI UPI
- CSB UPI
- CUB UPI
- digibank
- Equitas UPI
- Kotak
- PayZapp
- PNB
- RBL Pay
- realme PaySa
- United UPI Pay
- Vijaya UPI
不支持的应用
- Airtel Thanks
- AUPay
- Bandhan Bank UPI
- CANDI
- Indian Bank UPI
- Jet Pay
- KBL UPI
- KVB UPI
- LVB UPAAY
- Synd UPI
- UCO UPI
- Ultra Cash
完整示例代码
import 'package:flutter/material.dart';
import 'package:upi_india/upi_india.dart';

void main() => runApp(MyApp());

class MyApp extends StatelessWidget {
  @override
  Widget build(BuildContext context) {
    return MaterialApp(
      title: 'Test UPI',
      home: HomePage(),
    );
  }
}

class HomePage extends StatefulWidget {
  @override
  _HomePageState createState() => _HomePageState();
}

class _HomePageState extends State<HomePage> {
  Future<UpiResponse>? _transaction;
  UpiIndia _upiIndia = UpiIndia();
  List<UpiApp>? apps;

  TextStyle header = TextStyle(
    fontSize: 18,
    fontWeight: FontWeight.bold,
  );

  TextStyle value = TextStyle(
    fontWeight: FontWeight.w400,
    fontSize: 14,
  );

  @override
  void initState() {
    _upiIndia.getAllUpiApps(mandatoryTransactionId: false).then((value) {
      setState(() {
        apps = value;
      });
    }).catchError((e) {
      apps = [];
    });
    super.initState();
  }

  Future<UpiResponse> initiateTransaction(UpiApp app) async {
    return _upiIndia.startTransaction(
      app: app,
      receiverUpiId: "9078600498@ybl",
      receiverName: 'Md Azharuddin',
      transactionRefId: 'TestingUpiIndiaPlugin',
      transactionNote: 'Not actual. Just an example.',
      amount: 1.00,
    );
  }

  Widget displayUpiApps() {
    if (apps == null)
      return Center(child: CircularProgressIndicator());
    else if (apps!.length == 0)
      return Center(
        child: Text(
          "No apps found to handle transaction.",
          style: header,
        ),
      );
    else
      return Align(
        alignment: Alignment.topCenter,
        child: SingleChildScrollView(
          physics: BouncingScrollPhysics(),
          child: Wrap(
            children: apps!.map<Widget>((UpiApp app) {
              return GestureDetector(
                onTap: () {
                  _transaction = initiateTransaction(app);
                  setState(() {});
                },
                child: Container(
                  height: 100,
                  width: 100,
                  child: Column(
                    mainAxisSize: MainAxisSize.min,
                    mainAxisAlignment: MainAxisAlignment.center,
                    children: <Widget>[
                      Image.memory(
                        app.icon,
                        height: 60,
                        width: 60,
                      ),
                      Text(app.name),
                    ],
                  ),
                ),
              );
            }).toList(),
          ),
        ),
      );
  }

  String _upiErrorHandler(error) {
    switch (error) {
      case UpiIndiaAppNotInstalledException:
        return 'Requested app not installed on device';
      case UpiIndiaUserCancelledException:
        return 'You cancelled the transaction';
      case UpiIndiaNullResponseException:
        return 'Requested app didn\'t return any response';
      case UpiIndiaInvalidParametersException:
        return 'Requested app cannot handle the transaction';
      default:
        return 'An Unknown error has occurred';
    }
  }

  void _checkTxnStatus(String status) {
    switch (status) {
      case UpiPaymentStatus.SUCCESS:
        print('Transaction Successful');
        break;
      case UpiPaymentStatus.SUBMITTED:
        print('Transaction Submitted');
        break;
      case UpiPaymentStatus.FAILURE:
        print('Transaction Failed');
        break;
      default:
        print('Received an Unknown transaction status');
    }
  }

  Widget displayTransactionData(title, body) {
    return Padding(
      padding: const EdgeInsets.all(8.0),
      child: Row(
        mainAxisAlignment: MainAxisAlignment.spaceBetween,
        children: [
          Text("$title: ", style: header),
          Flexible(
              child: Text(
            body,
            style: value,
          )),
        ],
      ),
    );
  }

  @override
  Widget build(BuildContext context) {
    return Scaffold(
      appBar: AppBar(
        title: Text('UPI'),
      ),
      body: Column(
        children: <Widget>[
          Expanded(
            child: displayUpiApps(),
          ),
          Expanded(
            child: FutureBuilder(
              future: _transaction,
              builder: (BuildContext context, AsyncSnapshot<UpiResponse> snapshot) {
                if (snapshot.connectionState == ConnectionState.done) {
                  if (snapshot.hasError) {
                    return Center(
                      child: Text(
                        _upiErrorHandler(snapshot.error.runtimeType),
                        style: header,
                      ), // Print's text message on screen
                    );
                  }

                  // If we have data then definitely we will have UpiResponse.
                  // It cannot be null
                  UpiResponse _upiResponse = snapshot.data!;

                  // Data in UpiResponse can be null. Check before printing
                  String txnId = _upiResponse.transactionId ?? 'N/A';
                  String resCode = _upiResponse.responseCode ?? 'N/A';
                  String txnRef = _upiResponse.transactionRefId ?? 'N/A';
                  String status = _upiResponse.status ?? 'N/A';
                  String approvalRef = _upiResponse.approvalRefNo ?? 'N/A';
                  _checkTxnStatus(status);

                  return Padding(
                    padding: const EdgeInsets.all(8.0),
                    child: Column(
                      mainAxisAlignment: MainAxisAlignment.center,
                      children: <Widget>[
                        displayTransactionData('Transaction Id', txnId),
                        displayTransactionData('Response Code', resCode),
                        displayTransactionData('Reference Id', txnRef),
                        displayTransactionData('Status', status.toUpperCase()),
                        displayTransactionData('Approval No', approvalRef),
                      ],
                    ),
                  );
                } else
                  return Center(
                    child: Text(''),
                  );
              },
            ),
          )
        ],
      ),
    );
  }
}
希望这篇文档对你有帮助!如果你有任何问题或需要进一步的帮助,请随时提问。
更多关于Flutter印度统一支付接口插件upi_india的使用的实战系列教程也可以访问 https://www.itying.com/category-92-b0.html
更多关于Flutter印度统一支付接口插件upi_india的使用的实战系列教程也可以访问 https://www.itying.com/category-92-b0.html
关于Flutter中印度统一支付接口(UPI)插件upi_india的使用,下面是一个基本的代码示例,展示如何在Flutter应用中集成和使用该插件。请注意,由于具体的插件实现和API可能会随时间变化,以下代码仅供参考,并假设upi_india插件已经按照Flutter插件的标准方式集成到你的项目中。
1. 添加依赖
首先,确保在你的pubspec.yaml文件中添加了upi_india插件的依赖:
dependencies:
  flutter:
    sdk: flutter
  upi_india: ^最新版本号  # 请替换为实际的最新版本号
然后运行flutter pub get来安装依赖。
2. 导入插件
在你的Dart文件中(例如main.dart),导入插件:
import 'package:flutter/material.dart';
import 'package:upi_india/upi_india.dart';
3. 初始化插件
在适当的时机(例如应用启动时)初始化插件。这通常是在State的initState方法中,或者如果你使用的是GetX、Provider等状态管理库,则在相应的初始化逻辑中。
void initUpiPlugin() async {
  try {
    await UpiIndia.initialize();
    print("UPI plugin initialized successfully");
  } catch (e) {
    print("Failed to initialize UPI plugin: $e");
  }
}
4. 发起支付请求
使用插件提供的API来发起支付请求。以下是一个简化的示例,展示如何调用支付功能:
void makePayment() async {
  try {
    String upiId = "your_upi_id@upi";  // 替换为实际的UPI ID
    double amount = 100.0;  // 支付金额
    String note = "Payment for goods";  // 可选的支付备注

    UpiPaymentResponse response = await UpiIndia.pay(
      upiId: upiId,
      amount: amount,
      note: note,
    );

    if (response.status == "SUCCESS") {
      print("Payment successful: ${response.transactionId}");
      // 处理支付成功逻辑
    } else {
      print("Payment failed: ${response.errorMessage}");
      // 处理支付失败逻辑
    }
  } catch (e) {
    print("An error occurred during payment: $e");
  }
}
5. 在UI中调用支付功能
最后,在你的UI中添加一个按钮来触发支付功能:
void main() => runApp(MyApp());

class MyApp extends StatelessWidget {
  @override
  Widget build(BuildContext context) {
    return MaterialApp(
      home: Scaffold(
        appBar: AppBar(
          title: Text('UPI Payment Example'),
        ),
        body: Center(
          child: ElevatedButton(
            onPressed: () async {
              await initUpiPlugin();  // 确保插件已初始化
              makePayment();
            },
            child: Text('Make Payment'),
          ),
        ),
      ),
    );
  }
}
注意事项
- 权限:确保你的Android和iOS项目已经配置了必要的权限,以访问支付相关的功能。
- 安全性:不要在客户端硬编码敏感信息,如API密钥或支付密码。这些信息应该通过安全的方式(如服务器端生成)传递给客户端。
- 错误处理:在实际应用中,应该添加更详细的错误处理和用户反馈机制。
- 测试:在发布前,确保在多种设备和网络环境下充分测试支付功能。
由于upi_india插件的具体实现和API可能会变化,请参考插件的官方文档和示例代码以获取最新的使用指南。


