Flutter视觉增强插件glass_kit的使用
Flutter视觉增强插件glass_kit的使用
目录
关于
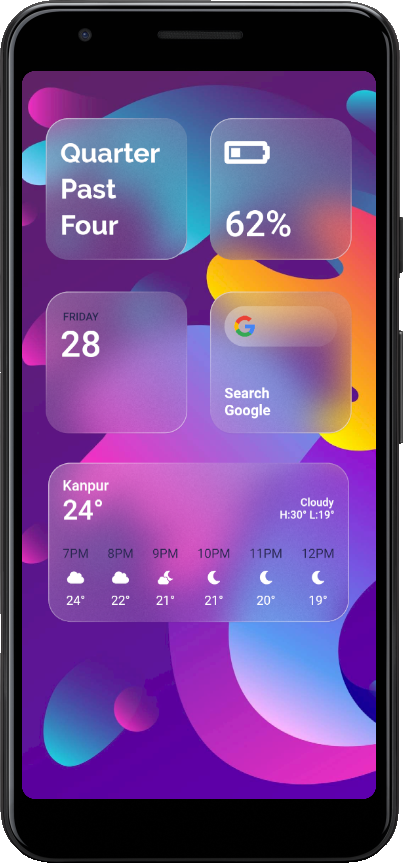
GlassMorphism 是一种新的UI趋势,深受设计师的喜爱。glass_kit 提供了多种小部件和其他元素,以轻松且高效地在Flutter应用程序中实现这种风格。

图库
| iOS风格的玻璃形态 | 卡片中的玻璃形态 |
|---|---|
 |
 |
源代码可以在这里找到。
开始使用
要在项目中使用 glass_kit,首先需要将其添加到项目的 pubspec.yaml 文件中:
dependencies:
  glass_kit: ^4.0.1
然后运行以下命令来获取包:
flutter packages get
接下来,在Dart文件中导入该包:
import 'package:glass_kit/glass_kit.dart';
用法
glass_kit 提供了两种构造函数来创建玻璃容器:clearGlass 和 frostedGlass。如果需要,可以提供 height 和 width 参数。
创建透明玻璃容器
GlassContainer.clearGlass(child: Child());
创建磨砂玻璃容器
GlassContainer.frostedGlass(width: 300, child: Child());
完全自定义的玻璃容器
你也可以使用 GlassContainer 构造函数来创建完全自定义的玻璃容器。例如,创建一个圆形的玻璃容器:
GlassContainer(
  height: 300,
  width: 400,
  gradient: LinearGradient(
    colors: [Colors.white.withOpacity(0.40), Colors.white.withOpacity(0.10)],
    begin: Alignment.topLeft,
    end: Alignment.bottomRight,
  ),
  borderGradient: LinearGradient(
    colors: [
      Colors.white.withOpacity(0.60),
      Colors.white.withOpacity(0.10),
      Colors.lightBlueAccent.withOpacity(0.05),
      Colors.lightBlueAccent.withOpacity(0.6),
    ],
    begin: Alignment.topLeft,
    end: Alignment.bottomRight,
    stops: [0.0, 0.39, 0.40, 1.0],
  ),
  blur: 15.0,
  borderWidth: 1.5,
  elevation: 3.0,
  isFrostedGlass: true,
  shadowColor: Colors.black.withOpacity(0.20),
  alignment: Alignment.center,
  frostedOpacity: 0.12,
  margin: EdgeInsets.all(8.0),
  padding: EdgeInsets.all(8.0),
);
注意:GlassContainer 的属性与常规 Container 类似,但有一些例外和附加属性。更多详情请参阅文档。
示例代码
下面是一个完整的示例代码,展示了如何在应用中使用 glass_kit:
import 'package:flutter/material.dart';
import 'package:glass_kit/glass_kit.dart';

void main() {
  runApp(GlassKitApp());
}

class GlassKitApp extends StatelessWidget {
  @override
  Widget build(BuildContext context) {
    return MaterialApp(
      debugShowCheckedModeBanner: false,
      home: HomePage(),
    );
  }
}

class HomePage extends StatelessWidget {
  @override
  Widget build(BuildContext context) {
    return Scaffold(
      backgroundColor: Colors.black87,
      body: Container(
        alignment: Alignment.center,
        decoration: BoxDecoration(
          image: DecorationImage(
            image: AssetImage('assets/bg_1.jpg'),
            fit: BoxFit.cover,
          ),
        ),
        child: GlassContainer(
          height: 200,
          width: 350,
          gradient: LinearGradient(
            colors: [
              Colors.white.withOpacity(0.40),
              Colors.white.withOpacity(0.10),
            ],
            begin: Alignment.topLeft,
            end: Alignment.bottomRight,
          ),
          borderGradient: LinearGradient(
            colors: [
              Colors.white.withOpacity(0.60),
              Colors.white.withOpacity(0.10),
              Colors.purpleAccent.withOpacity(0.05),
              Colors.purpleAccent.withOpacity(0.60),
            ],
            begin: Alignment.topLeft,
            end: Alignment.bottomRight,
            stops: [0.0, 0.39, 0.40, 1.0],
          ),
          blur: 20,
          borderRadius: BorderRadius.circular(24.0),
          borderWidth: 1.0,
          elevation: 3.0,
          isFrostedGlass: true,
          shadowColor: Colors.purple.withOpacity(0.20),
        ),
      ),
    );
  }
}
这个示例代码创建了一个带有背景图像的页面,并在其上放置了一个磨砂玻璃效果的容器。你可以根据自己的需求调整容器的属性,以实现不同的视觉效果。
更多关于Flutter视觉增强插件glass_kit的使用的实战系列教程也可以访问 https://www.itying.com/category-92-b0.html
更多关于Flutter视觉增强插件glass_kit的使用的实战系列教程也可以访问 https://www.itying.com/category-92-b0.html
当然,下面是一个关于如何在Flutter项目中使用glass_kit插件来实现视觉增强效果的代码案例。glass_kit是一个提供玻璃效果和其他视觉增强功能的Flutter插件。
首先,确保你已经在pubspec.yaml文件中添加了glass_kit依赖:
dependencies:
  flutter:
    sdk: flutter
  glass_kit: ^最新版本号  # 请替换为最新的版本号
然后运行flutter pub get来获取依赖。
接下来,你可以在你的Flutter应用中使用glass_kit。以下是一个简单的示例,展示如何应用玻璃效果到一个容器上:
import 'package:flutter/material.dart';
import 'package:glass_kit/glass_kit.dart';

void main() {
  runApp(MyApp());
}

class MyApp extends StatelessWidget {
  @override
  Widget build(BuildContext context) {
    return MaterialApp(
      title: 'Glass Kit Demo',
      theme: ThemeData(
        primarySwatch: Colors.blue,
      ),
      home: Scaffold(
        appBar: AppBar(
          title: Text('Glass Kit Demo'),
        ),
        body: Center(
          child: GlassContainerDemo(),
        ),
      ),
    );
  }
}

class GlassContainerDemo extends StatelessWidget {
  @override
  Widget build(BuildContext context) {
    return Stack(
      alignment: Alignment.center,
      children: [
        // 背景图片
        Image.network(
          'https://example.com/your-background-image.jpg', // 替换为你的背景图片URL
          fit: BoxFit.cover,
        ),
        // 玻璃效果容器
        GlassContainer(
          width: 300,
          height: 200,
          blur: 10.0,
          spread: 4.0,
          borderRadius: BorderRadius.circular(20.0),
          child: Center(
            child: Text(
              'Glass Effect',
              style: TextStyle(
                color: Colors.white,
                fontSize: 24,
                fontWeight: FontWeight.bold,
              ),
            ),
          ),
        ),
      ],
    );
  }
}

// GlassContainer 是一个自定义的 Widget,用于展示玻璃效果
class GlassContainer extends StatelessWidget {
  final double width;
  final double height;
  final double blur;
  final double spread;
  final BorderRadius borderRadius;
  final Widget child;

  const GlassContainer({
    Key? key,
    required this.width,
    required this.height,
    required this.blur,
    required this.spread,
    required this.borderRadius,
    required this.child,
  }) : super(key: key);

  @override
  Widget build(BuildContext context) {
    return Container(
      width: width,
      height: height,
      decoration: BoxDecoration(
        borderRadius: borderRadius,
        color: Colors.transparent,
        boxShadow: [
          BoxShadow(
            color: Colors.white.withOpacity(0.3),
            blurRadius: blur,
            spreadRadius: spread,
          ),
        ],
      ),
      child: BackdropFilter(
        filter: ImageFilter.blur(sigmaX: blur, sigmaY: blur),
        child: Container(
          decoration: BoxDecoration(
            borderRadius: borderRadius,
            color: Colors.black.withOpacity(0.5), // 用于显示内容的背景色,可以根据需要调整
          ),
          child: child,
        ),
      ),
    );
  }
}
在这个示例中,我们创建了一个GlassContainer小部件,它结合了BoxDecoration、BoxShadow和BackdropFilter来实现玻璃效果。你可以根据需要调整blur和spread参数来改变模糊和扩散的程度。
请注意,glass_kit插件本身可能提供了更直接和高级的功能,但这个示例展示了如何通过Flutter的基本组件来实现类似的效果。如果glass_kit提供了更具体的API或组件,请参考其官方文档以获取更详细和优化的使用方法。


