Flutter触摸指示器插件touch_indicator的使用
Flutter触摸指示器插件touch_indicator的使用
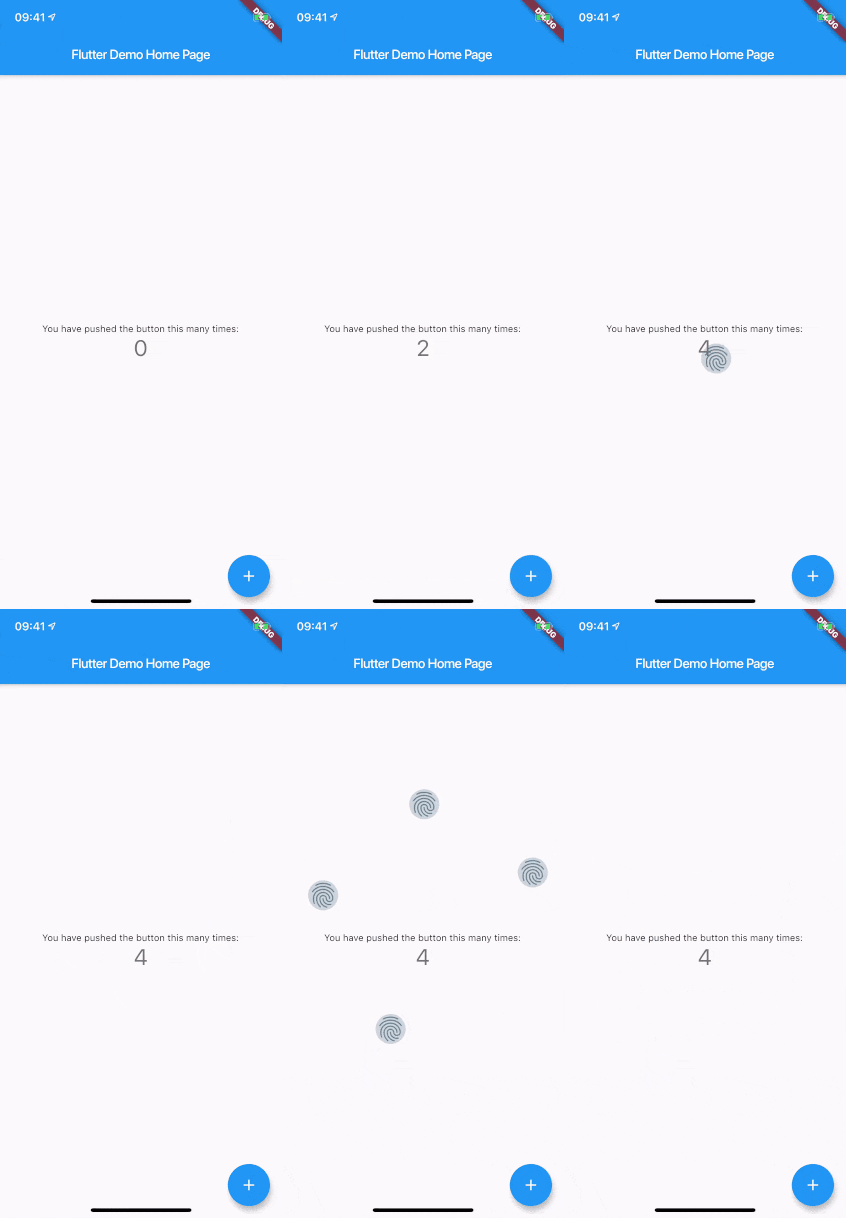
当您录制应用程序的屏幕时,通常希望提供用户手指触碰屏幕位置的视觉指示。在Android上显示这个信息是很容易的。但在iOS上,这并不那么直观。touch_indicator插件使在两个平台上都变得更容易和一致。
它会在每个触碰的手指上显示一个指示器,并且是完全可定制的。

安装
将插件添加到您的pubspec.yaml文件中:
dependencies:
  touch_indicator: ^2.0.0
使用方法
在Dart代码中导入该包:
import 'package:touch_indicator/touch_indicator.dart';
将所有路由包装在TouchIndicator小部件中:
class MyApp extends StatelessWidget {
  @override
  Widget build(BuildContext context) {
    return MaterialApp(
      title: 'Touch indicator example',
      builder: (context, child) => TouchIndicator(child: child!),
      home: MyHomePage(title: 'Flutter Demo Home Page'),
    );
  }
}
自定义选项
indicatorColor
更改指示器的颜色,默认为Colors.blueGrey。
indicatorSize
更改指示器的大小,默认为40.0。
indicator
通过在此处添加一个Widget, 您可以改变触摸指示器的完整外观。请确保提供适当的indicatorSize, 以便指示器能正确地定位在触摸点的中心。
forceInReleaseMode
如果您想在应用程序处于发布模式时显示指示器,请启用此选项,默认为false。
enabled
您可以使用此选项动态启用或禁用指示器的显示,默认为true。
示例Demo
下面是一个完整的示例demo,演示了如何使用touch_indicator插件:
import 'package:flutter/material.dart';
import 'package:touch_indicator/touch_indicator.dart';

void main() => runApp(MyApp());

class MyApp extends StatelessWidget {
  // 这个widget是您应用程序的根。
  @override
  Widget build(BuildContext context) {
    return MaterialApp(
      title: 'Flutter Demo',
      builder: (context, child) => TouchIndicator(child: child!),
      home: MyHomePage(
        title: 'Flutter Demo Home Page',
      ),
    );
  }
}

class MyHomePage extends StatefulWidget {
  MyHomePage({Key? key, required this.title}) : super(key: key);

  final String title;

  @override
  _MyHomePageState createState() => _MyHomePageState();
}

class _MyHomePageState extends State<MyHomePage> {
  int _counter = 0;

  void _incrementCounter() {
    setState(() {
      _counter++;
    });
  }

  @override
  Widget build(BuildContext context) {
    return Scaffold(
      appBar: AppBar(
        title: Text(widget.title),
      ),
      body: Center(
        child: Column(
          mainAxisAlignment: MainAxisAlignment.center,
          children: <Widget>[
            const Text(
              'You have pushed the button this many times:',
            ),
            Text(
              '$_counter',
              style: Theme.of(context).textTheme.bodyText2,
            ),
          ],
        ),
      ),
      floatingActionButton: FloatingActionButton(
        onPressed: _incrementCounter,
        tooltip: 'Increment',
        child: const Icon(Icons.add),
      ),
    );
  }
}
请注意,在上面的示例中,我已在MaterialApp的builder属性中使用了TouchIndicator, 并将其child设置为MyHomePage。这意味着,只要用户与页面上的任何元素进行交互,都会显示触摸指示器。此外,我还提供了几个自定义选项(如forceInReleaseMode, enabled, indicatorSize, 和indicatorColor),但为了简化起见,它们被注释掉了。您可以根据需要取消注释并调整这些选项。
更多关于Flutter触摸指示器插件touch_indicator的使用的实战系列教程也可以访问 https://www.itying.com/category-92-b0.html
更多关于Flutter触摸指示器插件touch_indicator的使用的实战系列教程也可以访问 https://www.itying.com/category-92-b0.html
当然,以下是如何在Flutter应用中使用touch_indicator插件的一个示例代码案例。touch_indicator插件用于在触摸屏幕上显示指示器,帮助开发者调试或展示触摸位置。
首先,确保你已经在pubspec.yaml文件中添加了touch_indicator依赖:
dependencies:
  flutter:
    sdk: flutter
  touch_indicator: ^x.y.z  # 替换为最新版本号
然后运行flutter pub get来获取依赖。
接下来,在你的Flutter应用中,你可以按照以下方式使用TouchIndicator:
import 'package:flutter/material.dart';
import 'package:touch_indicator/touch_indicator.dart';

void main() {
  runApp(MyApp());
}

class MyApp extends StatelessWidget {
  @override
  Widget build(BuildContext context) {
    return MaterialApp(
      title: 'Flutter Touch Indicator Demo',
      theme: ThemeData(
        primarySwatch: Colors.blue,
      ),
      home: Scaffold(
        appBar: AppBar(
          title: Text('Touch Indicator Demo'),
        ),
        body: Center(
          child: Stack(
            children: [
              // 其他内容,比如图片、文本等
              Image.network(
                'https://via.placeholder.com/600x400',
                fit: BoxFit.cover,
              ),
              // 添加TouchIndicator
              TouchIndicator(
                // 自定义指示器样式
                indicatorBuilder: (context, position) {
                  return Container(
                    width: 40,
                    height: 40,
                    decoration: BoxDecoration(
                      color: Colors.red.withOpacity(0.5),
                      borderRadius: BorderRadius.circular(20),
                    ),
                    child: Center(
                      child: Text(
                        'Touch',
                        style: TextStyle(color: Colors.white),
                      ),
                    ),
                    position: position,
                  );
                },
                // 可选:设置触摸监听器,如果不需要可以省略
                onTouchDown: (details) {
                  print('Touch Down at: ${details.globalPosition}');
                },
                onTouchUp: (details) {
                  print('Touch Up at: ${details.globalPosition}');
                },
                onTouchMove: (details) {
                  print('Touch Move at: ${details.globalPosition}');
                },
              ),
            ],
          ),
        ),
      ),
    );
  }
}
解释
- 依赖添加:确保在
pubspec.yaml中添加了touch_indicator依赖。 - TouchIndicator组件:在Stack中添加了
TouchIndicator组件,它会在触摸时显示一个自定义的指示器。 - indicatorBuilder:这是一个构建函数,用于定义触摸指示器的样式和位置。这里我们创建了一个带有文本“Touch”的半透明红色容器。
- onTouchDown, onTouchUp, onTouchMove:这些是可选的触摸事件监听器,可以用于在触摸按下、抬起和移动时执行一些操作,例如打印触摸位置。
这个示例展示了如何在Flutter应用中使用touch_indicator插件来显示触摸位置。你可以根据需要自定义指示器的样式和行为。


