Flutter引导提示插件tutorial_coach_mark的使用
Flutter引导提示插件tutorial_coach_mark的使用
简介
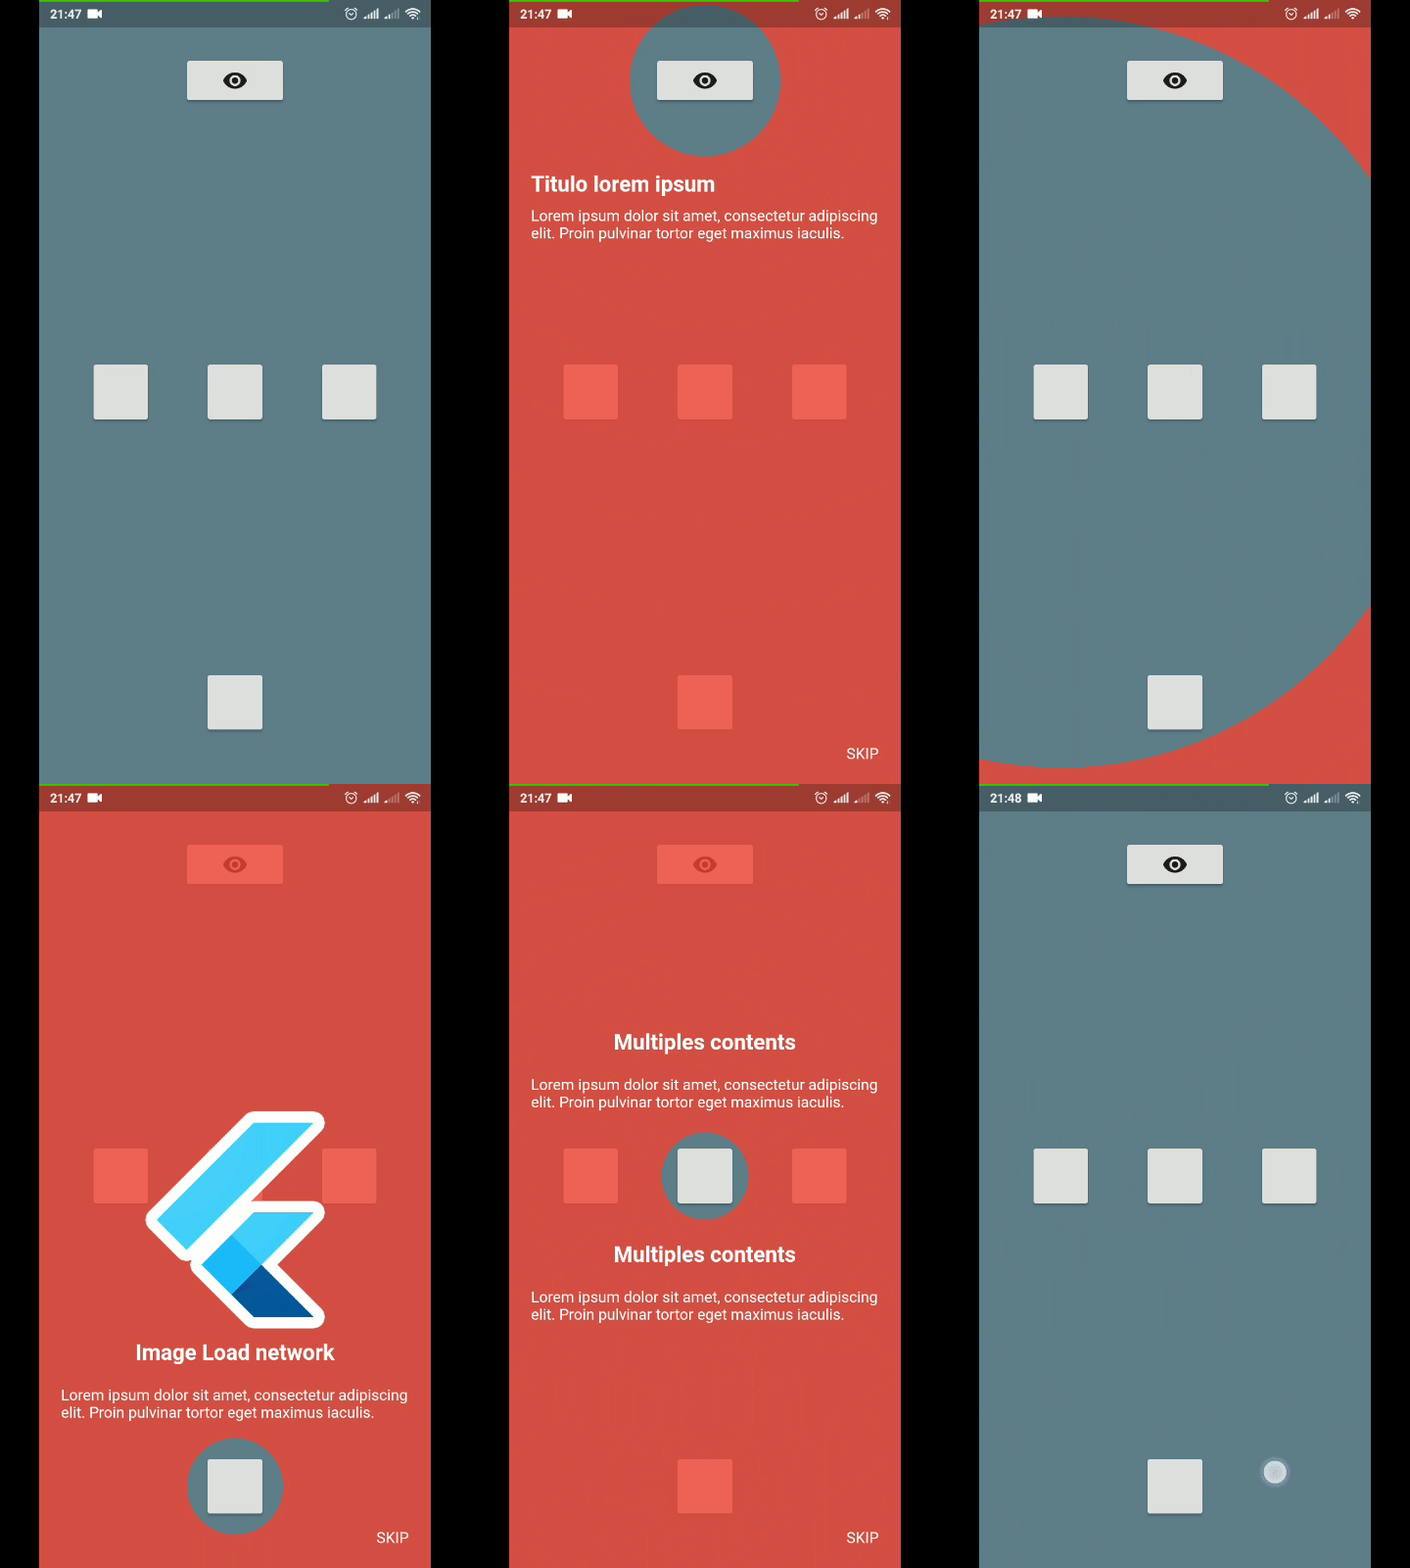
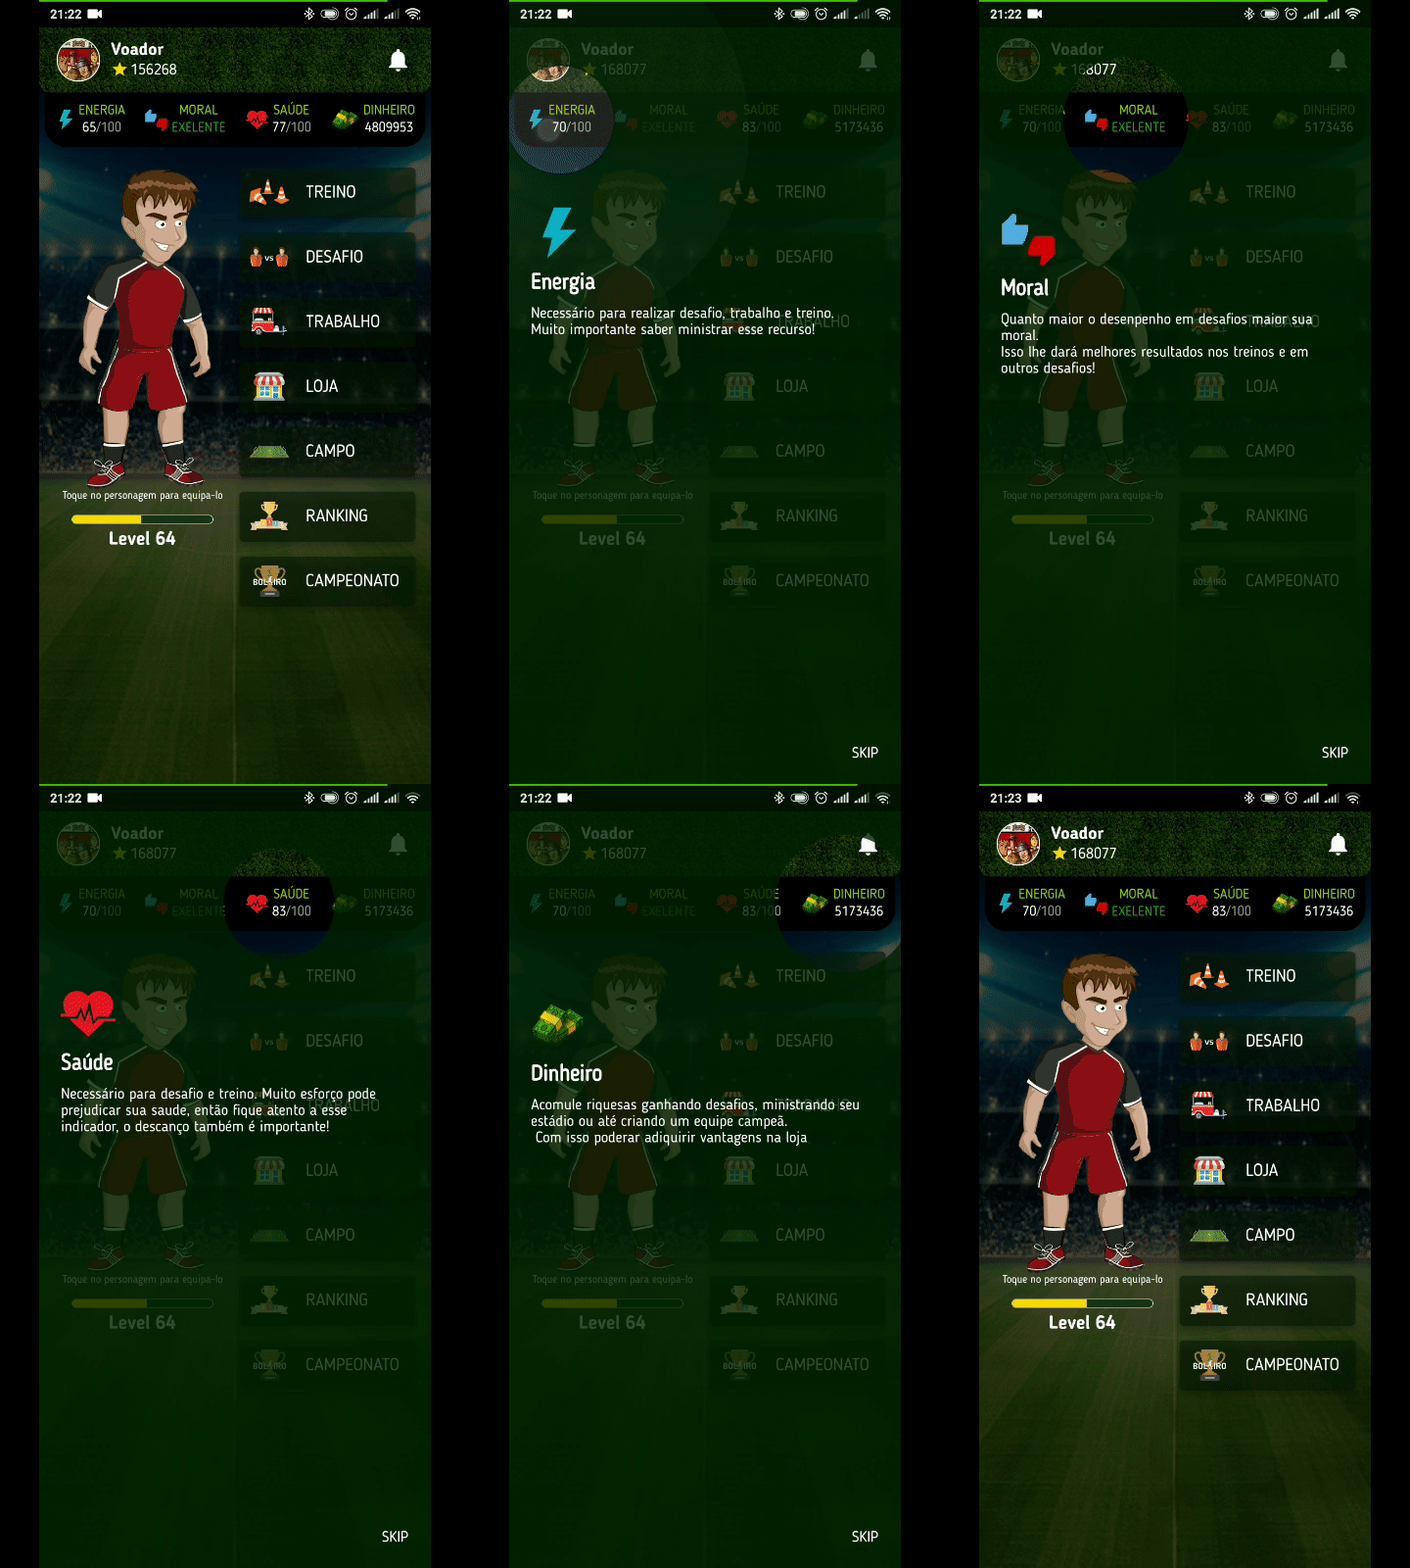
tutorial_coach_mark 是一个用于创建应用程序内教程或引导提示的强大Flutter插件。它可以帮助用户了解应用程序的关键功能和操作流程,通过高亮显示特定的UI元素并提供相关的说明内容。


使用方法
要使用此插件,需要在项目的pubspec.yaml文件中添加tutorial_coach_mark作为依赖项:
dependencies:
  tutorial_coach_mark: ^最新版本号
然后运行 flutter pub get 来安装插件。
示例代码
下面是一个完整的示例,展示了如何在Flutter应用中使用tutorial_coach_mark来创建引导教程:
import 'dart:ui';
import 'package:flutter/material.dart';
import 'package:tutorial_coach_mark/tutorial_coach_mark.dart';

void main() => runApp(const MyApp());

class MyApp extends StatelessWidget {
  const MyApp({Key? key}) : super(key: key);

  @override
  Widget build(BuildContext context) {
    return MaterialApp(
      title: 'TutorialCoachMark Demo',
      theme: ThemeData(
        primarySwatch: Colors.blue,
      ),
      home: const MyHomePage(),
    );
  }
}

class MyHomePage extends StatefulWidget {
  const MyHomePage({Key? key}) : super(key: key);

  @override
  MyHomePageState createState() => MyHomePageState();
}

class MyHomePageState extends State<MyHomePage> {
  late TutorialCoachMark tutorialCoachMark;

  GlobalKey keyButton = GlobalKey();
  GlobalKey keyButton1 = GlobalKey();
  GlobalKey keyButton2 = GlobalKey();
  GlobalKey keyButton3 = GlobalKey();
  GlobalKey keyButton4 = GlobalKey();
  GlobalKey keyButton5 = GlobalKey();

  GlobalKey keyBottomNavigation1 = GlobalKey();
  GlobalKey keyBottomNavigation2 = GlobalKey();
  GlobalKey keyBottomNavigation3 = GlobalKey();

  @override
  void initState() {
    createTutorial();
    Future.delayed(Duration.zero, showTutorial);
    super.initState();
  }

  @override
  Widget build(BuildContext context) {
    return Scaffold(
      appBar: AppBar(
        actions: [
          IconButton(
            key: keyButton1,
            icon: const Icon(Icons.add),
            onPressed: () {},
          ),
          PopupMenuButton(
            key: keyButton1,
            icon: const Icon(Icons.view_list, color: Colors.white),
            itemBuilder: (context) => [
              const PopupMenuItem(
                child: Text("Is this"),
              ),
              const PopupMenuItem(
                child: Text("What"),
              ),
              const PopupMenuItem(
                child: Text("You Want?"),
              ),
            ],
          )
        ],
      ),
      body: Container(
        color: Colors.white,
        child: Stack(
          children: [
            Padding(
              padding: const EdgeInsets.only(top: 100.0),
              child: Align(
                alignment: Alignment.topCenter,
                child: Container(
                  key: keyButton,
                  color: Colors.blue,
                  height: 100,
                  width: MediaQuery.of(context).size.width - 50,
                  child: Align(
                    alignment: Alignment.center,
                    child: ElevatedButton(
                      child: const Icon(Icons.remove_red_eye),
                      onPressed: () {
                        showTutorial();
                      },
                    ),
                  ),
                ),
              ),
            ),
            Align(
              alignment: Alignment.center,
              child: SizedBox(
                width: 50,
                height: 50,
                child: ElevatedButton(
                  key: keyButton2,
                  onPressed: () {},
                  child: Container(),
                ),
              ),
            ),
            Align(
              alignment: Alignment.bottomCenter,
              child: Padding(
                padding: const EdgeInsets.all(50.0),
                child: SizedBox(
                  width: 50,
                  height: 50,
                  child: ElevatedButton(
                    key: keyButton3,
                    onPressed: () {},
                    child: Container(),
                  ),
                ),
              ),
            ),
            Align(
              alignment: Alignment.centerRight,
              child: Padding(
                padding: const EdgeInsets.all(50.0),
                child: SizedBox(
                  width: 50,
                  height: 50,
                  child: ElevatedButton(
                    key: keyButton4,
                    onPressed: () {},
                    child: Container(),
                  ),
                ),
              ),
            ),
            Align(
              alignment: Alignment.centerLeft,
              child: Padding(
                padding: const EdgeInsets.all(50.0),
                child: SizedBox(
                  width: 50,
                  height: 50,
                  child: ElevatedButton(
                    key: keyButton5,
                    onPressed: () {},
                    child: Container(),
                  ),
                ),
              ),
            )
          ],
        ),
      ),
      bottomNavigationBar: Stack(
        children: [
          SizedBox(
            height: 50,
            child: Row(
              children: [
                Expanded(
                    child: Center(
                  child: SizedBox(
                    key: keyBottomNavigation1,
                    height: 40,
                    width: 40,
                  ),
                )),
                Expanded(
                    child: Center(
                  child: SizedBox(
                    key: keyBottomNavigation2,
                    height: 40,
                    width: 40,
                  ),
                )),
                Expanded(
                  child: Center(
                    child: SizedBox(
                      key: keyBottomNavigation3,
                      height: 40,
                      width: 40,
                    ),
                  ),
                ),
              ],
            ),
          ),
          BottomNavigationBar(
            items: const <BottomNavigationBarItem>[
              BottomNavigationBarItem(
                icon: Icon(Icons.home),
                label: 'Home',
              ),
              BottomNavigationBarItem(
                icon: Icon(Icons.business),
                label: 'Business',
              ),
              BottomNavigationBarItem(
                icon: Icon(Icons.school),
                label: 'School',
              ),
            ],
            selectedItemColor: Colors.amber[800],
            onTap: (index) {},
          ),
        ],
      ),
    );
  }

  void showTutorial() {
    tutorialCoachMark.show(context: context);
  }

  void createTutorial() {
    tutorialCoachMark = TutorialCoachMark(
      targets: _createTargets(),
      colorShadow: Colors.red,
      textSkip: "SKIP",
      paddingFocus: 10,
      opacityShadow: 0.5,
      imageFilter: ImageFilter.blur(sigmaX: 8, sigmaY: 8),
      onFinish: () {
        print("finish");
      },
      onClickTarget: (target) {
        print('onClickTarget: $target');
      },
      onClickTargetWithTapPosition: (target, tapDetails) {
        print("target: $target");
        print(
            "clicked at position local: ${tapDetails.localPosition} - global: ${tapDetails.globalPosition}");
      },
      onClickOverlay: (target) {
        print('onClickOverlay: $target');
      },
      onSkip: () {
        print("skip");
        return true;
      },
    );
  }

  List<TargetFocus> _createTargets() {
    List<TargetFocus> targets = [];
    targets.add(
      TargetFocus(
        identify: "keyBottomNavigation1",
        keyTarget: keyBottomNavigation1,
        alignSkip: Alignment.topRight,
        enableOverlayTab: true,
        contents: [
          TargetContent(
            align: ContentAlign.top,
            builder: (context, controller) {
              return const Column(
                mainAxisSize: MainAxisSize.min,
                crossAxisAlignment: CrossAxisAlignment.start,
                children: <Widget>[
                  Text(
                    "Titulo lorem ipsum",
                    style: TextStyle(
                      color: Colors.white,
                    ),
                  ),
                ],
              );
            },
          ),
        ],
      ),
    );

    // 其他目标定义...

    return targets;
  }
}
关键点解释
- 初始化:在
initState()中调用createTutorial()方法来设置所有需要引导的目标。 - 显示引导:通过
showTutorial()方法触发显示教程。 - 创建目标:
_createTargets()函数负责生成一系列的TargetFocus对象,每个对象代表一个要聚焦的UI元素及其相关的内容。 - 自定义样式:可以通过设置不同的参数来自定义阴影颜色、跳过按钮文本等外观属性。
- 交互事件处理:提供了回调函数来响应用户的点击或其他交互行为。
以上就是关于tutorial_coach_mark的基本使用介绍,希望对您有所帮助!如果有任何问题或者需要进一步的帮助,请随时提问。
更多关于Flutter引导提示插件tutorial_coach_mark的使用的实战系列教程也可以访问 https://www.itying.com/category-92-b0.html
更多关于Flutter引导提示插件tutorial_coach_mark的使用的实战系列教程也可以访问 https://www.itying.com/category-92-b0.html
当然,下面是一个关于如何在Flutter项目中使用tutorial_coach_mark插件的示例代码。这个插件用于在应用内创建引导提示,帮助用户了解应用的主要功能。
首先,你需要在pubspec.yaml文件中添加依赖:
dependencies:
  flutter:
    sdk: flutter
  tutorial_coach_mark: ^2.0.0  # 请检查最新版本号
然后运行flutter pub get来安装依赖。
接下来,我们创建一个简单的Flutter应用,并在其中使用tutorial_coach_mark插件。
主应用代码 (main.dart)
import 'package:flutter/material.dart';
import 'package:tutorial_coach_mark/tutorial_coach_mark.dart';

void main() {
  runApp(MyApp());
}

class MyApp extends StatelessWidget {
  @override
  Widget build(BuildContext context) {
    return MaterialApp(
      title: 'Flutter Demo',
      theme: ThemeData(
        primarySwatch: Colors.blue,
      ),
      home: MyHomePage(),
    );
  }
}

class MyHomePage extends StatefulWidget {
  @override
  _MyHomePageState createState() => _MyHomePageState();
}

class _MyHomePageState extends State<MyHomePage> {
  final GlobalKey _scaffoldKey = GlobalKey<ScaffoldState>();
  late TutorialCoachMark _tutorialCoachMark;

  @override
  void initState() {
    super.initState();
    _tutorialCoachMark = TutorialCoachMark(
      context,
      alignment: Alignment.topCenter,
      textStyle: TextStyle(color: Colors.white, fontSize: 18),
      color: Colors.black45,
      targetPadding: 16.0,
      skipController: SkipController(
        skipText: 'Skip',
        skipTextStyle: TextStyle(color: Colors.white),
        skipColor: Colors.blue,
        showSkip: true,
      ),
      continueController: ContinueController(
        continueText: 'Next',
        continueTextStyle: TextStyle(color: Colors.white),
        continueColor: Colors.blue,
      ),
      overlayShape: RoundedRectangleBorder(
        borderRadius: BorderRadius.circular(10),
      ),
    )..showTargets([
      TargetFocus(
        identify: 'button1',
        keyTarget: _myKey1,
        top: 20,
        bottom: 20,
        left: 20,
        right: 20,
        title: 'Button 1',
        description: 'This is the first button',
      ),
      TargetFocus(
        identify: 'button2',
        keyTarget: _myKey2,
        top: 20,
        bottom: 20,
        left: 20,
        right: 20,
        title: 'Button 2',
        description: 'This is the second button',
      ),
    ]);
  }

  @override
  Widget build(BuildContext context) {
    return Scaffold(
      key: _scaffoldKey,
      appBar: AppBar(
        title: Text('Tutorial Coach Mark Example'),
      ),
      body: Padding(
        padding: const EdgeInsets.all(16.0),
        child: Column(
          mainAxisAlignment: MainAxisAlignment.center,
          children: <Widget>[
            ElevatedButton(
              key: ValueKey('button1_key'), // This key should match _myKey1
              child: Text('Button 1'),
              onPressed: () {},
            ),
            SizedBox(height: 20),
            ElevatedButton(
              key: ValueKey('button2_key'), // This key should match _myKey2
              child: Text('Button 2'),
              onPressed: () {},
            ),
          ],
        ),
      ),
    );
  }

  final GlobalKey _myKey1 = GlobalKey();
  final GlobalKey _myKey2 = GlobalKey();

  @override
  void didChangeDependencies() {
    super.didChangeDependencies();
    // Here we're assigning the keys to the actual widgets for targeting
    WidgetsBinding.instance!.addPostFrameCallback((_) {
      _myKey1 = _scaffoldKey.currentContext!.findRenderObjectOfType<RenderBox>()
          ?.descendantRenderObjectOfType<RenderBox>(matching: (RenderBox box) {
        final Element? element = box.attachment!.owner!.elementForRenderObject(box);
        return element?.widget?.key == ValueKey('button1_key');
      })!
          .toGlobalKey();

      _myKey2 = _scaffoldKey.currentContext!.findRenderObjectOfType<RenderBox>()
          ?.descendantRenderObjectOfType<RenderBox>(matching: (RenderBox box) {
        final Element? element = box.attachment!.owner!.elementForRenderObject(box);
        return element?.widget?.key == ValueKey('button2_key');
      })!
          .toGlobalKey();

      // After assigning keys, we can re-show the targets if needed
      // _tutorialCoachMark.showTargets(...);
    });
  }

  @override
  void dispose() {
    _tutorialCoachMark.dispose();
    super.dispose();
  }
}
解释
- 依赖添加:在
pubspec.yaml中添加tutorial_coach_mark依赖。 - 初始化插件:在
_MyHomePageState的initState方法中初始化TutorialCoachMark实例,并配置相关属性,如对齐方式、文本样式、颜色等。 - 定义目标:使用
TargetFocus定义引导提示的目标,包括按钮的标识、位置、标题和描述。 - 分配键:在
didChangeDependencies方法中使用WidgetsBinding.instance!.addPostFrameCallback确保在布局完成后分配键给实际的按钮。 - 显示目标:调用
showTargets方法显示引导提示。 - 资源清理:在
dispose方法中调用_tutorialCoachMark.dispose()来释放资源。
这个示例展示了如何在Flutter应用中使用tutorial_coach_mark插件来创建引导提示。你可以根据实际需求调整引导提示的配置和内容。


