Flutter弹出菜单插件popup_menu_2的使用
Flutter弹出菜单插件popup_menu_2的使用
插件简介
popup_menu_2 是一个Flutter插件,它提供了一个上下文弹出菜单(Contextual Menu),用于在不打断用户注意力的情况下显示菜单选项。该插件支持所有平台。
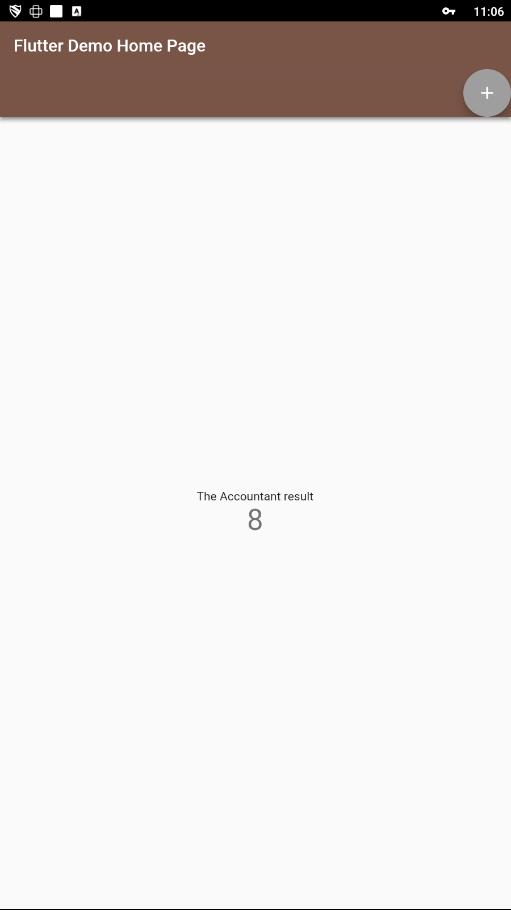
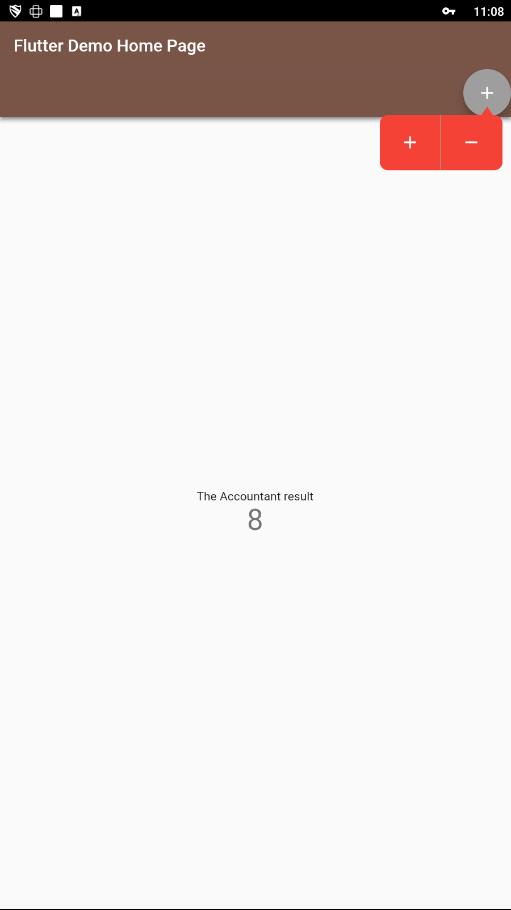
屏幕截图


使用方法
要使用popup_menu_2,首先需要在项目的pubspec.yaml文件中添加依赖:
dependencies:
  popup_menu_2: ^latest_version # 请替换为最新版本号
然后在你的Dart代码中导入:
import 'package:popup_menu_2/popup_menu_2.dart';
接下来,我们来看一个完整的示例Demo,演示如何创建一个带有两个操作项(增加和减少计数器)的弹出菜单。
示例代码
import 'package:flutter/material.dart';
import 'package:popup_menu_2/popup_menu_2.dart';

void main() {
  runApp(const MyApp());
}

class MyApp extends StatelessWidget {
  const MyApp({Key? key}) : super(key: key);

  @override
  Widget build(BuildContext context) {
    return MaterialApp(
      title: 'Flutter Demo',
      debugShowCheckedModeBanner: false,
      theme: ThemeData(primarySwatch: Colors.brown, primaryColor: Colors.white),
      home: const MyHomePage(title: 'Flutter Demo Home Page'),
    );
  }
}

class MyHomePage extends StatefulWidget {
  const MyHomePage({Key? key, required this.title}) : super(key: key);

  final String title;

  @override
  State<MyHomePage> createState() => _MyHomePageState();
}

class _MyHomePageState extends State<MyHomePage> {
  int _counter = 0;
  GlobalKey key = GlobalKey();
  GlobalKey<ContextualMenuState> keyState = GlobalKey<ContextualMenuState>();

  Future<void> _incrementCounter() async {
    await Future.delayed(const Duration(milliseconds: 500));

    setState(() {
      _counter++;
    });

    keyState.currentState?.dismiss();
  }

  Future<void> _decrementCounter() async {
    await Future.delayed(const Duration(milliseconds: 500));
    setState(() {
      _counter--;
    });
    keyState.currentState?.dismiss();
  }

  @override
  Widget build(BuildContext context) {
    return SafeArea(
      child: Scaffold(
        appBar: AppBar(
          title: Text(widget.title),
          bottom: AppBar(
            actions: [_action(context)],
          ),
        ),
        body: Center(
          child: Column(
            mainAxisAlignment: MainAxisAlignment.center,
            children: <Widget>[
              const Text(
                'The Accountant result',
              ),
              Text(
                '$_counter',
                style: Theme.of(context).textTheme.headlineMedium,
              ),
            ],
          ),
        ),
      ),
    );
  }

  PhysicalModel _action(BuildContext context) {
    return PhysicalModel(
      color: Colors.grey,
      shape: BoxShape.circle,
      elevation: 10,
      child: SizedBox(
        height: AppBar().preferredSize.height,
        width: AppBar().preferredSize.height,
        child: add(context),
      ),
    );
  }

  Widget add(BuildContext context) {
    return Padding(
      padding: const EdgeInsets.all(12.0),
      child: ContextualMenu(
        key: keyState,
        targetWidgetKey: key,
        maxColumns: 2,
        backgroundColor: Colors.red,
        dismissOnClickAway: true,
        items: [
          ContextPopupMenuItem(
            onTap: _incrementCounter,
            child: const Icon(Icons.add, color: Colors.white),
          ),
          ContextPopupMenuItem(
            onTap: _decrementCounter,
            child: const Icon(Icons.remove, color: Colors.white),
          ),
        ],
        child: Icon(
          Icons.add,
          key: key,
          color: Colors.white,
        ),
      ),
    );
  }
}
在这个例子中,我们创建了一个简单的应用程序,其中包含一个计数器。通过点击应用栏中的加号图标,会弹出一个菜单,允许用户选择增加或减少计数器的值。当用户点击菜单项后,菜单会自动关闭,并更新计数器的显示。
许可证
Copyright © 2022, youmti.net
All rights reserved.
Redistribution and use in source and binary forms, with or without modification.
查看我的其他包
如果您对其他Flutter插件感兴趣,可以查看以下链接:
希望这个指南能够帮助您更好地理解和使用popup_menu_2插件。如果有任何问题或建议,请随时联系我!
更多关于Flutter弹出菜单插件popup_menu_2的使用的实战系列教程也可以访问 https://www.itying.com/category-92-b0.html
更多关于Flutter弹出菜单插件popup_menu_2的使用的实战系列教程也可以访问 https://www.itying.com/category-92-b0.html
当然,以下是如何在Flutter中使用popup_menu_2插件来创建弹出菜单的一个简单示例。popup_menu_2插件允许你在Flutter应用中实现自定义的弹出菜单。
首先,确保你已经将popup_menu_2插件添加到你的pubspec.yaml文件中:
dependencies:
  flutter:
    sdk: flutter
  popup_menu_2: ^0.3.0  # 请注意版本号,确保使用最新版本
然后,运行flutter pub get来获取依赖。
接下来,在你的Flutter应用中实现弹出菜单。以下是一个完整的示例代码:
import 'package:flutter/material.dart';
import 'package:popup_menu_2/popup_menu.dart';

void main() {
  runApp(MyApp());
}

class MyApp extends StatelessWidget {
  @override
  Widget build(BuildContext context) {
    return MaterialApp(
      title: 'Flutter Popup Menu Demo',
      theme: ThemeData(
        primarySwatch: Colors.blue,
      ),
      home: MyHomePage(),
    );
  }
}

class MyHomePage extends StatefulWidget {
  @override
  _MyHomePageState createState() => _MyHomePageState();
}

class _MyHomePageState extends State<MyHomePage> {

  @override
  Widget build(BuildContext context) {
    return Scaffold(
      appBar: AppBar(
        title: Text('Popup Menu Demo'),
      ),
      body: Center(
        child: Column(
          mainAxisAlignment: MainAxisAlignment.center,
          children: <Widget>[
            Text(
              'Tap the button to see the popup menu',
              style: TextStyle(fontSize: 24),
            ),
            SizedBox(height: 20),
            PopupMenuButton<String>(
              icon: Icon(Icons.more_vert),
              onSelected: (value) {
                // Handle the selected menu item
                ScaffoldMessenger.of(context).showSnackBar(
                  SnackBar(content: Text("Selected: $value")),
                );
              },
              itemBuilder: (context) => [
                PopupMenuItem<String>(
                  value: 'Option 1',
                  child: Text('Option 1'),
                ),
                PopupMenuItem<String>(
                  value: 'Option 2',
                  child: Text('Option 2'),
                ),
                PopupMenuItem<String>(
                  value: 'Option 3',
                  child: Text('Option 3'),
                ),
              ],
            ),
          ],
        ),
      ),
    );
  }
}
代码解释
-
依赖引入:
- 在
pubspec.yaml文件中添加popup_menu_2依赖。
- 在
-
主应用结构:
MyApp类是一个简单的MaterialApp,包含了一个MyHomePage小部件。
-
主页面:
MyHomePage是一个有状态的部件,它包含一个Scaffold,其中包含一个AppBar和一个居中的Column。Column中包含一个说明文本和一个PopupMenuButton。
-
弹出菜单按钮:
PopupMenuButton是一个泛型小部件,用于显示弹出菜单。icon属性定义了按钮的图标。onSelected是一个回调函数,当用户选择菜单项时被调用。itemBuilder是一个生成菜单项的构建器函数,返回一个List<PopupMenuItem<T>>。
-
菜单项:
- 每个
PopupMenuItem包含一个value(用于标识选中的项)和一个child(显示在菜单中的文本)。
- 每个
运行这个示例代码,当你点击菜单按钮时,会看到一个包含三个选项的弹出菜单。选择其中一个选项后,会在屏幕底部显示一个SnackBar,指示你选择了哪个选项。
希望这个示例对你有帮助!如果你有任何其他问题,请随时提问。


