Flutter多列表拖拽排序插件draggable_multi_listview的使用
Flutter多列表拖拽排序插件draggable_multi_listview的使用
draggable_multi_listview
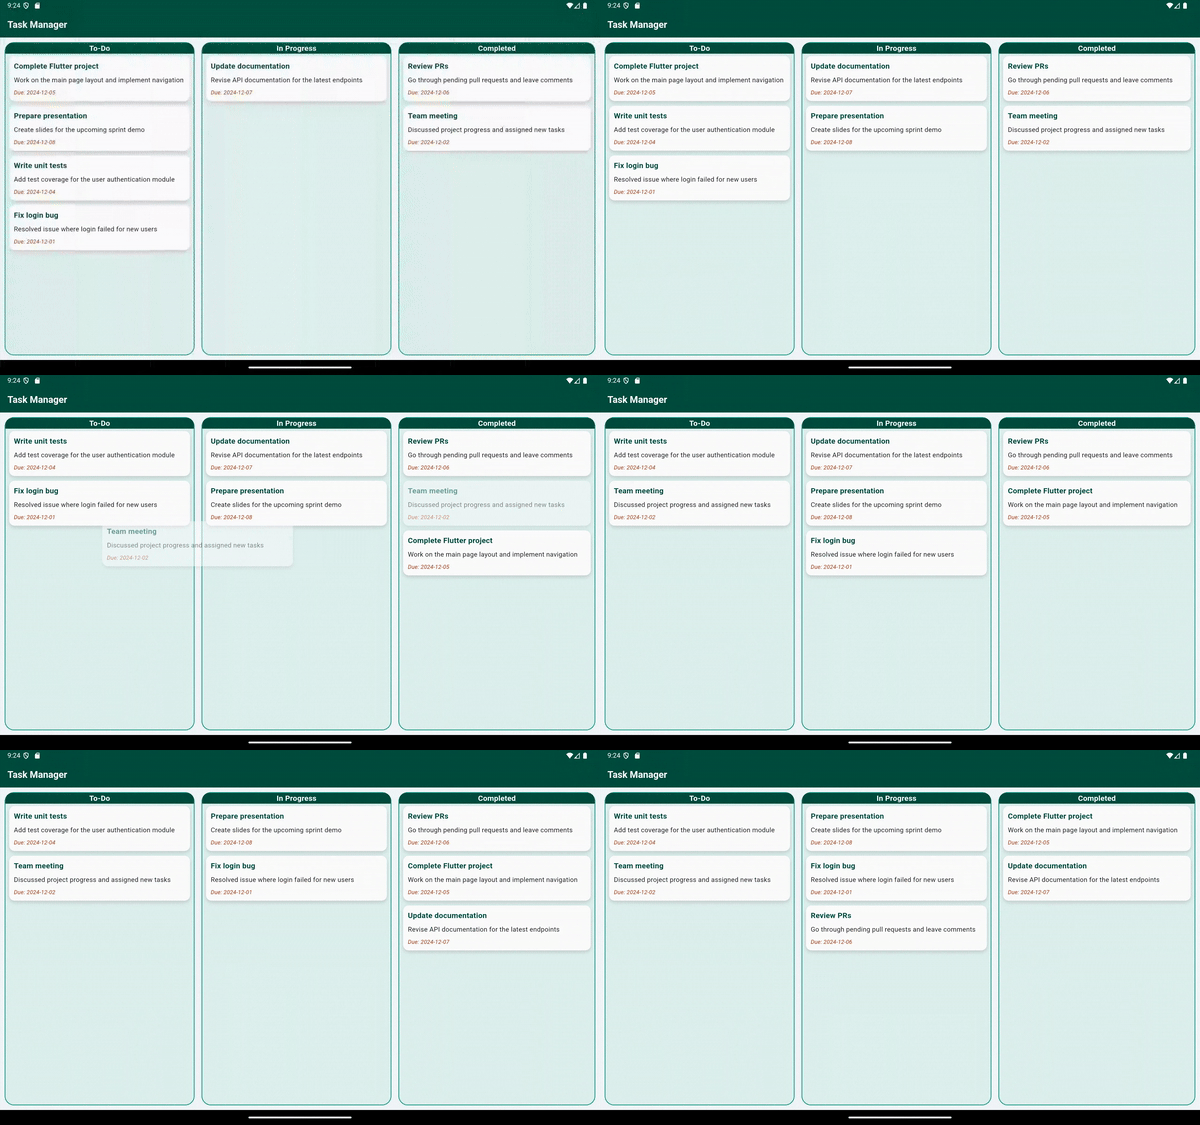
draggable_multi_listview 是一个高度可定制的Flutter包,允许开发者创建多个可拖拽和放置的列表,并支持动态UI自定义。该包支持的功能包括拖放功能、动画过渡以及UI装饰,以实现精美的外观。
功能特性
- 创建带有标题和项目的多个列表。
- 支持在列表之间通过平滑动画进行项目拖放。
- 自定义间距、标题对齐方式和UI装饰。
- 提供回调函数,用于处理项目移动后列表的更新。
- 灵活且响应式的布局设计。
示例演示
装饰后的UI

未装饰的UI

安装步骤
-
在您的
pubspec.yaml文件中添加依赖:dependencies: draggable_multi_listview: ^1.0.7 -
执行命令以获取依赖项:
flutter pub get -
在Dart文件中导入包:
import 'package:draggable_multi_listview/draggable_multi_listview.dart';
使用示例
下面是一个完整的示例代码,展示了如何在应用中使用 draggable_multi_listview 小部件:
import 'package:draggable_multi_listview/draggable_multi_listview.dart';
import 'package:flutter/material.dart';

void main() {
  runApp(DraggableMultiListViewExample());
}

/// A StatelessWidget representing the entire example UI for a
/// draggable_multi_listview task manager with three categories: To-Do, In Progress, Completed.
class DraggableMultiListViewExample extends StatelessWidget {
  DraggableMultiListViewExample({super.key});

  /// List of tasks in the "In Progress" state.
  final List<Map> inProgress = [
    {
      "title": "Write unit tests",
      "description": "Add test coverage for the user authentication module",
      "dueDate": "2024-12-04",
    },
    {
      "title": "Update documentation",
      "description": "Revise API documentation for the latest endpoints",
      "dueDate": "2024-12-07",
    },
  ];

  /// List of tasks in the "Completed" state.
  final List<Map> completed = [
    {
      "title": "Fix login bug",
      "description": "Resolved issue where login failed for new users",
      "dueDate": "2024-12-01",
    },
    {
      "title": "Team meeting",
      "description": "Discussed project progress and assigned new tasks",
      "dueDate": "2024-12-02",
    },
  ];

  /// List of tasks in the "To-Do" state.
  final List<Map> toDo = [
    {
      "title": "Complete Flutter project",
      "description": "Work on the main page layout and implement navigation",
      "dueDate": "2024-12-05",
    },
    {
      "title": "Review PRs",
      "description": "Go through pending pull requests and leave comments",
      "dueDate": "2024-12-06",
    },
    {
      "title": "Prepare presentation",
      "description": "Create slides for the upcoming sprint demo",
      "dueDate": "2024-12-08",
    },
  ];

  @override
  Widget build(BuildContext context) {
    return MaterialApp(
      debugShowCheckedModeBanner: false,
      title: 'Drag and Drop Example',
      theme: ThemeData.light().copyWith(
        scaffoldBackgroundColor: const Color(0xFFF3F8FB),
        appBarTheme: const AppBarTheme(
          backgroundColor: Color(0xFF004D40),
          titleTextStyle: TextStyle(
            color: Colors.white,
            fontSize: 20,
            fontWeight: FontWeight.bold,
          ),
        ),
      ),
      home: Scaffold(
        appBar: AppBar(
          title: const Text('Task Manager'),
        ),
        body: Padding(
          padding: const EdgeInsets.all(10),
          child: MultiDragAndDrop(
            uiDecorated: false,
            disableTitle: false,
            titleTextStyle: const TextStyle(
              color: Colors.black,
              fontSize: 18,
              fontWeight: FontWeight.bold,
            ),
            verticalSpacing: 5,
            titleAlignment: TitleAlignment.center,
            items: [
              ListData(
                title: 'To-Do',
                items: toDo,
              ),
              ListData(
                title: 'In Progress',
                items: inProgress,
              ),
              ListData(
                title: 'Completed',
                items: completed,
              ),
            ],
            horizontalSpacingRatio: 0.02,
            itemBuilder: (item) => Container(
              decoration: BoxDecoration(
                color: Colors.white,
                borderRadius: BorderRadius.circular(12),
                boxShadow: [
                  BoxShadow(
                    color: Colors.grey.withOpacity(0.4),
                    blurRadius: 6,
                    offset: const Offset(0, 4),
                  ),
                ],
              ),
              child: Padding(
                padding: const EdgeInsets.all(10.0),
                child: Column(
                  crossAxisAlignment: CrossAxisAlignment.start,
                  children: [
                    Text(
                      item['title'].toString(),
                      style: const TextStyle(
                        fontSize: 16,
                        fontWeight: FontWeight.bold,
                        color: Color(0xFF004D40),
                      ),
                    ),
                    const SizedBox(height: 8),
                    Text(
                      item['description'].toString(),
                      style: const TextStyle(
                        fontSize: 14,
                        color: Colors.black87,
                      ),
                    ),
                    const SizedBox(height: 8),
                    Text(
                      "Due: ${item['dueDate']}",
                      style: const TextStyle(
                        fontSize: 12,
                        fontStyle: FontStyle.italic,
                        color: Color(0xFFBF360C),
                      ),
                    ),
                  ],
                ),
              ),
            ),
            onListsChanged: (updatedLists, sourceIndex, targetIndex, movedItem) {},
          ),
        ),
      ),
    );
  }
}
使用指南
断言规则
horizontalSpacingRatio必须在范围 0.01 和 0.09 之间。- 初始项目列表不能为空。
- 如果启用了
uiDecorated:- 必须提供
paddingForDecoratedUi,titleTextStyle, 和decorationForDecoratedUi。
- 必须提供
- 如果禁用了
uiDecorated:- 不应提供
paddingForDecoratedUi和decorationForDecoratedUi。
- 不应提供
通过遵循这些指南,您可以确保 draggable_multi_listview 插件在您的应用程序中正确运行并提供良好的用户体验。
更多关于Flutter多列表拖拽排序插件draggable_multi_listview的使用的实战系列教程也可以访问 https://www.itying.com/category-92-b0.html
当然,以下是如何在Flutter中使用draggable_multi_listview插件来实现多列表拖拽排序的一个示例代码。这个插件允许你在Flutter应用中创建可拖拽排序的多列表视图。
首先,确保你已经在pubspec.yaml文件中添加了draggable_multi_listview依赖:
dependencies:
  flutter:
    sdk: flutter
draggable_multi_listview: ^x.y.z # 替换为最新版本号然后,运行flutter pub get来安装依赖。
接下来是一个简单的示例代码,展示如何使用draggable_multi_listview:
import 'package:flutter/material.dart';
import 'package:draggable_multi_listview/draggable_multi_listview.dart';

void main() {
  runApp(MyApp());
}

class MyApp extends StatelessWidget {
  @override
  Widget build(BuildContext context) {
    return MaterialApp(
      title: 'Draggable Multi ListView Example',
      theme: ThemeData(
        primarySwatch: Colors.blue,
      ),
      home: MyHomePage(),
    );
  }
}

class MyHomePage extends StatefulWidget {
  @override
  _MyHomePageState createState() => _MyHomePageState();
}

class _MyHomePageState extends State<MyHomePage> {
  final List<List<String>> initialData = [
    ['Item 1.1', 'Item 1.2', 'Item 1.3'],
    ['Item 2.1', 'Item 2.2'],
    ['Item 3.1', 'Item 3.2', 'Item 3.3', 'Item 3.4'],
  ];

  List<List<String>> data = List.from(initialData);

  @override
  Widget build(BuildContext context) {
    return Scaffold(
      appBar: AppBar(
        title: Text('Draggable Multi ListView Example'),
      ),
      body: Padding(
        padding: const EdgeInsets.all(8.0),
        child: DraggableMultiListView(
          lists: data,
          onDragCompleted: (fromListIndex, fromIndex, toListIndex, toIndex) {
            setState(() {
              if (fromListIndex != toListIndex) {
                // Move item to another list
                final item = data[fromListIndex].removeAt(fromIndex);
                data[toListIndex].insert(toIndex, item);
              } else {
                // Reorder item within the same list
                final item = data[fromListIndex].removeAt(fromIndex);
                data[fromListIndex].insert(toIndex, item);
              }
            });
          },
          itemBuilder: (context, item, listIndex, itemIndex) {
            return ListTile(
              title: Text(item),
              trailing: Icon(Icons.drag_handle),
            );
          },
          keyProvider: (index, listIndex) => ValueKey(itemKey(listIndex, index)),
        ),
      ),
    );
  }

  String itemKey(int listIndex, int itemIndex) {
    return '${listIndex}_${itemIndex}';
  }
}
代码解释
-
依赖导入:导入必要的Flutter和
draggable_multi_listview包。 -
数据初始化:在
_MyHomePageState中,初始化一个包含多个子列表的List<List<String>>,每个子列表包含一些字符串项。 -
UI构建:
- 使用
Scaffold和AppBar来构建应用的基本结构。 - 使用
Padding为内容添加内边距。 - 使用
DraggableMultiListView来构建多列表视图。lists属性接受我们的data列表。onDragCompleted回调在拖拽完成时更新数据。itemBuilder用于构建每个列表项的UI。keyProvider为每个列表项提供一个唯一的ValueKey,这对于列表的重建和动画很重要。
- 使用
-
唯一键生成:
itemKey方法生成一个基于列表索引和项索引的唯一字符串键。
这样,你就可以在Flutter应用中实现一个支持多列表拖拽排序的功能了。如果你需要更复杂的逻辑或自定义UI,可以进一步扩展这个示例代码。


