Flutter命令面板插件command_palette的使用
Flutter命令面板插件command_palette的使用
command_palette
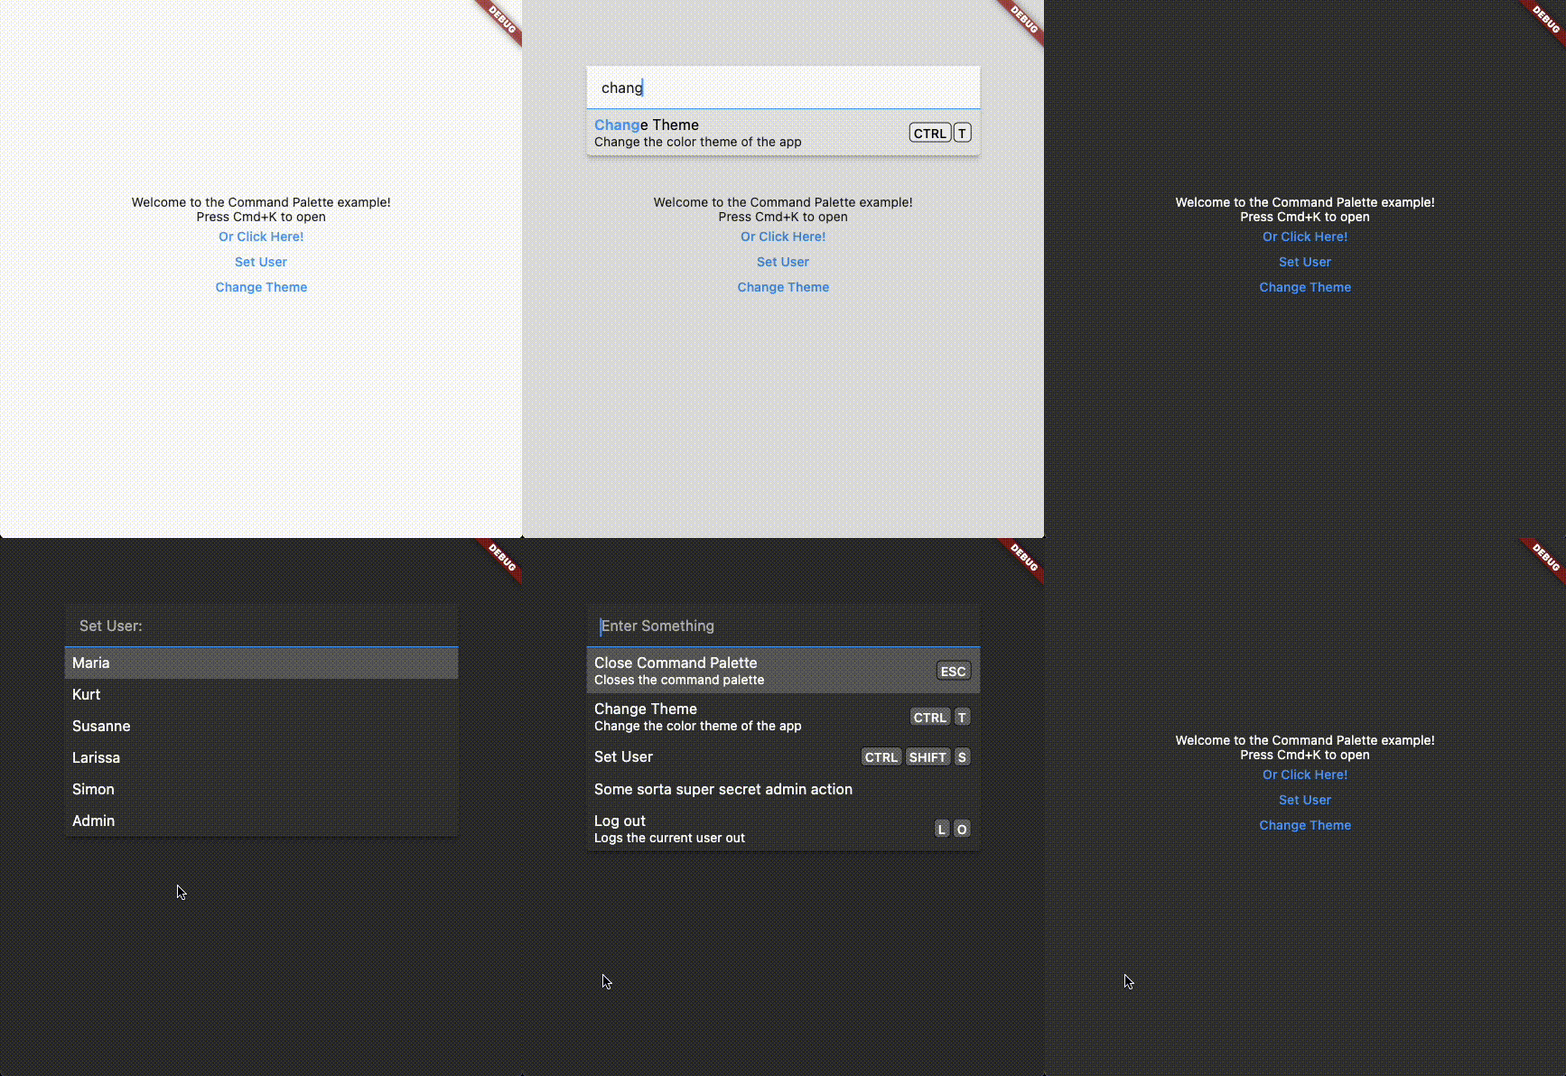
command_palette 是一个Flutter小部件,允许您弹出命令面板,类似于Visual Studio Code和Slack中的命令面板。它为用户提供了一种方便的方式来执行与应用程序相关的各种操作。

Features
- 通过键盘快捷键或编程方式访问命令面板。
- 定义用户自定义的操作列表,并为每个操作定义回调函数。
- 使用默认样式或构建自己的自定义列表项。
- 使用自己的过滤逻辑。
- 在整个应用程序中使用,或仅在某些部分使用!
- 支持没有键盘的应用程序!
Getting Started
要安装此包,请运行以下命令:
flutter pub install command_palette
或者将 command_palette 添加到您的 pubspec.yaml 文件中。
Usage
基本用法
首先,在您的 widget 树中放置 CommandPalette 小部件:
import 'package:command_palette/command_palette.dart';

CommandPalette(
  actions: [
    CommandPaletteAction(
      label: "Goto Home Page",
      actionType: CommandPaletteActionType.single,
      onSelect: () {
        // 执行跳转首页或其他操作
      }
    ),
    CommandPaletteAction(
      id: "change-theme",
      label: "Change Theme",
      actionType: CommandPaletteActionType.nested,
      description: "更改应用程序的颜色主题",
      shortcut: ["ctrl", "t"],
      childrenActions: [
        CommandPaletteAction(
          label: "Light",
          actionType: CommandPaletteActionType.single,
          onSelect: () {
            setState(() {
              themeMode = ThemeMode.light;
            });
          },
        ),
        CommandPaletteAction(
          label: "Dark",
          actionType: CommandPaletteActionType.single,
          onSelect: () {
            setState(() {
              themeMode = ThemeMode.dark;
            });
          },
        ),
      ],
    ),
  ],
  child: Text("使用键盘快捷键打开面板!"),
)
没有键盘的情况下打开面板
对于没有键盘的设备,可以使用 InheritedWidget 来打开面板:
CommandPalette.of(context).open();
创建自定义过滤器
filter 是一个配置选项,允许您定义自己的自定义过滤逻辑。返回类型为 List<CommandPaletteAction>。您可以使用子类 MatchedCommandPaletteAction 来增强子字符串高亮显示。
CommandPalette(
  config: CommandPaletteConfig(
    filter: (query, allActions) {
      // 自定义过滤逻辑
      return allActions.where((action) {
        if (action is MatchedCommandPaletteAction) {
          // 处理匹配的action
        }
        return true; // 或者根据条件返回true/false
      }).toList();
    },
  ),
  // ...
)
直接打开嵌套动作
要直接打开嵌套动作(例如,您想要有一个“设置用户”的按钮,该按钮将打开面板并直接选择“设置用户”嵌套动作),可以使用以下方法:
CommandPalette.of(context).openToAction(actionId);
其中 actionId 是与 CommandPaletteAction 的 id 匹配的值。
示例代码
下面是一个完整的示例代码,展示了如何在应用程序中使用 command_palette 插件:
import 'dart:math';
import 'package:command_palette/command_palette.dart';
import 'package:flutter/material.dart';

void main() {
  runApp(const MyApp());
}

class MyApp extends StatelessWidget {
  const MyApp({Key? key}) : super(key: key);

  @override
  Widget build(BuildContext context) {
    return MaterialApp(
      home: MyHomePage(),
    );
  }
}

class MyHomePage extends StatefulWidget {
  const MyHomePage({Key? key}) : super(key: key);

  @override
  State<MyHomePage> createState() => _MyHomePageState();
}

class _MyHomePageState extends State<MyHomePage> {
  ThemeMode themeMode = ThemeMode.light;
  String _currentUser = "";
  Color? color;
  List<String> users = ["Maria", "Kurt", "Susanne", "Larissa", "Simon", "Admin"];

  @override
  Widget build(BuildContext context) {
    return MaterialApp(
      darkTheme: ThemeData.dark(),
      theme: ThemeData.light(),
      themeMode: themeMode,
      home: Builder(
        builder: (context) {
          return CommandPalette(
            config: CommandPaletteConfig(
              style: CommandPaletteStyle(
                actionLabelTextAlign: TextAlign.left,
                textFieldInputDecoration: InputDecoration(
                  hintText: "输入内容",
                  contentPadding: EdgeInsets.all(16),
                ),
              ),
              instructionConfig: CommandPaletteInstructionConfig(
                showInstructions: true,
              ),
            ),
            actions: [
              CommandPaletteAction.single(
                label: "关闭命令面板",
                description: "关闭命令面板",
                shortcut: ["esc"],
                leading: Icon(Icons.close),
                onSelect: () {
                  Navigator.of(context).pop();
                },
              ),
              CommandPaletteAction.nested(
                id: "change-theme",
                label: "更改主题",
                description: "更改应用程序的颜色主题",
                shortcut: ["ctrl", "t"],
                leading: Icon(Icons.format_paint),
                childrenActions: [
                  CommandPaletteAction.single(
                    label: "浅色",
                    onSelect: () {
                      setState(() {
                        themeMode = ThemeMode.light;
                      });
                    },
                  ),
                  CommandPaletteAction.single(
                    label: "深色",
                    onSelect: () {
                      setState(() {
                        themeMode = ThemeMode.dark;
                      });
                    },
                  ),
                ],
              ),
              CommandPaletteAction.input(
                id: "new-user",
                label: "新建用户",
                shortcut: ["ctrl", "shift", "n"],
                leading: Icon(Icons.add),
                onConfirmInput: (value) {
                  setState(() {
                    users.add(value);
                  });
                  ScaffoldMessenger.of(context).showSnackBar(
                      SnackBar(content: Text('创建用户: $value')));
                },
              ),
              CommandPaletteAction.nested(
                id: 1,
                label: "设置用户",
                shortcut: ["ctrl", "shift", "s"],
                leading: Icon(Icons.account_circle),
                childrenActions: [
                  ...users.map(
                    (e) => CommandPaletteAction.single(
                      label: e,
                      onSelect: () => setState(() {
                        _currentUser = e;
                        color = Colors.transparent;
                      }),
                    ),
                  ),
                ],
              ),
              if (_currentUser == "Admin")
                CommandPaletteAction.single(
                  label: "超级秘密管理员操作",
                  onSelect: () {
                    setState(() {
                      color = Color(Random().nextInt(0xFFFFFF)).withAlpha(255);
                    });
                  },
                ),
              if (_currentUser.isNotEmpty)
                CommandPaletteAction.single(
                  label: "注销",
                  shortcut: ["l", "o"],
                  description: "注销当前用户",
                  onSelect: () {
                    setState(() {
                      _currentUser = "";
                      color = Colors.transparent;
                    });
                  },
                ),
            ],
            child: Builder(
              builder: (context) {
                return Scaffold(
                  body: Center(
                    child: Column(
                      mainAxisAlignment: MainAxisAlignment.center,
                      children: <Widget>[
                        Text("欢迎来到命令面板示例!"),
                        TextButton(
                          child: Text("点击这里!"),
                          onPressed: () {
                            CommandPalette.of(context).open();
                          },
                        ),
                        if (_currentUser.isNotEmpty)
                          Text("当前用户: $_currentUser")
                        else
                          TextButton(
                            child: Text("设置用户"),
                            onPressed: () {
                              CommandPalette.of(context).openToAction(1);
                            },
                          ),
                        TextButton(
                          child: Text("更改主题"),
                          onPressed: () {
                            CommandPalette.of(context)
                                .openToAction("change-theme");
                          },
                        ),
                        AnimatedContainer(
                          duration: const Duration(milliseconds: 1000),
                          width: 50,
                          height: 50,
                          color: color,
                        )
                      ],
                    ),
                  ),
                );
              },
            ),
          );
        },
      ),
    );
  }
}
这个示例展示了如何在应用程序中集成和使用 command_palette 插件,包括基本的命令面板配置、操作定义、自定义过滤器以及如何在没有键盘的情况下打开面板。希望这能帮助您更好地理解和使用 command_palette 插件。
更多关于Flutter命令面板插件command_palette的使用的实战系列教程也可以访问 https://www.itying.com/category-92-b0.html
更多关于Flutter命令面板插件command_palette的使用的实战系列教程也可以访问 https://www.itying.com/category-92-b0.html
当然,下面是一个关于如何在Flutter项目中使用command_palette插件的示例代码。command_palette插件通常用于提供一个命令面板,用户可以通过快捷键或菜单触发,快速执行一些常用的命令。
1. 添加依赖
首先,你需要在你的pubspec.yaml文件中添加command_palette依赖:
dependencies:
  flutter:
    sdk: flutter
  command_palette: ^x.y.z  # 请替换为最新版本号
然后运行flutter pub get来安装依赖。
2. 创建Flutter项目并导入插件
假设你已经有一个Flutter项目,如果没有,请先创建一个。然后在你的主文件(通常是main.dart)中导入command_palette插件:
import 'package:flutter/material.dart';
import 'package:command_palette/command_palette.dart';

void main() {
  runApp(MyApp());
}
3. 设置Command Palette
创建一个包含一些命令的列表,并设置CommandPalette:
class MyApp extends StatelessWidget {
  @override
  Widget build(BuildContext context) {
    return MaterialApp(
      title: 'Flutter Command Palette Demo',
      theme: ThemeData(
        primarySwatch: Colors.blue,
      ),
      home: MyHomePage(),
    );
  }
}

class MyHomePage extends StatefulWidget {
  @override
  _MyHomePageState createState() => _MyHomePageState();
}

class _MyHomePageState extends State<MyHomePage> {
  final List<Command> commands = [
    Command(
      id: 'command1',
      displayName: 'Command One',
      description: 'This is the first command',
      action: () {
        showSnackBar('Command One Executed');
      },
    ),
    Command(
      id: 'command2',
      displayName: 'Command Two',
      description: 'This is the second command',
      action: () {
        showSnackBar('Command Two Executed');
      },
    ),
    // 可以添加更多命令
  ];

  final CommandPaletteController commandPaletteController = CommandPaletteController();

  @override
  void initState() {
    super.initState();
    // 初始化Command Palette
    commandPaletteController.init(
      context,
      commands,
      trigger: LogicalKeySet(LogicalKeyboardKey.meta, LogicalKeyboardKey.keyP),
    );
  }

  @override
  Widget build(BuildContext context) {
    return Scaffold(
      appBar: AppBar(
        title: Text('Command Palette Demo'),
      ),
      body: Center(
        child: Text('Press Cmd+P (or Meta+P on macOS) to open Command Palette'),
      ),
    );
  }

  void showSnackBar(String message) {
    ScaffoldMessenger.of(context).showSnackBar(
      SnackBar(
        content: Text(message),
      ),
    );
  }
}
4. 运行应用
现在,你可以运行你的Flutter应用。当你按下Cmd+P(在macOS上)或者相应的快捷键(在Windows/Linux上,你可能需要配置)时,命令面板应该会出现,并且你可以通过上下箭头键选择命令并执行它们。
注意事项
- 确保你已经按照
command_palette插件的文档正确配置了快捷键。 - 你可以根据需要添加更多的命令和自定义动作。
- 插件的API可能会随着版本更新而变化,请查阅最新的文档以确保兼容性。
这样,你就成功地在Flutter项目中集成了command_palette插件,并创建了一个简单的命令面板。


