HarmonyOS 鸿蒙Next 日历控件 鸿蒙场景化代码
HarmonyOS 鸿蒙Next 日历控件 鸿蒙场景化代码
<markdown _ngcontent-cmq-c147="" class="markdownPreContainer">
自定义日历实现日程页
介绍
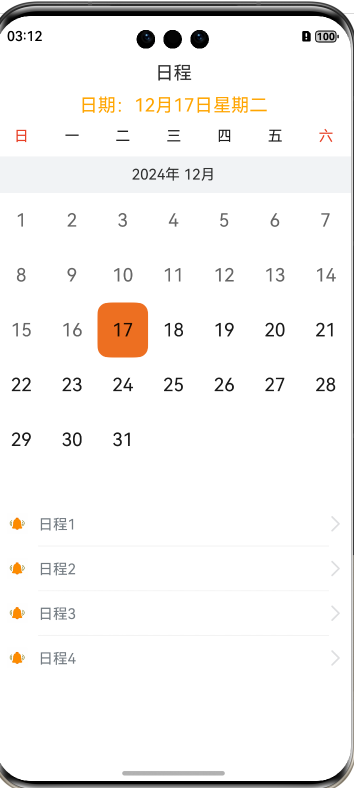
本示例实践通过原生组件实现日历页面。
使用说明
进入应用显示日期与实际日期一致,点击不同日期可切换,日期底部显示应用预设的四条日程。
实现效果

实现思路
显示日历界面周信息时,由于一周七天是固定的,在列表中利用ForEach进行循环渲染。显示每个月的日期时,由于每个月天数不一致,列表中数据较多且不确定,这种情况下使用LazyForEach进行数据循环渲染。当组件滑出可视区域外时,框架会进行组件销毁回收以降低内存占用。核心代码如下,源码参考
CustomCalendarPicker.ets
 LazyForEach(this.contentData, (monthItem: Month) => {
          // 设置ListItemGroup头部组件,显示年份和月份
          ListItemGroup({ header: this.itemHead(monthItem.month) }) {
            ListItem() {
              Stack() {
                Text(monthItem.num.toString())
                  .fontSize($r('app.integer.month_text'))
                  .fontColor($r('app.color.ohos_id_color_palette_aux8'))
                  .opacity(MONTH_OPACITY)
                Grid() {
                  ForEach(monthItem.days, (day: number) => {
                    GridItem() {
                      Text(day.toString())
                        .fontSize($r('app.string.ohos_id_text_size_headline'))
                        .fontColor(day < this.currentDay && monthItem.num ===
                        this.currentMonth ? $r('app.color.ohos_id_color_text_secondary') : $r('app.color.ohos_id_color_text_primary'))
                    }
                    .borderRadius($r('app.string.ohos_id_corner_radius_default_m'))
                    .backgroundColor(day === this.currentDay && monthItem.num ===
                    this.currentMonth ? $r('app.color.ohos_id_color_palette9') : $r('app.color.ohos_id_color_background'))
                    .opacity(day === 0 ? 0 : 1) // 将日期数组中为0的都设置为不显示,即不显示上个月和下个月的内容
                    // 点击选定的日期后,关闭日历弹窗,显示日期改变为选择的日期
                    .onClick(() => {
                      if (day != 0) {
                        let weekIndex = monthItem.days.indexOf(day) % WEEK_NUMBER; // 将当前日转换成星期显示
                        this.date = [monthItem.num, day, weekIndex];
                        this.currentDay = day;
                      }
                    })
                  })
                }
                .backgroundColor($r('app.color.ohos_id_color_background'))
                .columnsTemplate('1fr 1fr 1fr 1fr 1fr 1fr 1fr')
                // 当前月显示的数组元素个数大于35则显示6行,否则显示5行
                .rowsTemplate(monthItem.days.length > MONTH_NUMBER ? '1fr 1fr 1fr 1fr 1fr 1fr' : '1fr 1fr 1fr 1fr 1fr')
                .height(monthItem.days.length > MONTH_NUMBER ? GRID_HEIGHT_L : GRID_HEIGHT_M)
              }
            }
          }
        })
高性能知识点
列表中数据较多且不确定的情况下,使用LazyForEach进行数据循环渲染。
工程结构&模块类型
entry/src/main/ets/
|---entryability
|   |---EntryAbility.ets
|---pages
|   |---CustomCalendarPicker.ets  // 日历页面
模块依赖
无
参考资料
</markdown>更多关于HarmonyOS 鸿蒙Next 日历控件 鸿蒙场景化代码的实战系列教程也可以访问 https://www.itying.com/category-93-b0.html
更多关于HarmonyOS 鸿蒙Next 日历控件 鸿蒙场景化代码的实战系列教程也可以访问 https://www.itying.com/category-93-b0.html
在HarmonyOS鸿蒙Next系统中,日历控件的场景化代码实现主要依赖于ArkUI框架中的JS或TS语言。以下是一个简单的日历控件场景化代码示例:
@Entry
@Component
struct CalendarComponent {
  @State date: Date = new Date();

  build() {
    Column() {
      Text("当前日期: " + this.date.toLocaleDateString())
        .fontSize(18)
        .fontWeight(FontWeight.Bold)

      Calendar({
        date: this.date,
        onDateChanged: (newDate) => {
          this.date = newDate;
        }
      })
    }.padding(20)
  }
}
上述代码创建了一个包含日历控件的页面。CalendarComponent结构体定义了一个状态变量date,初始化为当前日期。页面布局中,首先显示当前日期,然后通过Calendar组件允许用户选择日期。当用户选择新日期时,onDateChanged回调函数会更新date状态,页面会自动刷新以显示新日期。
此示例展示了如何在鸿蒙系统中使用ArkUI框架实现日历控件的基本功能。如果需要更复杂的功能或定制,可以参考鸿蒙官方文档深入了解Calendar组件的API和更多ArkUI编程技巧。
如果问题依旧没法解决请联系官网客服,官网地址是:https://www.itying.com/category-93-b0.html


