Flutter iCloud存储同步插件icloud_storage_sync的使用
Flutter iCloud存储同步插件icloud_storage_sync的使用
🌟 简介
iCloud_Storage_Sync简化了iCloud存储集成,为你的Flutter iOS应用带来了强大的云功能:
- 🔄 轻松备份和同步应用数据
- 📱💻 在所有设备上提供一致的用户体验
- 🔒 安全地存储和检索重要信息
- ☁️ 无缝集成到iCloud生态系统中
✨ 功能
| Feature | Description |
|---|---|
| 📂 | 获取iCloud文件 |
| ⬆️ | 上传文件到iCloud |
| ✏️ | 重命名iCloud文件 |
| 🗑️ | 删除iCloud文件 |
| ↔️ | 移动iCloud文件 |
🚀 快速开始
1. 🛠️ 安装
在pubspec.yaml中添加以下依赖:
dependencies:
  icloud_storage_sync: ^1.0.0
2. ⚙️ 安装插件
运行以下命令:
flutter pub get
3. 💻 使用
在Dart代码中导入插件:
import 'package:icloud_storage_sync/icloud_storage_sync.dart';
📋 先决条件
在开始之前,请确保你已经具备以下条件:
- ☑️ Apple开发者账户
- ☑️ 应用ID和iCloud容器ID
- ☑️ 启用并分配了iCloud功能
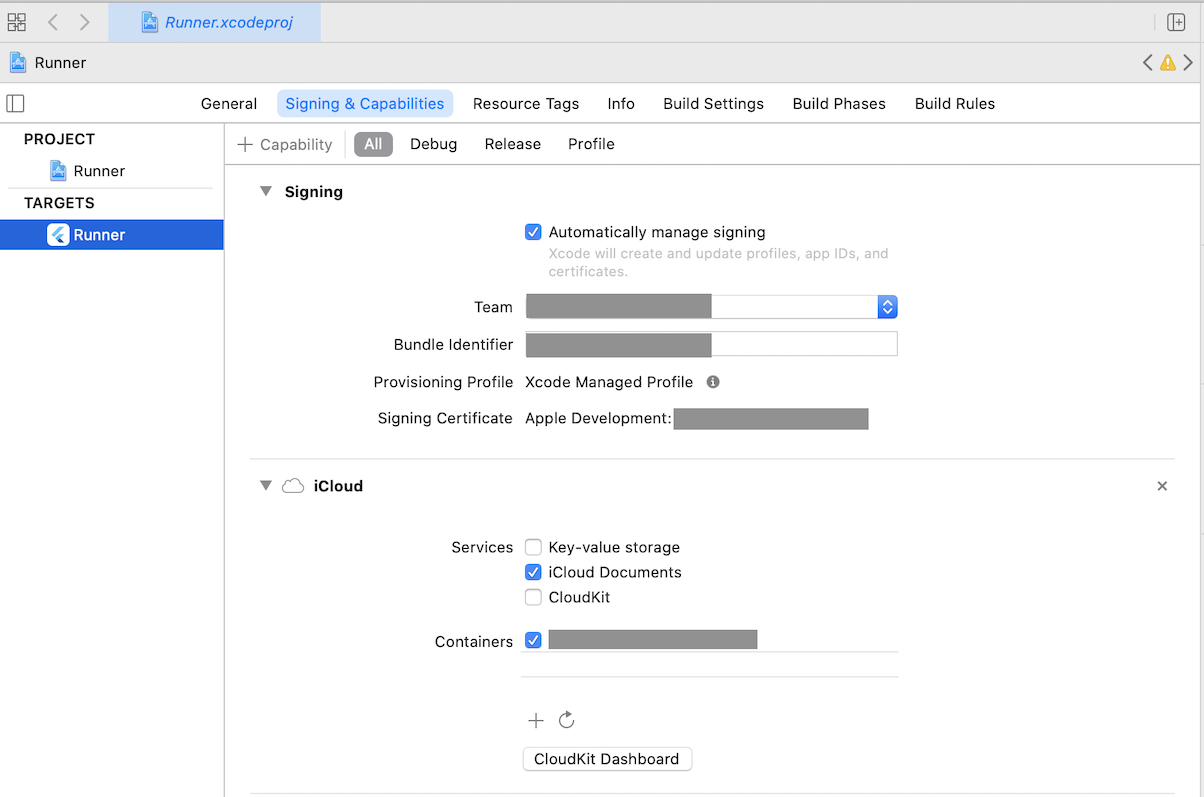
- ☑️ 在Xcode中配置了iCloud功能
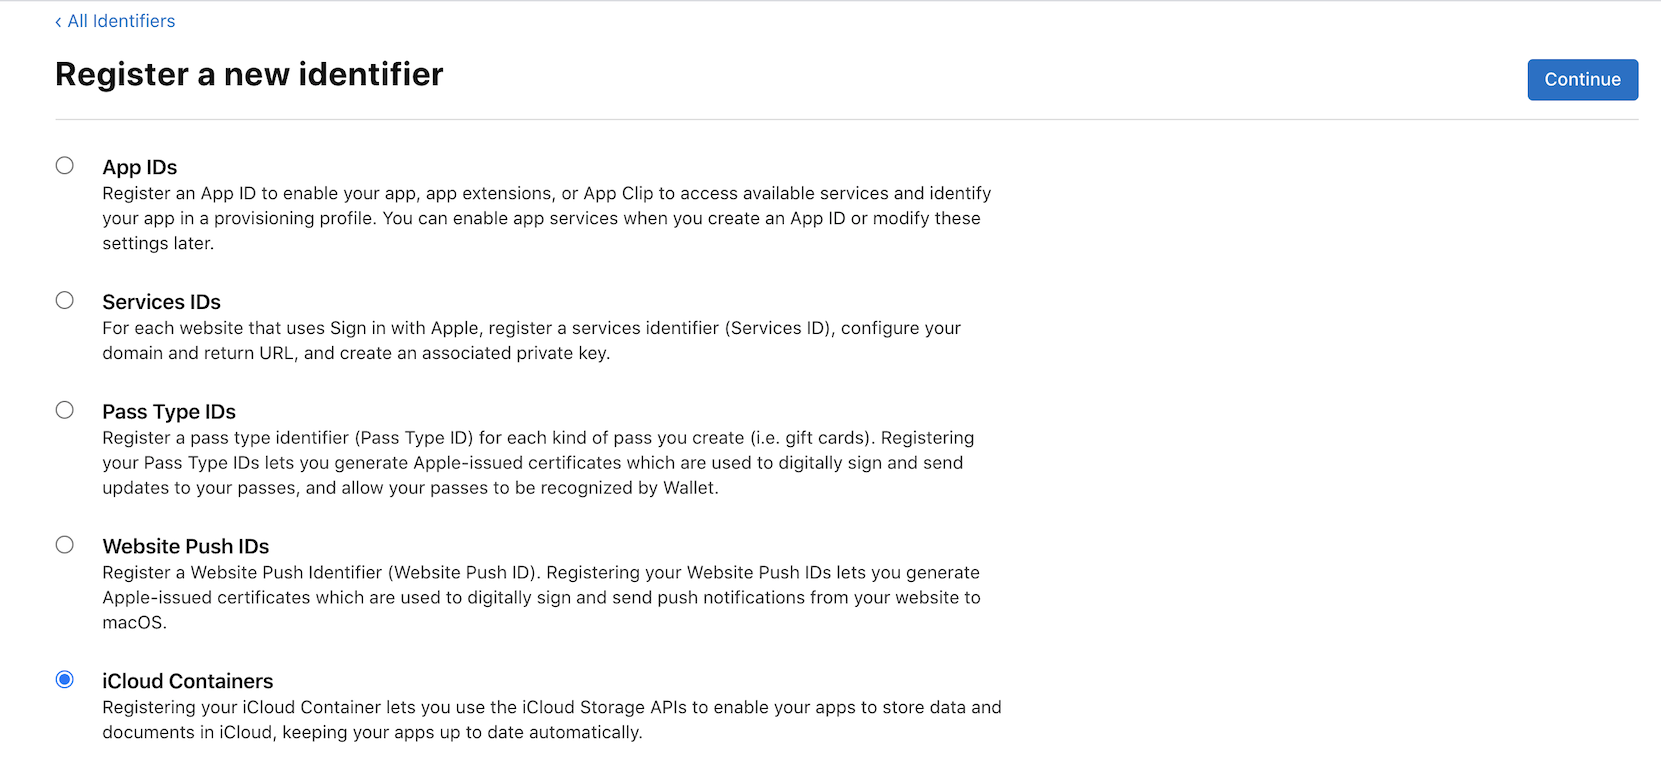
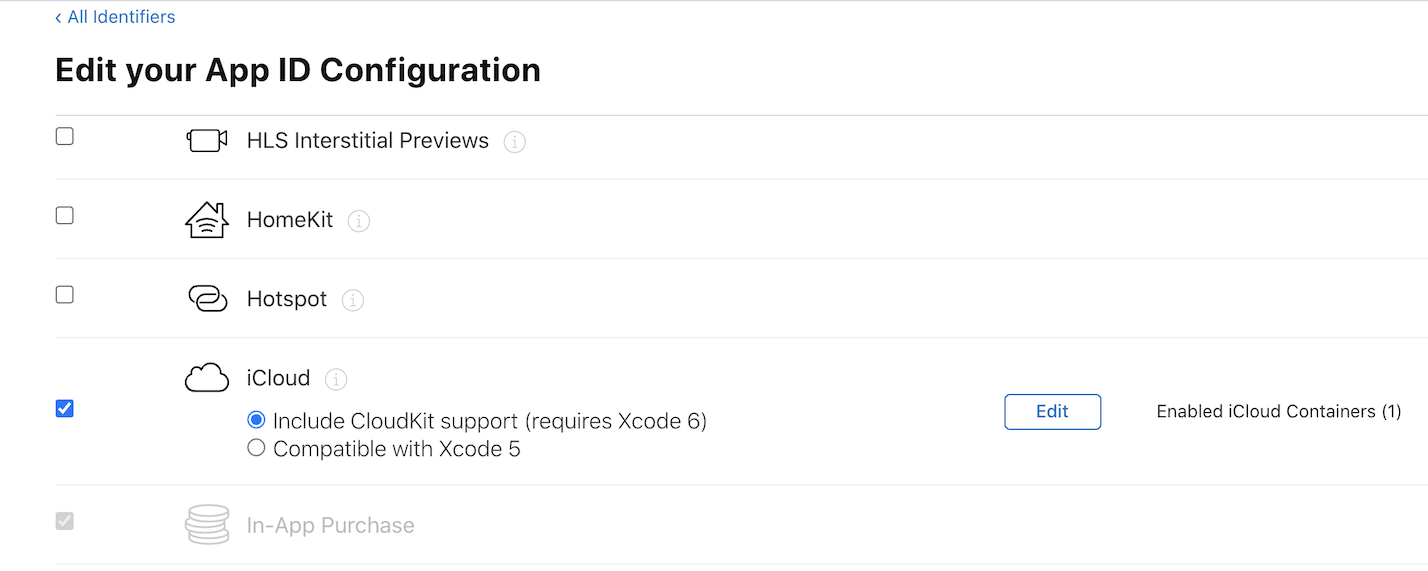
查看如何设置iCloud容器和启用功能以获取详细步骤。
🧰 API示例
📥 获取iCloud文件
Future<List<CloudFiles>> getCloudFiles({required String containerId}) async {
  return await icloudSyncPlugin.getCloudFiles(containerId: containerId);
}
📤 上传文件到iCloud
Future<void> upload({
  required String containerId,
  required String filePath,
  String? destinationRelativePath,
  StreamHandler<double>? onProgress,
}) async {
  await icloudSyncPlugin.upload(
    containerId: containerId,
    filePath: filePath,
    destinationRelativePath: destinationRelativePath,
    onProgress: onProgress,
  );
}
🏷️ 重命名iCloud文件
Future<void> rename({
  required String containerId,
  required String relativePath,
  required String newName,
}) async {
  await icloudSyncPlugin.rename(
    containerId: containerId,
    relativePath: relativePath,
    newName: newName,
  );
}
🗑️ 删除iCloud文件
Future<void> delete({
  required String containerId,
  required String relativePath,
}) async {
  await icloudSyncPlugin.delete(
    containerId: containerId,
    relativePath: relativePath,
  );
}
🔀 移动iCloud文件
Future<void> move({
  required String containerId,
  required String fromRelativePath,
  required String toRelativePath,
}) async {
  await IcloudSyncPlatform.instance.move(
    containerId: containerId,
    fromRelativePath: fromRelativePath,
    toRelativePath: toRelativePath,
  );
}
🛠 如何设置iCloud容器和启用功能
- 登录Apple开发者账户并选择“证书、ID和简档”。
- 创建一个App ID(如果需要)和一个iCloud容器ID。

- 将iCloud容器分配给你的App ID。

- 在Xcode中启用iCloud功能并选择你的容器。

示例项目
以下是一个简单的示例项目,展示了如何使用icloud_storage_sync插件:
import 'package:flutter/material.dart';
import 'package:get/get.dart';
import 'package:icloud_storage_sync_example/apple_sign.dart';
import 'package:icloud_storage_sync_example/controller/icloud_plugin_controller.dart';

// Entry point of the application
void main() {
  // Ensure that Flutter widgets are initialized
  WidgetsFlutterBinding.ensureInitialized();

  // Initialize the IcloudController using GetX for dependency injection
  Get.lazyPut(() => IcloudController());

  // Run the app
  runApp(const MyApp());
}

// Root widget of the application
class MyApp extends StatefulWidget {
  const MyApp({super.key});

  [@override](/user/override)
  State<MyApp> createState() => _MyAppState();
}

class _MyAppState extends State<MyApp> {
  [@override](/user/override)
  Widget build(BuildContext context) {
    // Use GetMaterialApp for GetX functionality
    return GetMaterialApp(
      // Disable the debug banner
      debugShowCheckedModeBanner: false,

      // Set the app theme
      theme: ThemeData(
          useMaterial3: false,
          appBarTheme: const AppBarTheme(backgroundColor: Colors.green)),

      // Set the initial route to the Apple Sign In screen
      home: const AppleSignInScreen(),
    );
  }
}
更多关于Flutter iCloud存储同步插件icloud_storage_sync的使用的实战系列教程也可以访问 https://www.itying.com/category-92-b0.html
更多关于Flutter iCloud存储同步插件icloud_storage_sync的使用的实战系列教程也可以访问 https://www.itying.com/category-92-b0.html
当然,下面是一个关于如何使用 icloud_storage_sync 插件在 Flutter 中实现 iCloud 存储同步的示例代码。这个插件允许你在 Flutter 应用中轻松地将数据同步到 iCloud。
首先,你需要在 pubspec.yaml 文件中添加 icloud_storage_sync 依赖:
dependencies:
  flutter:
    sdk: flutter
  icloud_storage_sync: ^最新版本号  # 请替换为实际发布的最新版本号
然后,运行 flutter pub get 来获取依赖。
接下来,你需要在 iOS 项目中进行一些配置,以便插件能够正常工作。这通常涉及在 Info.plist 文件中添加一些键和值,以及确保你的应用具有访问 iCloud 的权限。
以下是一个简单的 Flutter 应用示例,展示了如何使用 icloud_storage_sync 插件来存储和检索数据:
import 'package:flutter/material.dart';
import 'package:icloud_storage_sync/icloud_storage_sync.dart';

void main() {
  runApp(MyApp());
}

class MyApp extends StatefulWidget {
  @override
  _MyAppState createState() => _MyAppState();
}

class _MyAppState extends State<MyApp> {
  final ICloudStorageSync _icloudStorageSync = ICloudStorageSync();
  String? _retrievedData;

  @override
  Widget build(BuildContext context) {
    return MaterialApp(
      home: Scaffold(
        appBar: AppBar(
          title: Text('iCloud Storage Sync Example'),
        ),
        body: Padding(
          padding: const EdgeInsets.all(16.0),
          child: Column(
            mainAxisAlignment: MainAxisAlignment.center,
            children: <Widget>[
              ElevatedButton(
                onPressed: () async {
                  String dataToSave = 'Hello, iCloud!';
                  try {
                    await _icloudStorageSync.saveData('myKey', dataToSave);
                    ScaffoldMessenger.of(context).showSnackBar(
                      SnackBar(content: Text('Data saved to iCloud')),
                    );
                  } catch (e) {
                    ScaffoldMessenger.of(context).showSnackBar(
                      SnackBar(content: Text('Failed to save data: $e')),
                    );
                  }
                },
                child: Text('Save Data to iCloud'),
              ),
              SizedBox(height: 20),
              ElevatedButton(
                onPressed: () async {
                  try {
                    String? data = await _icloudStorageSync.retrieveData('myKey');
                    setState(() {
                      _retrievedData = data;
                    });
                    ScaffoldMessenger.of(context).showSnackBar(
                      SnackBar(content: Text('Data retrieved from iCloud')),
                    );
                  } catch (e) {
                    ScaffoldMessenger.of(context).showSnackBar(
                      SnackBar(content: Text('Failed to retrieve data: $e')),
                    );
                  }
                },
                child: Text('Retrieve Data from iCloud'),
              ),
              SizedBox(height: 20),
              if (_retrievedData != null)
                Text(
                  'Retrieved Data: $_retrievedData',
                  style: TextStyle(fontSize: 18),
                ),
            ],
          ),
        ),
      ),
    );
  }
}
在这个示例中,我们创建了一个简单的 Flutter 应用,其中有两个按钮:一个用于将数据保存到 iCloud,另一个用于从 iCloud 检索数据。保存的数据使用了一个键 'myKey'。
请注意,这个插件的实际使用可能需要更多的配置和错误处理,具体取决于你的应用需求。此外,由于这是一个第三方插件,因此建议查看其官方文档和仓库以获取最新信息和最佳实践。
最后,不要忘记在发布应用之前彻底测试 iCloud 同步功能,以确保它在所有目标设备和操作系统版本上都能正常工作。


