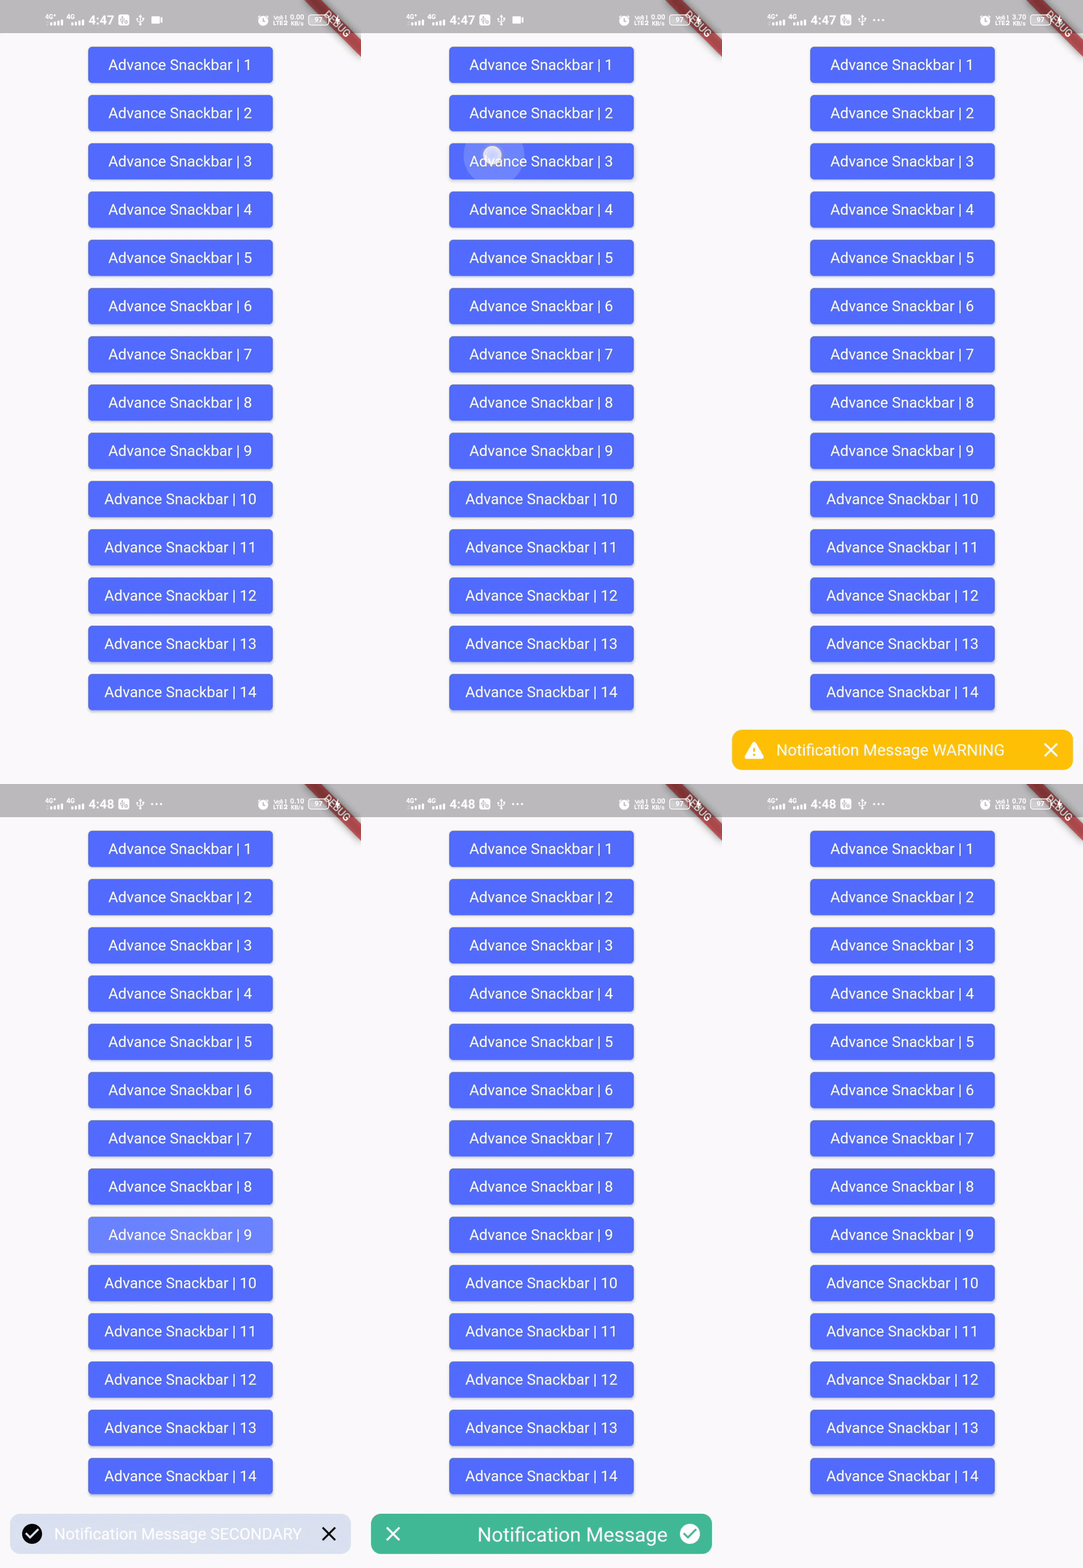
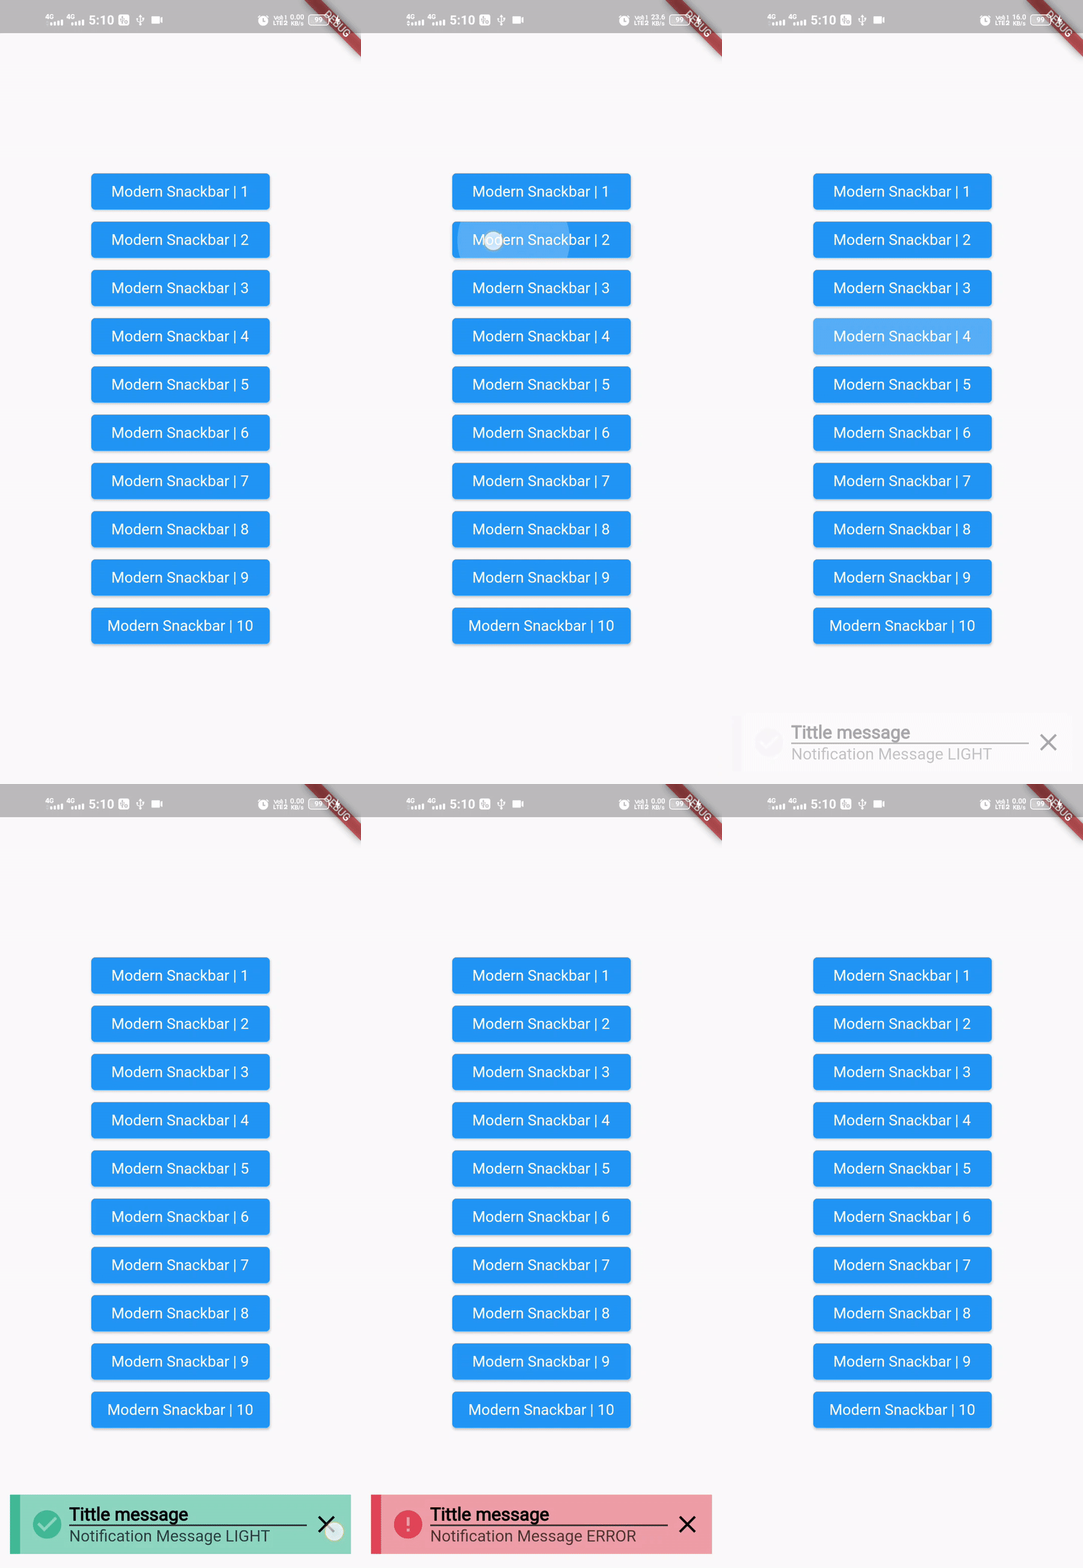
Flutter高级通知管理插件advance_notification的使用
Flutter高级通知管理插件advance_notification的使用
Advance_Notification 是一个带有自定义Snackbar的Flutter包。
安装
1. 添加依赖
在您的pubspec.yaml文件中添加以下内容:
dependencies:
  smart_notification: <latest_version>
2. 安装
通过命令行安装包:
flutter pub add smart_notification
3. 导入
现在可以在您的Dart代码中导入:
import 'package:smart_notification/smart_notification.dart';
使用方法
Advance_Notification 提供了多种设计风格的Snackbar,包括 BASIC, ADVANCE 和 MODERN 模式。
基本模式 (BASIC)
您可以使用基本模式的Snackbar,可以设置背景颜色、文本颜色和位置。

示例 1.1
// 显示一条简单的消息
AdvanceSnackBar(message: "Hello...").show(context);
示例 1.2
// 设置背景颜色
AdvanceSnackBar(
    message: "Notification Message",
    bgColor: Colors.blueAccent).show(context);
示例 1.3
// 设置背景颜色和文本颜色
AdvanceSnackBar(
    message: "Notification Message",
    bgColor: Colors.tealAccent,
    textColor: Colors.red).show(context);
示例 1.4
// 设置固定位置
AdvanceSnackBar(
    message: "Notification Message",
    bgColor: Colors.tealAccent,
    textColor: Colors.red,
    isFixed: false).show(context);
高级模式 (ADVANCE)
高级模式提供了许多功能,包括默认关闭按钮、自定义关闭事件、颜色和图标图像。

示例 2.1
// 使用高级模式
AdvanceSnackBar(
    message: "Notification Message",
    mode: "ADVANCE").show(context);
示例 2.2
// 自定义持续时间
AdvanceSnackBar(
    message: "Notification Message",
    mode: "ADVANCE",
    duration: Duration(seconds: 5)).show(context);
示例 2.3
// 设置背景色、文本色和关闭图标颜色
AdvanceSnackBar(
    message: "Notification Message",
    mode: "ADVANCE",
    duration: Duration(seconds: 5),
    bgColor: Colors.red,
    textColor: Colors.black,
    iconColor: Colors.black).show(context);
示例 2.4
// 设置文本大小和显示图标
AdvanceSnackBar(
    message: "Notification Message",
    mode: "ADVANCE",
    duration: Duration(seconds: 5),
    bgColor: Colors.red,
    textColor: Colors.white,
    iconColor: Colors.white,
    textSize: 22,
    isIcon: true).show(context);
示例 2.5
// 更改类型图标的位置
AdvanceSnackBar(
    message: "Notification Message",
    mode: "ADVANCE",
    duration: Duration(seconds: 5),
    type: "ERROR",
    textSize: 20,
    isIcon: true,
    iconPosition: "RIGHT").show(context);
示例 2.6
// 添加标题
AdvanceSnackBar(
    message: "Notification Message",
    tittle: "Tittle message",
    mode: "ADVANCE",
    type: "ERROR",
    textSize: 20,
    isIcon: true,
    closeIconPosition: "LEFT").show(context);
示例 2.7
// 更改分隔线颜色
AdvanceSnackBar(
    message: "Notification Message",
    tittle: "Tittle message",
    mode: "ADVANCE",
    type: "ERROR",
    textSize: 20,
    isIcon: true,
    dividerColor: Colors.red,
    closeIconPosition: "LEFT").show(context);
示例 2.8
// 添加额外的小部件(如按钮、图标、图片等)
AdvanceSnackBar(
    message: "Notification Message ",
    mode: "ADVANCE",
    type: "PRIMARY",
    tittle: "Tittle message",
    iconPosition: "RIGHT",
    child: Padding(
        padding: const EdgeInsets.only(left: 2),
        child: Icon(
            Icons.all_inbox,
            color: Colors.red,
            size: 25,
        ),
    ),
    isIcon: true).show(context);
示例 2.9
// 覆盖关闭按钮的点击事件
AdvanceSnackBar(
    message: "Notification Message ",
    mode: "ADVANCE",
    type: "PRIMARY",
    onClick: () {
        print("Hello");
    },
    isIcon: true).show(context);
现代模式 (MODERN)
现代模式具有所有高级模式的功能,并且具有一些新功能。它有一个独特的设计。

示例 3.1
// 使用现代模式
AdvanceSnackBar(
    message: "Notification Message",
    mode: "MODERN").show(context);
示例 3.2
// 更改类型
AdvanceSnackBar(
    message: "Notification Message",
    mode: "MODERN",
    type: "WARNING").show(context);
示例 3.3
// 显示图标
AdvanceSnackBar(
    message: "Notification Message",
    mode: "MODERN",
    type: "ERROR",
    isIcon: true).show(context);
示例 3.4
// 添加标题
AdvanceSnackBar(
    message: "Notification Message content",
    mode: "MODERN",
    type: "ERROR",
    tittle: "Tittle message",
    isIcon: true).show(context);
完整示例Demo
import 'package:flutter/material.dart';
import 'package:smart_notification/smart_notification.dart';

class NotificationDemo extends StatefulWidget {
  const NotificationDemo({Key? key}) : super(key: key);

  [@override](/user/override)
  _NotificationDemoState createState() => _NotificationDemoState();
}

class _NotificationDemoState extends State<NotificationDemo> {

  [@override](/user/override)
  Widget build(BuildContext context) {
    return Scaffold(
      body: Container(
        child: SafeArea(
            child: Center(
          child: IntrinsicWidth(
            child: Column(
              crossAxisAlignment: CrossAxisAlignment.stretch,
              mainAxisAlignment: MainAxisAlignment.center,
              children: [
                Ebutton(
                  text: "Notification | Basic ",
                  color: Colors.purple,
                  onClick: () {
                    AdvanceSnackBar(message: "Hello....").show(context);
                  },
                ),
                Ebutton(
                  text: "Notification | Basic 1",
                  color: Colors.purple,
                  onClick: () {
                    AdvanceSnackBar(
                            message: "Notification Message",
                            bgColor: Colors.blueAccent)
                        .show(context);
                  },
                ),
                // 其他示例按钮省略...
              ],
            ),
          ),
        )),
      ),
    );
  }
}

/// Ebutton是一个自定义的 ElevatedButton 小部件。
class Ebutton extends StatelessWidget {
  final String text;
  final Color color;
  final VoidCallback? onClick;

  const Ebutton({
    @required this.text = "",
    this.color = Colors.blueAccent,
    this.onClick,
  });

  [@override](/user/override)
  Widget build(BuildContext context) {
    return ElevatedButton(
      onPressed: () {
        onClick!.call();
      },
      child: Text(text),
      style: ElevatedButton.styleFrom(
        primary: color, //
      ),
    );
  }
}
更多关于Flutter高级通知管理插件advance_notification的使用的实战系列教程也可以访问 https://www.itying.com/category-92-b0.html
更多关于Flutter高级通知管理插件advance_notification的使用的实战系列教程也可以访问 https://www.itying.com/category-92-b0.html
当然,advance_notification(注意:这个包名可能是虚构的,因为Flutter社区中并没有一个广泛认可的名为advance_notification的插件,不过我们可以基于常见的Flutter通知管理插件的功能来模拟一个高级通知管理的实现)在Flutter中用于管理高级通知功能,通常涉及发送本地通知、处理用户交互、以及管理通知的定时和周期性等。
下面是一个模拟高级通知管理功能的Flutter代码案例,使用了flutter_local_notifications插件,这是一个流行的用于本地通知管理的Flutter插件。
首先,确保在你的pubspec.yaml文件中添加依赖:
dependencies:
  flutter:
    sdk: flutter
  flutter_local_notifications: ^9.0.0  # 请检查最新版本号
然后,在你的Flutter应用中实现通知管理功能:
import 'package:flutter/material.dart';
import 'package:flutter_local_notifications/flutter_local_notifications.dart';

void main() {
  runApp(MyApp());
}

class MyApp extends StatelessWidget {
  @override
  Widget build(BuildContext context) {
    return MaterialApp(
      home: NotificationManager(),
    );
  }
}

class NotificationManager extends StatefulWidget {
  @override
  _NotificationManagerState createState() => _NotificationManagerState();
}

class _NotificationManagerState extends State<NotificationManager> {
  final FlutterLocalNotificationsPlugin flutterLocalNotificationsPlugin =
      FlutterLocalNotificationsPlugin();

  var initializationSettingsAndroid;
  var initializationSettingsIOS;
  var initializationSettings;

  @override
  void initState() {
    super.initState();
    var androidInitializeSettings = AndroidInitializationSettings('@mipmap/ic_launcher');
    var iOSInitializeSettings = IOSInitializationSettings(
      requestAlertPermission: true,
      requestBadgePermission: true,
      requestSoundPermission: true,
    );
    initializationSettingsAndroid = androidInitializeSettings;
    initializationSettingsIOS = iOSInitializeSettings;
    initializationSettings = InitializationSettings(
      android: androidInitializeSettings,
      iOS: iOSInitializeSettings,
    );

    flutterLocalNotificationsPlugin.initialize(initializationSettings,
        onSelectNotification: onSelectNotification);
  }

  Future<void> _showNotificationWithDefaultSound() async {
    var androidPlatformChannelSpecifics = AndroidNotificationDetails(
      'your channel id',
      'your channel name',
      'your channel description',
      importance: Importance.max,
      priority: Priority.high,
    );
    var iOSPlatformChannelSpecifics = IOSNotificationDetails();
    var platformChannelSpecifics = NotificationDetails(
      android: androidPlatformChannelSpecifics,
      iOS: iOSPlatformChannelSpecifics,
    );
    await flutterLocalNotificationsPlugin.show(
      0,
      'Hello World',
      'This is a default sound notification',
      platformChannelSpecifics,
      payload: 'item x',
    );
  }

  Future<void> _scheduleNotificationWithCustomSound() async {
    var scheduledDate = DateTime.now().add(Duration(seconds: 5));

    var androidPlatformChannelSpecifics = AndroidNotificationDetails(
      'your scheduled channel id',
      'your scheduled channel name',
      'your channel description',
      playSound: true,
      sound: RawResourceAndroidNotificationSound('custom_sound'),
      importance: Importance.max,
      priority: Priority.high,
    );
    var iOSPlatformChannelSpecifics = IOSNotificationDetails(
      presentAlert: true,
      playSound: true,
      sound: 'custom_sound.caf',
    );
    var platformChannelSpecifics = NotificationDetails(
      android: androidPlatformChannelSpecifics,
      iOS: iOSPlatformChannelSpecifics,
    );
    await flutterLocalNotificationsPlugin.schedule(
      0,
      'Scheduled Notification',
      'This notification is scheduled for a later time!',
      scheduledDate,
      platformChannelSpecifics,
      payload: 'item x',
    );
  }

  Future<void> onSelectNotification(String payload) async {
    if (payload != null) {
      showDialog(
        context: context,
        builder: (BuildContext context) => CupertinoAlertDialog(
          title: Text('Payload'),
          content: Text('Payload: $payload'),
        ),
      );
    }
  }

  @override
  Widget build(BuildContext context) {
    return Scaffold(
      appBar: AppBar(
        title: Text('Notification Manager'),
      ),
      body: Center(
        child: Column(
          mainAxisAlignment: MainAxisAlignment.center,
          children: <Widget>[
            ElevatedButton(
              onPressed: _showNotificationWithDefaultSound,
              child: Text('Show Notification with Default Sound'),
            ),
            SizedBox(height: 20),
            ElevatedButton(
              onPressed: _scheduleNotificationWithCustomSound,
              child: Text('Schedule Notification with Custom Sound'),
            ),
          ],
        ),
      ),
    );
  }
}
在这个示例中,我们做了以下几件事:
-
初始化通知插件:在
initState方法中,我们初始化了FlutterLocalNotificationsPlugin,并设置了Android和iOS的初始化设置。 -
显示即时通知:
_showNotificationWithDefaultSound方法用于立即显示一个带有默认声音的本地通知。 -
计划通知:
_scheduleNotificationWithCustomSound方法用于在指定的未来时间显示一个带有自定义声音的本地通知。 -
处理用户交互:当用户点击通知时,
onSelectNotification回调会被触发,显示一个对话框显示通知的payload。
请注意,对于iOS自定义声音,你需要将音频文件(例如custom_sound.caf)添加到Xcode项目中,并确保它在Info.plist中被正确引用。对于Android,音频文件应放在res/raw目录下,并在AndroidNotificationDetails中通过RawResourceAndroidNotificationSound指定。
这个示例提供了一个基础框架,你可以根据需要进一步扩展和自定义通知管理功能。


