


Flutter打印机控制插件nyx_printer的使用
Flutter打印机控制插件nyx_printer的使用
Flutter插件,用于连接到Nyx设备打印机,如NB55。
安装
安装NyX打印机插件:
flutter pub add nyx_printer
打印图像
import 'package:nyx_printer/nyx_printer.dart';
...
final _nyxPrinterPlugin = NyxPrinter();

Future<void> printImage() async {
  final image = await rootBundle.load("images/img.png"); // 加载图像文件
  await _nyxPrinterPlugin.printImage(image.buffer.asUint8List()); // 打印图像
}
打印文本
Future<void> printText() async {
  await _nyxPrinterPlugin.printText(
    "Grocery Store", // 要打印的文本
    textFormat: NyxTextFormat( // 文本格式
      textSize: 32,
      align: NyxAlign.center,
      font: NyxFont.monospace,
      style: NyxFontStyle.boldItalic,
    ),
  );
}
打印二维码
Future<void> printQrCode() async {
  await _nyxPrinterPlugin.printQrCode(
    "123456789", // 二维码内容
    width: 200, // 二维码宽度
    height: 200, // 二维码高度
  );
}
打印条形码
Future<void> printBarcode() async {
  await _nyxPrinterPlugin.printBarcode(
    "123456789", // 条形码内容
    width: 300, // 条形码宽度
    height: 40, // 条形码高度
  );
}
完整示例代码
import 'package:flutter/foundation.dart';
import 'package:flutter/material.dart';
import 'dart:async';
import 'package:flutter/services.dart';
import 'package:nyx_printer/nyx_printer.dart';
void main() {
runApp(const MyApp());
}
class MyApp extends StatefulWidget {
const MyApp({super.key});
[@override](/user/override)
State<MyApp> createState() => _MyAppState();
}
class _MyAppState extends State<MyApp> {
final _nyxPrinterPlugin = NyxPrinter();
[@override](/user/override)
void initState() {
super.initState();
}
Future<void> printImage() async {
try {
final image = await rootBundle.load("images/img.png"); // 加载图像文件
await _nyxPrinterPlugin.printImage(image.buffer.asUint8List()); // 打印图像
} catch (e) {
if (kDebugMode) {
print(e); // 错误处理
}
}
}
Future<void> printText() async {
try {
await _nyxPrinterPlugin.printText("Welcome to Nyx"); // 打印文本
} catch (e) {
if (kDebugMode) {
print(e); // 错误处理
}
}
}
Future<void> printTextCenter() async {
try {
await _nyxPrinterPlugin.printText(
"Welcome to Nyx",
textFormat: NyxTextFormat(
align: NyxAlign.center, // 居中对齐
),
);
} catch (e) {
if (kDebugMode) {
print(e); // 错误处理
}
}
}
Future<void> printTextRight() async {
try {
await _nyxPrinterPlugin.printText(
"Welcome to Nyx",
textFormat: NyxTextFormat(
align: NyxAlign.right, // 右对齐
),
);
} catch (e) {
if (kDebugMode) {
print(e); // 错误处理
}
}
}
Future<void> printBarcode() async {
try {
await _nyxPrinterPlugin.printBarcode(
"123456789", // 条形码内容
width: 300, // 条形码宽度
height: 40, // 条形码高度
);
} catch (e) {
if (kDebugMode) {
print(e); // 错误处理
}
}
}
Future<void> printQr() async {
try {
await _nyxPrinterPlugin.printQrCode(
"123456789", // 二维码内容
width: 200, // 二维码宽度
height: 200, // 二维码高度
);
} catch (e) {
if (kDebugMode) {
print(e); // 错误处理
}
}
}
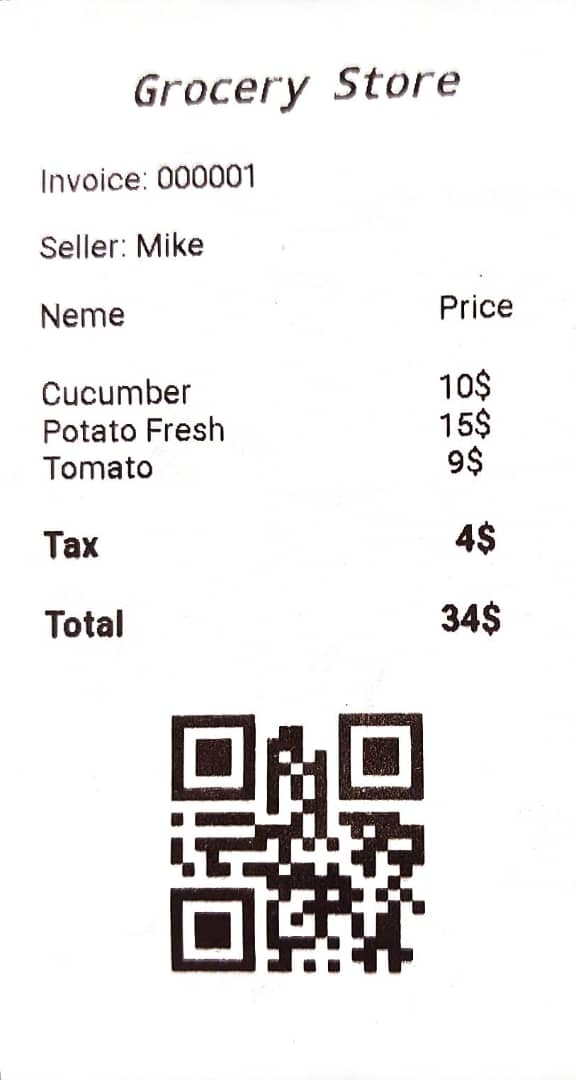
Future<void> printReceipt() async {
try {
await _nyxPrinterPlugin.printText(
"Grocery Store",
textFormat: NyxTextFormat(
textSize: 32,
align: NyxAlign.center,
font: NyxFont.monospace,
style: NyxFontStyle.boldItalic,
),
);
await _nyxPrinterPlugin.printText(
"Invoice: 000001",
);
await _nyxPrinterPlugin.printText(
"Seller: Mike",
);
await _nyxPrinterPlugin.printText("Neme\t\t\t\t\t\t\t\t\t\t\t\tPrice");
await _nyxPrinterPlugin.printText(
"Cucumber\t\t\t\t\t\t\t\t\t\t10\$",
textFormat: NyxTextFormat(topPadding: 5), // 顶部间距
);
await _nyxPrinterPlugin.printText("Potato Fresh\t\t\t\t\t\t\t\t\t15\$");
await _nyxPrinterPlugin.printText("Tomato\t\t\t\t\t\t\t\t\t\t\t 9\$");
await _nyxPrinterPlugin.printText(
"Tax\t\t\t\t\t\t\t\t\t\t\t\t\t 4\$",
textFormat: NyxTextFormat(
topPadding: 5,
style: NyxFontStyle.bold,
textSize: 26,
), // 字体加粗,字体大小
);
await _nyxPrinterPlugin.printText(
"Total\t\t\t\t\t\t\t\t\t\t\t\t34\$",
textFormat: NyxTextFormat(
topPadding: 5,
style: NyxFontStyle.bold,
textSize: 26,
), // 字体加粗,字体大小
);
await _nyxPrinterPlugin.printQrCode(
"123456789",
width: 200,
height: 200,
);
await _nyxPrinterPlugin.printText("");
} catch (e) {
if (kDebugMode) {
print(e); // 错误处理
}
}
}
[@override](/user/override)
Widget build(BuildContext context) {
final size = MediaQuery.of(context).size;
return MaterialApp(
home: Scaffold(
appBar: AppBar(
title: const Text('插件示例应用'),
),
body: Center(
child: Padding(
padding: const EdgeInsets.all(8.0),
child: Column(
children: [
SizedBox(
width: size.width,
height: 48,
child: ElevatedButton(
onPressed: printImage,
child: const Text('打印图像'),
),
),
Padding(
padding: const EdgeInsets.only(
top: 8.0,
),
child: Row(
children: [
Expanded(
flex: 1,
child: Padding(
padding: const EdgeInsets.all(8.0),
child: SizedBox(
height: 48,
child: ElevatedButton(
onPressed: printText,
child: const Text('左对齐文本'),
),
),
),
),
Expanded(
flex: 1,
child: Padding(
padding: const EdgeInsets.all(8.0),
child: SizedBox(
height: 48,
child: ElevatedButton(
onPressed: printTextCenter,
child: const Text('居中文本'),
),
),
),
),
Expanded(
flex: 1,
child: Padding(
padding: const EdgeInsets.all(8.0),
child: SizedBox(
height: 48,
child: ElevatedButton(
onPressed: printTextRight,
child: const Text('右对齐文本'),
),
),
),
),
],
),
),
Padding(
padding: const EdgeInsets.only(
top: 8.0,
),
child: SizedBox(
width: size.width,
height: 48,
child: ElevatedButton(
onPressed: printBarcode,
child: const Text('打印条形码'),
),
),
),
Padding(
padding: const EdgeInsets.only(
top: 8.0,
),
child: SizedBox(
width: size.width,
height: 48,
child: ElevatedButton(
onPressed: printQr,
child: const Text('打印二维码'),
),
),
),
Padding(
padding: const EdgeInsets.only(
top: 8.0,
),
child: SizedBox(
width: size.width,
height: 48,
child: ElevatedButton(
onPressed: printReceipt,
child: const Text('打印收据'),
),
),
),
],
),
),
),
),
);
}
}
更多关于Flutter打印机控制插件nyx_printer的使用的实战系列教程也可以访问 https://www.itying.com/category-92-b0.html

1 回复

更多关于Flutter打印机控制插件nyx_printer的使用的实战系列教程也可以访问 https://www.itying.com/category-92-b0.html
当然,下面是一个关于如何使用Flutter打印机控制插件nyx_printer的示例代码。这个示例将展示如何初始化打印机、发送打印任务以及处理打印结果。
首先,确保你已经在pubspec.yaml文件中添加了nyx_printer依赖:
dependencies:
  flutter:
    sdk: flutter
  nyx_printer: ^最新版本号  # 请替换为实际可用的最新版本号
然后,运行flutter pub get来安装依赖。
接下来,在你的Flutter项目中,你可以按照以下步骤使用nyx_printer插件:
-
初始化打印机:
import 'package:nyx_printer/nyx_printer.dart'; import 'package:flutter/material.dart'; void main() { runApp(MyApp()); } class MyApp extends StatelessWidget { @override Widget build(BuildContext context) { return MaterialApp( home: Scaffold( appBar: AppBar( title: Text('Printer Demo'), ), body: PrinterDemo(), ), ); } } class PrinterDemo extends StatefulWidget { @override _PrinterDemoState createState() => _PrinterDemoState(); } class _PrinterDemoState extends State<PrinterDemo> { late NyxPrinter _printer; @override void initState() { super.initState(); _initializePrinter(); } void _initializePrinter() async { // 初始化打印机实例,这里假设你使用的是蓝牙打印机 _printer = NyxPrinter.instance(printerType: PrinterType.bluetooth); // 如果需要,可以在这里进行蓝牙连接等操作 // 例如:_printer.connect('蓝牙设备地址'); setState(() {}); } void _printText() async { try { String textToPrint = "Hello, Flutter Printer!"; await _printer.printText(textToPrint); print("Print successful!"); } catch (e) { print("Print failed: $e"); } } @override Widget build(BuildContext context) { return Center( child: Column( mainAxisAlignment: MainAxisAlignment.center, children: <Widget>[ Text('Printer Demo'), ElevatedButton( onPressed: _printText, child: Text('Print Text'), ), ], ), ); } } -
处理不同类型的打印机:
如果你使用的是不同类型的打印机(例如USB、网络打印机),你需要在初始化时指定不同的
printerType。例如,对于USB打印机:_printer = NyxPrinter.instance(printerType: PrinterType.usb);对于网络打印机:
_printer = NyxPrinter.instance(printerType: PrinterType.network, ip: '打印机IP地址', port: 打印机端口号); -
打印其他内容:
nyx_printer插件可能支持打印图片、条码、二维码等内容。你可以查阅插件的官方文档来了解更多详细用法。例如,打印图片:Uint8List imageBytes = ...; // 你的图片字节数据 await _printer.printImage(imageBytes); -
错误处理:
在实际应用中,你应该添加更多的错误处理逻辑,以确保在打印过程中能够妥善处理各种异常情况。
请注意,上述代码是一个基本示例,实际使用时可能需要根据具体打印机型号和配置进行调整。此外,nyx_printer插件的具体API和用法可能会随着版本的更新而有所变化,因此建议查阅最新的官方文档来获取最准确的信息。