


Flutter动画效果插件easy_anim的使用
Flutter动画效果插件easy_anim的使用
Preface
当我们谈论Flutter动画时,我们通常会想到什么?
如果你阅读了Flutter文档手册,你的脑海中可能会有一堆诸如Tween、AnimationController、forward()等术语。当然,编写这些代码是可能的,但它们大大降低了开发效率,并增加了代码复杂度。如果不维护好,很容易导致代码混乱。
当然,官方也提供了如TweenAnimationBuilder这样的隐式动画来实现一些简单的单一动画,以及TweenSequence来实现串行动画,但在我的实际项目中,最简单的动画也是同时进行缩放和旋转的并行动画(也称为交织动画)。因此,这些并不适用。在pub.dev和Github上搜索了几个小时后,我没有找到一个可以以声明式且简单的方式编写动画的库,所以我决定自己写一个。
优势
- 使用组件方法声明式描述动画
- 自维护控制器,简洁地使用动画代码
- 支持延迟执行动画
- 支持循环执行动画
- 支持并行动画、串行动画和串行并行动画
快速开始
添加依赖
dependencies:
  easy_anim: ^3.1.1
最小使用示例
import 'package:easy_anim/easy_anim.dart';

EasyTweenAnimation(
  animSequence: [
    EasyTweenAnimationItem(
        animatables: {
          "width": Tween(begin: 0.0, end: 200.0),
        },
        weight: 100,
    ),
  ],
  duration: Duration(seconds: 2),
  builder: (BuildContext context, CurvedAnimation curvedAnimation, Map<String, Animation> animationMap, AnimationController animationController, Widget? child) {

    Animation width = animationMap['width'];

    return AnimatedBuilder(animation: curvedAnimation, builder: (context, child) {
      return Container(
        width: width.value,
        height: 100,
        decoration: BoxDecoration(
          color: Colors.red
        ),
      );
    },
    );
  }
)
上述示例中的第一个动画是从0到200的Container的宽度动画,动画执行时间为2秒。
上述代码类似于CSS动画:
@keyframes anim {
    from { width: 0px; }
    to   { width: 200px; }
}
示例项目截图
查看对应源码:
使用示例
import 'package:easy_anim/easy_anim.dart';

EasyTweenAnimation(
  animSequence: [
    EasyTweenAnimationItem(
      animatables: {
        "angle": Tween<double>(begin: 0, end: 1 * pi),
        "color": ColorTween(begin: Colors.blue, end: Colors.blue),
        "width": Tween<double>(begin: 100, end: 100),
      },
      weight: 50.0, // 占总时间的50%,即前2秒的0%~50%
    ),


    EasyTweenAnimationItem(
      animatables: {
        "color": ColorTween(begin: Colors.blue, end: Colors.red),
        "width": Tween<double>(begin: 100, end: 200),
      },
      weight: 50.0, // 占总时间的50%,即前2秒的50%~100%
    ),
  ],

  duration: Duration(seconds: 2), // 动画总执行时间
  delay: Duration(milliseconds: 200), // 延迟多长时间执行,默认立即执行
  loop: true, // 是否循环执行
  builder: (BuildContext context, CurvedAnimation curvedAnimation, Map<String, Animation> animationMap, AnimationController animationController, Widget? child) {

    // 从AnimationMap中取出每个效果的Animation对象
    Animation angle = animationMap["angle"];
    Animation color = animationMap['color'];
    Animation width = animationMap['width'];

    // 在AnimatedBuilder中使用每个效果的Animation对象值
    return AnimatedBuilder(animation: curvedAnimation, builder: (context, child) {
      return Transform.rotate(
        angle: angle.value,
        child: Container(
          color: color.value,
          width: width.value,
          height: width.value,
        ),
      );
    });
  },
)
这是一个由2秒组成的串行并行动画,第一秒方块旋转角度,第二秒同时改变颜色和宽度。
- 外层的
EasyTweenAnimation是一个用于构建动画的组件。其中的animSequence参数是每个时间段的动画效果,builder参数用于返回你想要构建的组件,其他参数见注释。 EasyTweenAnimationItem是某个时间段的动画效果,参数animatables是各个属性的动画,weight参数是此阶段在整个持续时间中的时间权重。
上述代码类似于CSS动画:
@keyframes anim {
    0% 	  {angle: 0; color: blue; width:100;}
    50%   {angle: 3.14;}
    100%  {color: red; width:200;}
}
参数描述
EasyTweenAnimation 组件参数描述
[animSequence: List<EasyTweenAnimationItem>]动画故事板序列[duration: Duration]动画总执行时间[curve: Curve]动画执行曲线,默认为线性[builder: Function]构建使用动画的组件[onStatus: Function]监听动画执行状态回调[child: Widget]子组件[delay: Duration]延迟时间,默认立即执行[loop: bool]是否循环执行
EasyTweenAnimationItem 组件参数描述
[animatables: Map<String, Animatable>]动画效果,在分段期间的动画效果组Map描述[key: String tag]效果名称,例如 width[value: Animatable animatable]动画效果,一般使用Tween或ColorTween
[weight: double]总动画执行时间的百分比权重(0-100)
示例代码
以下是完整的示例代码:
import 'dart:math';
import 'package:easy_anim/easy_anim.dart';
import 'package:flutter/material.dart';
void main() {
runApp(MyApp());
}
class MyApp extends StatelessWidget {
[@override](/user/override)
Widget build(BuildContext context) {
return MaterialApp(
title: 'Flutter Demo',
theme: ThemeData(
primarySwatch: Colors.blue,
visualDensity: VisualDensity.adaptivePlatformDensity,
),
home: MyHomePage(title: 'easy_anim example'),
);
}
}
class MyHomePage extends StatefulWidget {
MyHomePage({Key? key, this.title}) : super(key: key);
final String? title;
[@override](/user/override)
_MyHomePageState createState() => _MyHomePageState();
}
class _MyHomePageState extends State<MyHomePage> {
int _counter = 0;
[@override](/user/override)
Widget build(BuildContext context) {
return Scaffold(
appBar: AppBar(
title: Text(widget.title!),
),
body: SingleChildScrollView(
child: Column(
mainAxisSize: MainAxisSize.min,
children: [
this.one(),
this.two(),
this.three(),
this.four(),
this.five(),
SizedBox(height: 500,)
],
),
),
);
}
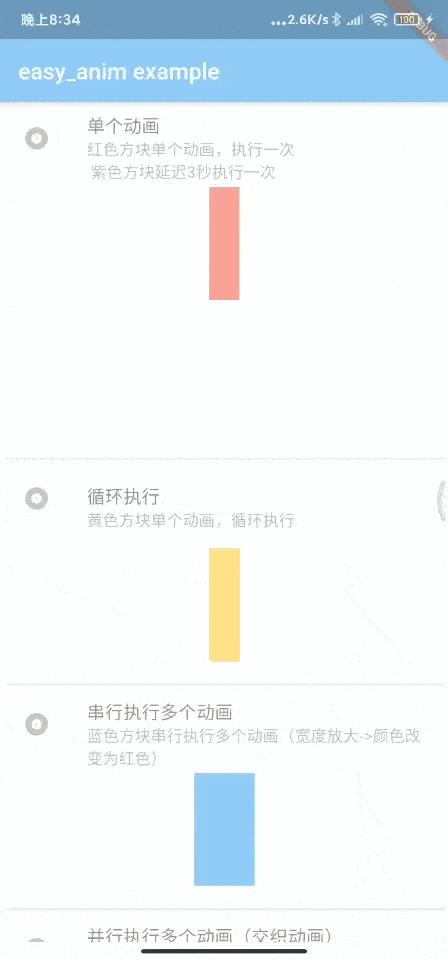
/// 单个动画单次执行
Widget one() {
return Card(
child: Column(
mainAxisSize: MainAxisSize.min,
children: [
ListTile(
leading: Icon(Icons.album),
title: Text('单个动画'),
subtitle: Text("红色方块单个动画,执行一次\n紫色方块延迟3秒执行一次"),
),
/// 示例
EasyTweenAnimation(
animSequence: [
EasyTweenAnimationItem(
animatables: {
"width": Tween(begin: 0.0, end: 200.0),
},
weight: 100,
),
],
duration: Duration(seconds: 2),
builder: (BuildContext context, CurvedAnimation curvedAnimation, Map<String, Animation> animationMap, AnimationController animationController, Widget? child) {
Animation width = animationMap['width']!;
return AnimatedBuilder(animation: curvedAnimation, builder: (context, child) {
return Container(
width: width.value,
height: 100,
decoration: BoxDecoration(
color: Colors.red
),
);
},
);
}
),
SizedBox(height: 20,),
/// 示例延迟
EasyTweenAnimation(
animSequence: [
EasyTweenAnimationItem(
animatables: {
"width": Tween(begin: 0.0, end: 200.0),
},
weight: 100,
),
],
duration: Duration(seconds: 2),
delay: Duration(seconds: 3),
builder: (BuildContext context, CurvedAnimation curvedAnimation, Map<String, Animation> animationMap, AnimationController animationController, Widget? child) {
Animation width = animationMap['width']!;
return AnimatedBuilder(animation: curvedAnimation, builder: (context, child) {
return Container(
width: width.value,
height: 100,
decoration: BoxDecoration(
color: Colors.deepPurpleAccent
),
);
},
);
}
),
SizedBox(height: 20,)
],
),
);
}
/// 单个动画循环执行
Widget two() {
return Card(
child: Column(
mainAxisSize: MainAxisSize.min,
children: [
ListTile(
leading: Icon(Icons.album),
title: Text('循环执行'),
subtitle: Text("黄色方块单个动画,循环执行"),
),
/// 示例
EasyTweenAnimation(
animSequence: [
EasyTweenAnimationItem(
animatables: {
"width": Tween(begin: 0.0, end: 200.0),
},
weight: 100,
),
],
duration: Duration(seconds: 2),
loop: true, /// 循环执行
curve: Curves.bounceInOut,
builder: (BuildContext context, CurvedAnimation curvedAnimation, Map<String, Animation> animationMap, AnimationController animationController, Widget? child) {
Animation width = animationMap['width']!;
return AnimatedBuilder(animation: curvedAnimation, builder: (context, child) {
return Container(
width: width.value,
height: 100,
decoration: BoxDecoration(
color: Colors.amber
),
);
},
);
}
),
SizedBox(height: 20,)
],
),
);
}
/// 串行执行多个动画
Widget three() {
return Card(
child: Column(
mainAxisSize: MainAxisSize.min,
children: [
ListTile(
leading: Icon(Icons.album),
title: Text('串行执行多个动画'),
subtitle: Text("蓝色方块串行执行多个动画(宽度放大->颜色改变为红色)"),
),
/// 示例
EasyTweenAnimation(
animSequence: [
EasyTweenAnimationItem(
animatables: {
"width": Tween(begin: 0.0, end: 200.0),
"color": ColorTween(begin: Colors.blue, end: Colors.blue), /// 第一个 EasyTweenAnimationItem 应该包含animSequence存在的所有效果作为默认值
},
weight: 50, /// 占总时长的50%,也就是0%~50%时的动画效果
),
EasyTweenAnimationItem(
animatables: {
"width": Tween(begin: 200.0, end: 200.0),
"color": ColorTween(begin: Colors.blue, end: Colors.red),
},
weight: 50, /// 占总时长的50%,也就是50%~100%时的动画效果
),
],
duration: Duration(seconds: 2),
loop: true, /// 循环执行
builder: (BuildContext context, CurvedAnimation curvedAnimation, Map<String, Animation> animationMap, AnimationController animationController, Widget? child) {
Animation width = animationMap['width']!;
Animation color = animationMap['color']!;
return AnimatedBuilder(animation: curvedAnimation, builder: (context, child) {
return Container(
width: width.value,
height: 100,
decoration: BoxDecoration(
color: color.value,
),
);
},
);
}
),
SizedBox(height: 20,)
],
),
);
}
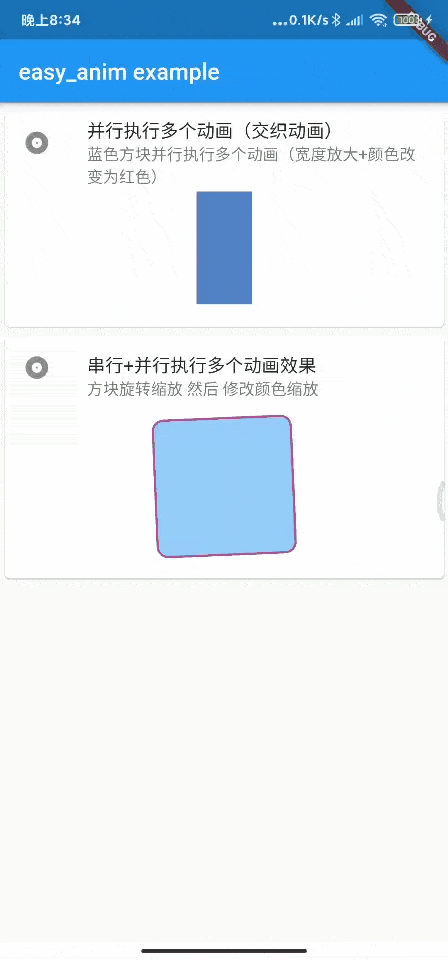
/// 并行执行多个动画(交织动画)
Widget four() {
return Card(
child: Column(
mainAxisSize: MainAxisSize.min,
children: [
ListTile(
leading: Icon(Icons.album),
title: Text('并行执行多个动画(交织动画)'),
subtitle: Text("蓝色方块并行执行多个动画(宽度放大+颜色改变为红色)"),
),
/// 示例
EasyTweenAnimation(
animSequence: [
EasyTweenAnimationItem(
animatables: {
"width": Tween(begin: 0.0, end: 200.0),
"color": ColorTween(begin: Colors.blue, end: Colors.red),
},
weight: 100,
),
],
duration: Duration(seconds: 2),
loop: true, /// 循环执行
builder: (BuildContext context, CurvedAnimation curvedAnimation, Map<String, Animation> animationMap, AnimationController animationController, Widget? child) {
Animation width = animationMap['width']!;
Animation color = animationMap['color']!;
return AnimatedBuilder(animation: curvedAnimation, builder: (context, child) {
return Container(
width: width.value,
height: 100,
decoration: BoxDecoration(
color: color.value,
),
);
},
);
}
),
SizedBox(height: 20,)
],
),
);
}
/// 串行+并行执行多个动画效果
Widget five() {
return Card(
child: Column(
mainAxisSize: MainAxisSize.min,
children: [
ListTile(
leading: Icon(Icons.album),
title: Text('串行+并行执行多个动画效果'),
subtitle: Text("方块旋转缩放 然后 修改颜色缩放"),
),
/// 示例
EasyTweenAnimation(
animSequence: [
EasyTweenAnimationItem(
animatables: {
"angle": Tween<double>(begin: 0, end: 1 * pi),
"size": Tween(begin: 50.0, end: 200.0),
"color": ColorTween(begin: Colors.blue[50], end: Colors.blue[400]),
"radius": Tween<double>(begin: 20, end: 0),
"borderColor": ColorTween(begin: Colors.red, end: Colors.deepPurpleAccent),
},
weight: 50,
),
EasyTweenAnimationItem(
animatables: {
"angle": Tween<double>(begin: 1 * pi, end: 1 * pi),
"size": Tween(begin: 200, end: 50.0),
"color": ColorTween(begin: Colors.blue[400], end: Colors.amber),
"radius": Tween<double>(begin: 0, end: 360),
"borderColor": ColorTween(begin: Colors.deepPurpleAccent, end: Colors.brown),
},
weight: 50,
),
],
duration: Duration(seconds: 2),
loop: true, /// 循环执行
builder: (BuildContext context, CurvedAnimation curvedAnimation, Map<String, Animation> animationMap, AnimationController animationController, Widget? child) {
Animation size = animationMap['size']!;
Animation color = animationMap['color']!;
Animation angle = animationMap['angle']!;
Animation radius = animationMap['radius']!;
Animation borderColor = animationMap['borderColor']!;
return AnimatedBuilder(animation: curvedAnimation, builder: (context, child) {
return Transform.rotate(
angle: angle.value,
child: Container(
width: size.value,
height: size.value,
decoration: BoxDecoration(
color: color.value,
borderRadius: BorderRadius.circular(radius.value),
border: Border.all(color: borderColor.value, width: 2),
),
)
);
},
);
}
),
SizedBox(height: 20,)
],
),
);
}
}
更多关于Flutter动画效果插件easy_anim的使用的实战系列教程也可以访问 https://www.itying.com/category-92-b0.html


更多关于Flutter动画效果插件easy_anim的使用的实战系列教程也可以访问 https://www.itying.com/category-92-b0.html
当然,以下是如何在Flutter项目中使用easy_anim插件来实现动画效果的一个代码示例。easy_anim是一个强大的Flutter库,它简化了动画的创建和管理。
首先,确保你已经在pubspec.yaml文件中添加了easy_anim依赖:
dependencies:
  flutter:
    sdk: flutter
  easy_anim: ^x.y.z  # 请替换为最新版本号
然后运行flutter pub get来安装依赖。
以下是一个简单的示例,展示如何使用easy_anim来创建一个淡入淡出的动画效果:
import 'package:flutter/material.dart';
import 'package:easy_anim/easy_anim.dart';

void main() {
  runApp(MyApp());
}

class MyApp extends StatelessWidget {
  @override
  Widget build(BuildContext context) {
    return MaterialApp(
      title: 'Easy Anim Example',
      theme: ThemeData(
        primarySwatch: Colors.blue,
      ),
      home: AnimExampleScreen(),
    );
  }
}

class AnimExampleScreen extends StatefulWidget {
  @override
  _AnimExampleScreenState createState() => _AnimExampleScreenState();
}

class _AnimExampleScreenState extends State<AnimExampleScreen> with SingleTickerProviderStateMixin {
  late AnimationController _controller;
  late Animatable<double> _opacity;

  @override
  void initState() {
    super.initState();
    _controller = AnimationController(
      duration: const Duration(seconds: 2),
      vsync: this,
    )..repeat(reverse: true); // 反复播放动画,reverse: true表示在正向和反向之间切换

    _opacity = Tween<double>(begin: 0.0, end: 1.0).animate(_controller);
  }

  @override
  void dispose() {
    _controller.dispose();
    super.dispose();
  }

  @override
  Widget build(BuildContext context) {
    return Scaffold(
      appBar: AppBar(
        title: Text('Easy Anim Example'),
      ),
      body: Center(
        child: AnimBuilder(
          animation: _controller,
          builder: (_, child) {
            return Opacity(
              opacity: _opacity.value,
              child: Container(
                width: 200,
                height: 200,
                color: Colors.blue,
                child: Center(
                  child: Text(
                    'Flutter',
                    style: TextStyle(color: Colors.white, fontSize: 24),
                  ),
                ),
              ),
            );
          },
        ),
      ),
    );
  }
}
在这个示例中:
-
我们首先定义了一个
_AnimExampleScreenState类,它扩展了State<AnimExampleScreen>并混合了SingleTickerProviderStateMixin,以便我们可以使用AnimationController。 -
在
initState方法中,我们创建了一个AnimationController,并设置其持续时间为2秒。我们使用Tween<double>来定义一个从0.0到1.0的透明度动画。 -
使用
AnimBuilder组件来包裹我们希望应用动画效果的子组件。AnimBuilder接收一个animation参数(即我们的_controller)和一个builder函数,该函数定义了如何根据动画状态构建子组件。 -
在
builder函数中,我们使用Opacity组件来应用透明度动画,并将_opacity.value作为opacity参数传递给它。 -
最后,在
dispose方法中,我们调用_controller.dispose()来释放动画控制器资源。
这个示例展示了如何使用easy_anim(尽管在这个简单案例中,我们实际上没有直接使用easy_anim提供的高级功能,而是使用了Flutter内置的动画系统,但easy_anim可以用于更复杂的场景,提供简化的API)。对于更复杂的动画,easy_anim可能会提供额外的便利函数和预定义的动画效果。你可以查阅easy_anim的文档以了解更多高级用法。