


Flutter地点选择器插件apple_maps_place_picker的使用
Flutter地点选择器插件apple_maps_place_picker的使用
Apple Maps Place Picker


此Flutter插件提供了使用Apple Maps的可自定义地点选择器。该插件允许用户使用Apple的原生MapKit框架搜索和选择位置。
注意: 此插件仅适用于iOS,因为它使用了Apple Maps。
所有由插件提供的功能,包括地点搜索和地理编码位置,都是完全免费使用的,无需额外的API密钥或产生额外费用。与Google Maps不同,Google Maps的地点搜索功能是付费的,而Apple则免费提供这些功能,使其成为iOS应用的一个成本效益解决方案。更多详细信息,请参阅官方Apple开发者论坛讨论。
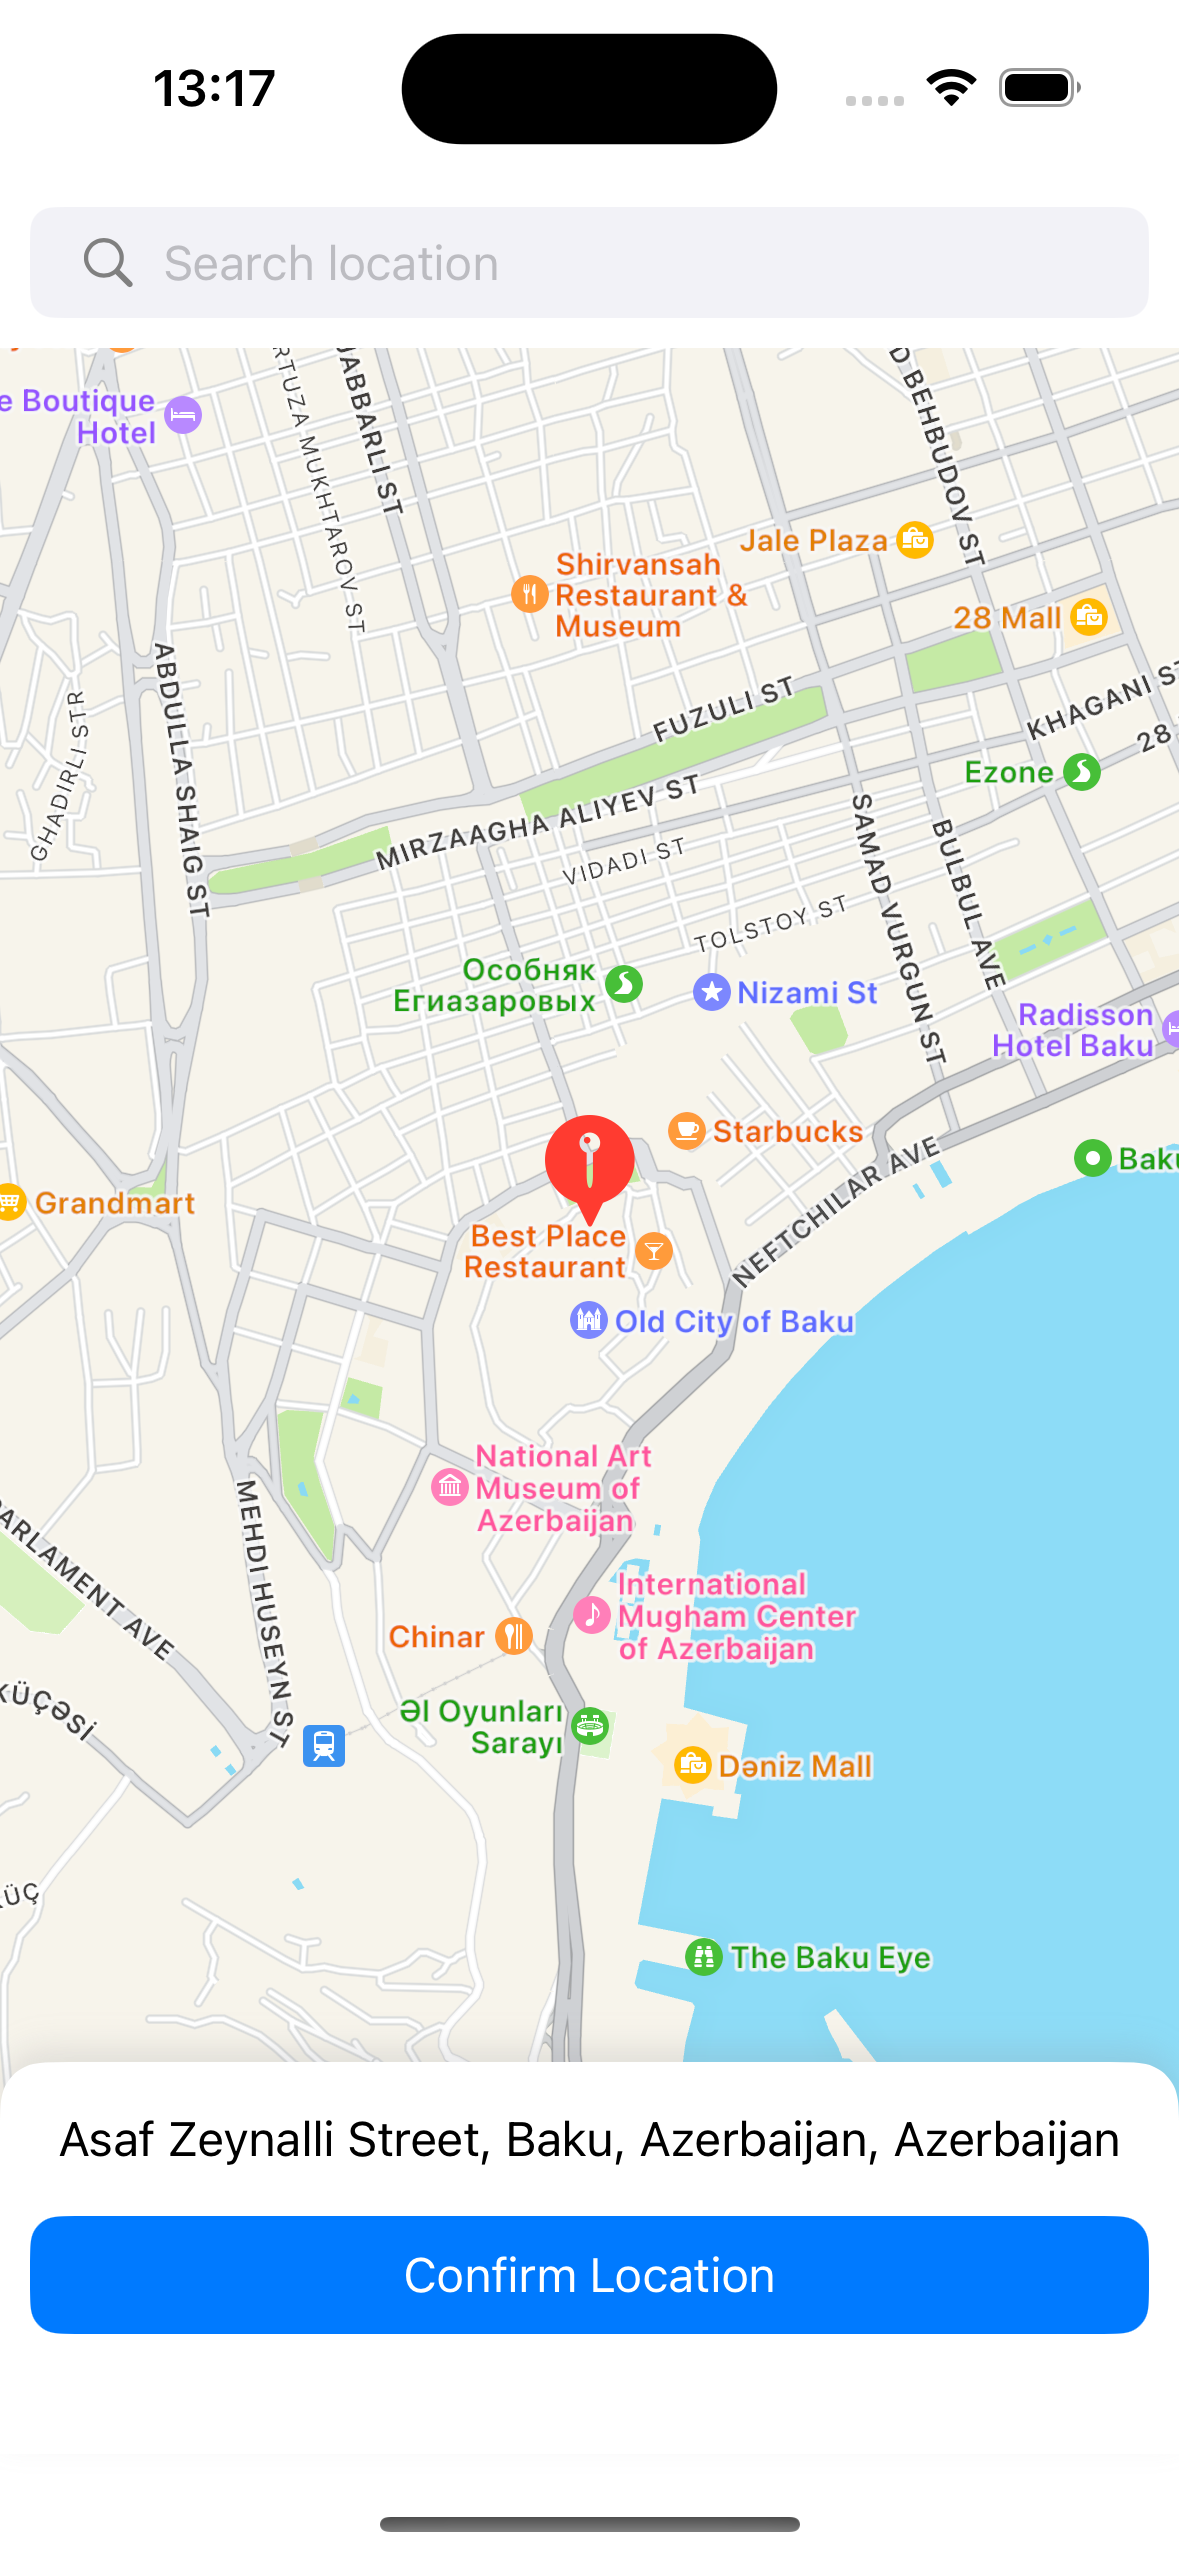
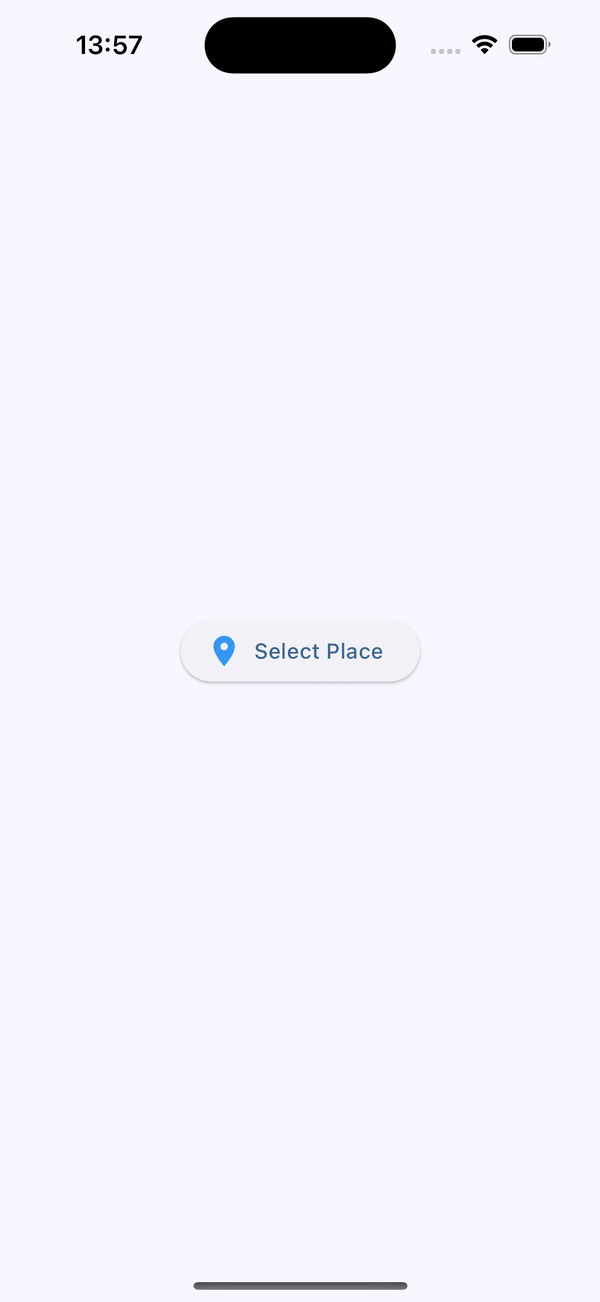
截图
光主题、暗主题及预览
| 光主题 | 暗主题 | 预览 |
|---|---|---|
 |
 |
 |
特性
- 🗺️ 原生Apple Maps集成
- 🔍 内置地点搜索功能
- 📍 自定义标记支持
- 🎬 自定义底部地址视图
- 🎨 可自定义UI组件
- 🎯 精确的位置选择
前提条件
- iOS 15.0 或更高版本
- Flutter 3.3.10 或更高版本
- 有效的Apple开发者账户以使用MapKit
安装
在你的包的pubspec.yaml文件中添加以下内容:
dependencies:
  apple_maps_place_picker: ^0.1.0
使用
基本实现
AppleMapsPlacePicker(
  initialLatitude: 40.37818,
  initialLongitude: 49.83991,
  onPlaceSelected: (Place place) {
    print('Selected place: ${place.address}');
  },
)
完全自定义
AppleMapsPlacePicker(
  initialLatitude: 40.37818,
  initialLongitude: 49.83991,
  config: PlacePickerConfig(
    searchBarConfig: SearchBarConfig(
      hintText: 'Search place',
      textFieldTextStyle: TextStyle(
        fontSize: 16,
        fontWeight: FontWeight.bold,
      ),
      backgroundColor: Colors.white,
    ),
    searchResultConfig: SearchResultConfig(
      itemTextStyle: TextStyle(
        fontSize: 16,
        color: Colors.black87,
      ),
      backgroundColor: Colors.grey[100],
    ),
    addressViewConfig: AddressViewConfig(
      confirmButtonText: 'Confirm',
      addressTextStyle: TextStyle(
        fontSize: 18,
        fontWeight: FontWeight.w300,
      ),
    ),
  ),
  onPlaceSelected: (Place place) {
    print('Selected place: ${place.address}');
  },
)
自定义标记
AppleMapsPlacePicker(
  initialLatitude: 40.37818,
  initialLongitude: 49.83991,
  onPlaceSelected: (Place place) {
    print('Selected place: ${place.address}');
  },
  customMarker: Container(
    width: 50,
    height: 50,
    decoration: BoxDecoration(
      color: Colors.blue,
      shape: BoxShape.circle,
    ),
  ),
)
自定义底部地址视图
AppleMapsPlacePicker(
  initialLatitude: 40.37818,
  initialLongitude: 49.83991,
  onPlaceSelected: (Place place) {
    print('Selected place: ${place.address}');
  },
  customBottomSheet: (Place? place) {
    return Container(
      color: Colors.white,
      padding: EdgeInsets.all(16),
      child: Column(
        children: [
          Text(place?.address ?? 'Not found'),
          ElevatedButton(
            onPressed: () {
              // 处理确认
            },
            child: Text('Confirm Location'),
          ),
        ],
      ),
    );
  },
)
待办事项
即将添加的功能和改进:
- ❌ 添加“我的位置”按钮功能
- ❌ 实现自定义地图样式支持
- ❌ 支持自定义搜索UI
示例
完整的示例可以在以下目录中查看:
// example/lib/main.dart
import 'package:apple_maps_place_picker/apple_maps_place_picker.dart';
import 'package:flutter/material.dart';

void main() {
  runApp(const MyApp());
}

class MyApp extends StatelessWidget {
  const MyApp({super.key});

  [@override](/user/override)
  Widget build(BuildContext context) {
    return MaterialApp(
      title: 'Flutter Demo',
      debugShowCheckedModeBanner: false,
      theme: ThemeData(
        colorScheme: ColorScheme.fromSeed(seedColor: Colors.blue),
        useMaterial3: true,
      ),
      home: const HomePage(),
    );
  }
}

class HomePage extends StatefulWidget {
  const HomePage({super.key});

  [@override](/user/override)
  State<HomePage> createState() => _HomePageState();
}

class _HomePageState extends State<HomePage> {
  Place? _selectedPlace;

  [@override](/user/override)
  Widget build(BuildContext context) {
    return Scaffold(
      body: Padding(
        padding: const EdgeInsets.all(16.0),
        child: Column(
          mainAxisAlignment: MainAxisAlignment.center,
          crossAxisAlignment: CrossAxisAlignment.center,
          children: [
            if (_selectedPlace != null) ...[
              Container(
                padding: const EdgeInsets.all(16),
                decoration: BoxDecoration(
                  color: Colors.grey.shade100,
                  borderRadius: BorderRadius.circular(12),
                ),
                child: Column(
                  crossAxisAlignment: CrossAxisAlignment.start,
                  children: [
                    const Text(
                      'Selected Place Details:',
                      style: TextStyle(
                        fontSize: 18,
                        fontWeight: FontWeight.bold,
                      ),
                    ),
                    const SizedBox(height: 12),
                    AddressDetailRow(
                      label: 'Address:',
                      value: _selectedPlace!.address ?? 'N/A',
                    ),
                    AddressDetailRow(
                      label: 'Latitude:',
                      value: _selectedPlace!.latitude.toStringAsFixed(6),
                    ),
                    AddressDetailRow(
                      label: 'Longitude:',
                      value: _selectedPlace!.longitude.toStringAsFixed(6),
                    ),
                    AddressDetailRow(
                      label: 'Name:',
                      value: _selectedPlace!.name,
                    ),
                  ],
                ),
              ),
              const SizedBox(height: 24),
            ],
            Center(
              child: ElevatedButton.icon(
                style: ElevatedButton.styleFrom(
                  iconColor: Colors.blue,
                ),
                onPressed: () async {
                  final result = await Navigator.push<Place?>(
                    context,
                    MaterialPageRoute(builder: (context) => const PlacePickerPage()),
                  );

                  if (result != null) {
                    setState(() {
                      _selectedPlace = result;
                    });
                  }
                },
                icon: const Icon(Icons.place),
                label: Text(
                  _selectedPlace == null ? 'Select Place' : 'Change Place',
                ),
              ),
            ),
          ],
        ),
      ),
    );
  }
}

class PlacePickerPage extends StatelessWidget {
  const PlacePickerPage({super.key});

  [@override](/user/override)
  Widget build(BuildContext context) {
    return Scaffold(
      appBar: AppBar(
        title: const Text('Place Picker'),
        backgroundColor: Colors.white,
      ),
      backgroundColor: Colors.white,
      body: SafeArea(
        child: AppleMapsPlacePicker(
          initialLatitude: 40.37818,
          initialLongitude: 49.83991,
          onPlaceSelected: (Place place) {
            debugPrint('Selected place address: ${place.address}');
            Navigator.pop(context, place);
          },
        ),
      ),
    );
  }
}

class AddressDetailRow extends StatelessWidget {
  const AddressDetailRow({
    super.key,
    required this.label,
    required this.value,
  });

  final String label;
  final String value;

  [@override](/user/override)
  Widget build(BuildContext context) {
    return Padding(
      padding: const EdgeInsets.symmetric(vertical: 4),
      child: Row(
        crossAxisAlignment: CrossAxisAlignment.start,
        children: [
          SizedBox(
            width: 80,
            child: Text(
              label,
              style: const TextStyle(
                fontWeight: FontWeight.w500,
                color: Colors.black54,
              ),
            ),
          ),
          Expanded(
            child: Text(
              value,
              style: const TextStyle(
                fontWeight: FontWeight.w500,
              ),
            ),
          ),
        ],
      ),
    );
  }
}
更多关于Flutter地点选择器插件apple_maps_place_picker的使用的实战教程也可以访问 https://www.itying.com/category-92-b0.html

更多关于Flutter地点选择器插件apple_maps_place_picker的使用的实战系列教程也可以访问 https://www.itying.com/category-92-b0.html
当然,以下是如何在Flutter项目中使用apple_maps_place_picker插件的示例代码。这个插件允许你在iOS设备上使用Apple Maps来选择地点。请注意,这个插件目前仅支持iOS平台。
首先,你需要在你的pubspec.yaml文件中添加依赖项:
dependencies:
  flutter:
    sdk: flutter
  apple_maps_place_picker: ^x.y.z  # 请替换为最新版本号
然后运行flutter pub get来获取依赖项。
接下来,确保你的iOS项目配置正确。由于apple_maps_place_picker依赖于Apple Maps,你需要在Info.plist中添加必要的权限请求,比如访问位置信息:
<key>NSLocationWhenInUseUsageDescription</key>
<string>需要您的位置信息来选择地点</string>
现在,你可以在你的Flutter代码中使用AppleMapsPlacePicker了。以下是一个简单的示例,展示如何打开地点选择器并处理选择的地点:
import 'package:flutter/material.dart';
import 'package:apple_maps_place_picker/apple_maps_place_picker.dart';

void main() {
  runApp(MyApp());
}

class MyApp extends StatelessWidget {
  @override
  Widget build(BuildContext context) {
    return MaterialApp(
      title: 'Flutter Demo',
      theme: ThemeData(
        primarySwatch: Colors.blue,
      ),
      home: MyHomePage(),
    );
  }
}

class MyHomePage extends StatefulWidget {
  @override
  _MyHomePageState createState() => _MyHomePageState();
}

class _MyHomePageState extends State<MyHomePage> {
  String selectedPlaceName = '';

  Future<void> _selectPlace() async {
    try {
      final PlaceResult result = await AppleMapsPlacePicker.showPicker(
        context,
        apiKey: 'YOUR_MAPS_API_KEY', // 如果需要API Key的话(此插件可能不需要)
        searchQuery: 'Restaurant', // 可选的搜索查询
        useCurrentLocation: true, // 是否使用当前位置作为中心点
      );

      if (result != null && result.place != null) {
        setState(() {
          selectedPlaceName = result.place.name;
        });
      }
    } catch (e) {
      print('Error selecting place: $e');
    }
  }

  @override
  Widget build(BuildContext context) {
    return Scaffold(
      appBar: AppBar(
        title: Text('Flutter Demo'),
      ),
      body: Center(
        child: Column(
          mainAxisAlignment: MainAxisAlignment.center,
          children: <Widget>[
            Text(
              'Selected Place: $selectedPlaceName',
              style: TextStyle(fontSize: 20),
            ),
            SizedBox(height: 20),
            ElevatedButton(
              onPressed: _selectPlace,
              child: Text('Select Place'),
            ),
          ],
        ),
      ),
    );
  }
}
在这个示例中:
- 我们创建了一个简单的Flutter应用,其中包含一个按钮和一个显示所选地点名称的文本。
- 点击按钮时,调用
_selectPlace函数,该函数使用AppleMapsPlacePicker.showPicker方法打开地点选择器。 - 用户选择地点后,地点信息将被返回,并更新UI中的文本。
请注意,apple_maps_place_picker插件的具体API可能会随着版本更新而变化,因此请参考其官方文档以获取最新和最准确的信息。如果插件需要API Key(尽管在撰写本文时可能不需要),请确保你已经获得了相应的API Key并正确配置。