


Flutter触摸步进器插件stepper_touch的使用
Flutter触摸步进器插件stepper_touch的使用
stepper_touch
stepper_touch 插件的概念灵感来自 Nikolay Kuchkarov。我扩展了该功能,使其在实际应用中更加实用。
感谢你!
请给这个仓库点个星,并分享给其他人。
gif
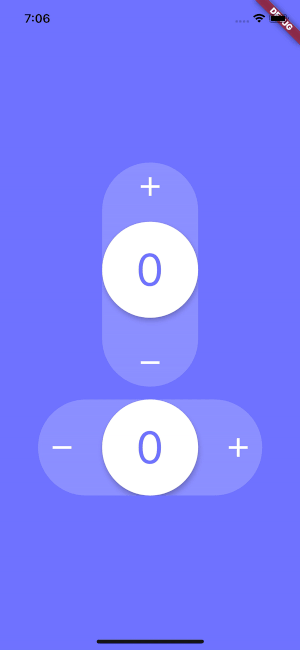
创建者
使用示例
import 'package:stepper_touch/stepper_touch.dart';

...

Container(
  padding: const EdgeInsets.all(8.0),
  child: StepperTouch(
    initialValue: 0,
    direction: Axis.vertical,
    withSpring: false,
    onChanged: (int value) => print('new value $value'),
  ),
),
...
获取入门指南
对于如何开始使用 Flutter,可以查看我们的在线文档: Flutter 文档。
完整示例代码
以下是一个完整的 Flutter 应用程序示例,展示了如何使用 stepper_touch 插件。
import 'package:flutter/material.dart';
import 'package:stepper_touch/stepper_touch.dart';

void main() {
  runApp(
    MaterialApp(
      theme: ThemeData(scaffoldBackgroundColor: const Color(0xFF6D72FF)),
      home: MyApp(),
    ),
  );
}

class MyApp extends StatefulWidget {
  [@override](/user/override)
  _MyAppState createState() => _MyAppState();
}

class _MyAppState extends State<MyApp> {
  [@override](/user/override)
  Widget build(BuildContext context) {
    return Scaffold(
      body: SafeArea(
        child: Center(
          child: Column(
            mainAxisAlignment: MainAxisAlignment.center,
            children: [
              // 第一个 StepperTouch 组件
              Padding(
                padding: const EdgeInsets.all(8.0),
                child: StepperTouch(
                  initialValue: 0,
                  direction: Axis.vertical,
                  withSpring: false,
                  onChanged: (int value) => print('new value $value'),
                ),
              ),

              // 第二个 StepperTouch 组件
              Padding(
                padding: const EdgeInsets.all(8.0),
                child: StepperTouch(
                  initialValue: 0,
                  onChanged: (int value) => print('new value $value'),
                ),
              ),
            ],
          ),
        ),
      ),
    );
  }
}
更多关于Flutter触摸步进器插件stepper_touch的使用的实战教程也可以访问 https://www.itying.com/category-92-b0.html
1 回复

更多关于Flutter触摸步进器插件stepper_touch的使用的实战系列教程也可以访问 https://www.itying.com/category-92-b0.html
当然,以下是如何在Flutter项目中集成和使用stepper_touch插件的示例代码。stepper_touch是一个触摸步进器插件,允许用户通过触摸和滑动来增加或减少数值。
首先,你需要在你的pubspec.yaml文件中添加stepper_touch依赖:
dependencies:
  flutter:
    sdk: flutter
  stepper_touch: ^最新版本号  # 请替换为实际的最新版本号
然后,运行flutter pub get来安装依赖。
接下来,你可以在你的Flutter应用中使用StepperTouch组件。以下是一个完整的示例代码,展示了如何在一个简单的Flutter应用中集成和使用stepper_touch:
import 'package:flutter/material.dart';
import 'package:stepper_touch/stepper_touch.dart';

void main() {
  runApp(MyApp());
}

class MyApp extends StatelessWidget {
  @override
  Widget build(BuildContext context) {
    return MaterialApp(
      title: 'Stepper Touch Demo',
      theme: ThemeData(
        primarySwatch: Colors.blue,
      ),
      home: MyHomePage(),
    );
  }
}

class MyHomePage extends StatefulWidget {
  @override
  _MyHomePageState createState() => _MyHomePageState();
}

class _MyHomePageState extends State<MyHomePage> {
  int _value = 0;

  void _onValueChanged(int value) {
    setState(() {
      _value = value;
    });
  }

  @override
  Widget build(BuildContext context) {
    return Scaffold(
      appBar: AppBar(
        title: Text('Stepper Touch Demo'),
      ),
      body: Center(
        child: Column(
          mainAxisAlignment: MainAxisAlignment.center,
          children: <Widget>[
            Text(
              'Current Value: $_value',
              style: TextStyle(fontSize: 24),
            ),
            SizedBox(height: 20),
            StepperTouch(
              initialValue: _value,
              minValue: 0,
              maxValue: 100,
              step: 1,
              onChanged: _onValueChanged,
              decoration: BoxDecoration(
                borderRadius: BorderRadius.circular(25),
                border: Border.all(color: Colors.blueAccent, width: 2),
              ),
            ),
          ],
        ),
      ),
    );
  }
}
在这个示例中:
MyApp是我们的主应用类,它创建了MaterialApp并设置了主题和主页。MyHomePage是一个有状态的组件,它包含了一个用于显示当前值的Text组件和一个StepperTouch组件。_value是一个私有变量,用于存储当前的步进器值。_onValueChanged是一个回调函数,当步进器的值改变时会被调用,并更新_value。StepperTouch组件配置了初始值、最小值、最大值、步长、回调函数和装饰样式。
你可以根据需要调整minValue、maxValue和step等参数,以及decoration属性来自定义步进器的外观。
希望这个示例代码对你有所帮助!