


Flutter计时器插件dp_stopwatch的使用
Flutter计时器插件dp_stopwatch的使用
dp_stopwatch 插件是一个增强版的计时器插件,它提供了更丰富的功能来控制计时器的状态。以下是该插件的基本使用方法。
特性
开始使用
该项目将迁移到null安全版本。
使用方法
创建视图模型
首先,我们需要创建一个 DPStopwatchViewModel 实例,并设置相应的文本样式:
final stopwatchViewModel = DPStopwatchViewModel(
  clockTextStyle: const TextStyle(
    color: Colors.black,
    fontSize: 32,
  ),
);
绑定视图模型到控件
在构建界面时,我们将 DPStopwatchWidget 和按钮绑定到视图模型:
[@override](/user/override)
Widget build(BuildContext context) {
return Scaffold(
backgroundColor: Colors.white70,
appBar: AppBar(
title: Text(widget.title),
),
body: Center(
child: Column(
mainAxisAlignment: MainAxisAlignment.center,
children: [
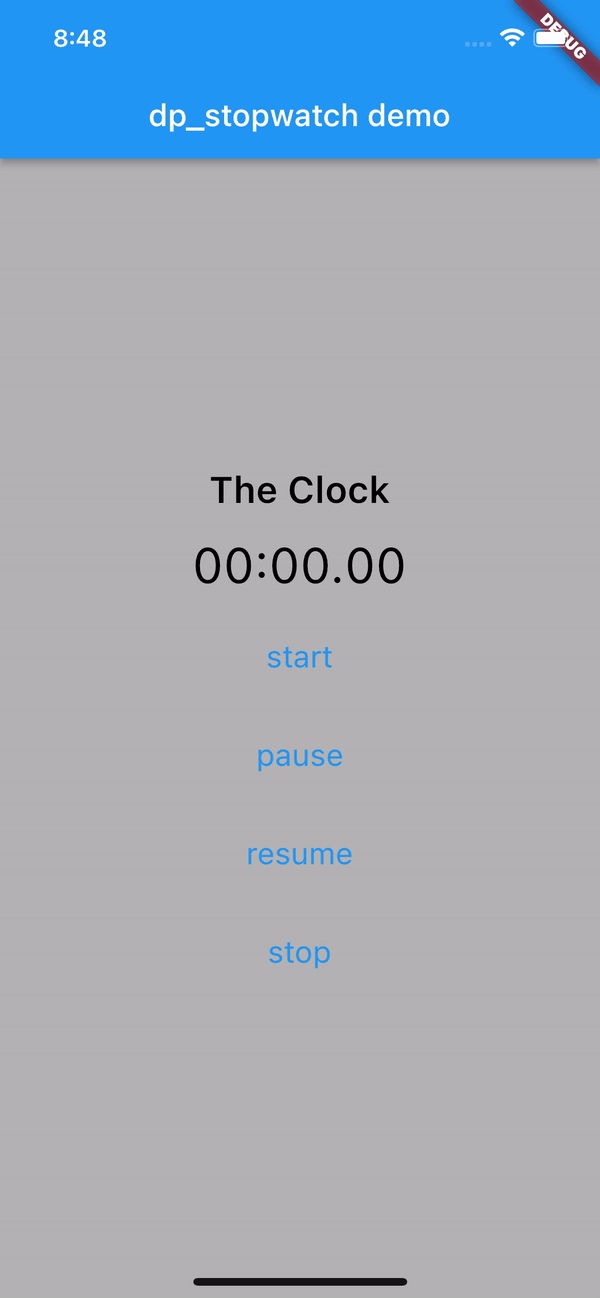
const Text(
'The Clock',
style: TextStyle(
color: Colors.black,
fontSize: 24,
fontWeight: FontWeight.w600,
),
),
const SizedBox(height: 16),
DPStopWatchWidget(
stopwatchViewModel,
),
const SizedBox(height: 16),
TextButton(
style: TextButton.styleFrom(
textStyle: const TextStyle(fontSize: 20),
),
onPressed: () {
stopwatchViewModel.start?.call();
},
child: const Text('start'),
),
const SizedBox(height: 16),
TextButton(
style: TextButton.styleFrom(
textStyle: const TextStyle(fontSize: 20),
),
onPressed: () {
stopwatchViewModel.pause?.call();
},
child: const Text('pause'),
),
const SizedBox(height: 16),
TextButton(
style: TextButton.styleFrom(
textStyle: const TextStyle(fontSize: 20),
),
onPressed: () {
stopwatchViewModel.resume?.call();
},
child: const Text('resume'),
),
const SizedBox(height: 16),
TextButton(
style: TextButton.styleFrom(
textStyle: const TextStyle(fontSize: 20),
),
onPressed: () {
stopwatchViewModel.stop?.call();
},
child: const Text('stop'),
),
],
),
),
);
}
控制计时器
通过调用视图模型的方法,可以控制计时器的状态,例如启动、暂停、恢复和停止。
完整示例代码
以下是一个完整的示例代码,展示了如何使用 dp_stopwatch 插件:
import 'package:flutter/material.dart';
import 'package:dp_stopwatch/dp_stopwatch.dart';

void main() {
  runApp(const MyApp());
}

class MyApp extends StatelessWidget {
  const MyApp({Key? key}) : super(key: key);

  [@override](/user/override)
  Widget build(BuildContext context) {
    return MaterialApp(
      title: 'example',
      theme: ThemeData(
        primarySwatch: Colors.blue,
      ),
      home: const MyHomePage(title: 'example'),
    );
  }
}

class MyHomePage extends StatefulWidget {
  const MyHomePage({Key? key, required this.title}) : super(key: key);

  final String title;

  [@override](/user/override)
  State<MyHomePage> createState() => _MyHomePageState();
}

class _MyHomePageState extends State<MyHomePage> {
  final stopwatchViewModel = DPStopwatchViewModel(
    clockTextStyle: const TextStyle(
      color: Colors.black,
      fontSize: 32,
    ),
  );

  [@override](/user/override)
  Widget build(BuildContext context) {
    return Scaffold(
      backgroundColor: Colors.white70,
      appBar: AppBar(
        title: Text(widget.title),
      ),
      body: Center(
        child: Column(
          mainAxisAlignment: MainAxisAlignment.center,
          children: [
            const Text(
              'The Clock',
              style: TextStyle(
                color: Colors.black,
                fontSize: 24,
                fontWeight: FontWeight.w600,
              ),
            ),
            const SizedBox(height: 16),
            DPStopWatchWidget(
              stopwatchViewModel,
            ),
            const SizedBox(height: 16),
            TextButton(
              style: TextButton.styleFrom(
                textStyle: const TextStyle(fontSize: 20),
              ),
              onPressed: () {
                stopwatchViewModel.start?.call();
              },
              child: const Text('start'),
            ),
            const SizedBox(height: 16),
            TextButton(
              style: TextButton.styleFrom(
                textStyle: const TextStyle(fontSize: 20),
              ),
              onPressed: () {
                stopwatchViewModel.pause?.call();
              },
              child: const Text('pause'),
            ),
            const SizedBox(height: 16),
            TextButton(
              style: TextButton.styleFrom(
                textStyle: const TextStyle(fontSize: 20),
              ),
              onPressed: () {
                stopwatchViewModel.resume?.call();
              },
              child: const Text('resume'),
            ),
            const SizedBox(height: 16),
            TextButton(
              style: TextButton.styleFrom(
                textStyle: const TextStyle(fontSize: 20),
              ),
              onPressed: () {
                stopwatchViewModel.stop?.call();
              },
              child: const Text('stop'),
            ),
          ],
        ),
      ),
    );
  }
}
更多关于Flutter计时器插件dp_stopwatch的使用的实战教程也可以访问 https://www.itying.com/category-92-b0.html
1 回复

更多关于Flutter计时器插件dp_stopwatch的使用的实战系列教程也可以访问 https://www.itying.com/category-92-b0.html
当然,以下是如何在Flutter项目中使用dp_stopwatch插件来实现一个简单计时器功能的示例代码。dp_stopwatch是一个用于创建和管理计时器的Flutter插件。
1. 添加依赖
首先,在你的pubspec.yaml文件中添加dp_stopwatch依赖:
dependencies:
  flutter:
    sdk: flutter
  dp_stopwatch: ^latest_version  # 请替换为最新版本号
2. 导入插件
在你的Dart文件中导入dp_stopwatch:
import 'package:dp_stopwatch/dp_stopwatch.dart';
3. 创建计时器功能
下面是一个完整的示例,展示如何在Flutter应用中使用dp_stopwatch插件来创建一个简单的计时器:
import 'package:flutter/material.dart';
import 'package:dp_stopwatch/dp_stopwatch.dart';

void main() {
  runApp(MyApp());
}

class MyApp extends StatelessWidget {
  @override
  Widget build(BuildContext context) {
    return MaterialApp(
      title: 'Flutter Stopwatch Demo',
      theme: ThemeData(
        primarySwatch: Colors.blue,
      ),
      home: StopwatchScreen(),
    );
  }
}

class StopwatchScreen extends StatefulWidget {
  @override
  _StopwatchScreenState createState() => _StopwatchScreenState();
}

class _StopwatchScreenState extends State<StopwatchScreen> with WidgetsBindingObserver {
  late StopwatchController _stopwatchController;
  String _timeDisplay = '00:00:00.000';

  @override
  void initState() {
    super.initState();
    WidgetsBinding.instance?.addObserver(this);
    _stopwatchController = StopwatchController();
    _stopwatchController.addListener(() {
      setState(() {
        _timeDisplay = _stopwatchController.formattedTime;
      });
    });
  }

  @override
  void dispose() {
    _stopwatchController.dispose();
    WidgetsBinding.instance?.removeObserver(this);
    super.dispose();
  }

  @override
  void didChangeAppLifecycleState(AppLifecycleState state) {
    if (state == AppLifecycleState.paused) {
      _stopwatchController.pause();
    } else if (state == AppLifecycleState.resumed) {
      _stopwatchController.resume();
    }
    super.didChangeAppLifecycleState(state);
  }

  @override
  Widget build(BuildContext context) {
    return Scaffold(
      appBar: AppBar(
        title: Text('Flutter Stopwatch'),
      ),
      body: Center(
        child: Column(
          mainAxisAlignment: MainAxisAlignment.center,
          children: <Widget>[
            Text(
              _timeDisplay,
              style: TextStyle(fontSize: 24),
            ),
            SizedBox(height: 20),
            Row(
              mainAxisAlignment: MainAxisAlignment.center,
              children: <Widget>[
                ElevatedButton(
                  onPressed: () {
                    _stopwatchController.start();
                  },
                  child: Text('Start'),
                ),
                SizedBox(width: 20),
                ElevatedButton(
                  onPressed: () {
                    _stopwatchController.pause();
                  },
                  child: Text('Pause'),
                ),
                SizedBox(width: 20),
                ElevatedButton(
                  onPressed: () {
                    _stopwatchController.reset();
                    setState(() {
                      _timeDisplay = '00:00:00.000';
                    });
                  },
                  child: Text('Reset'),
                ),
              ],
            ),
          ],
        ),
      ),
    );
  }
}
代码解释
- 添加依赖:在
pubspec.yaml中添加dp_stopwatch依赖。 - 导入插件:在Dart文件中导入
dp_stopwatch。 - 创建UI:
- 使用
StopwatchController来管理计时器的状态。 - 使用
addListener来监听计时器的变化,并更新UI。 - 使用
start、pause和reset方法来控制计时器的行为。 - 使用
didChangeAppLifecycleState来处理应用生命周期的变化,确保在暂停和恢复时正确管理计时器的状态。
- 使用
这个示例展示了如何在Flutter应用中集成和使用dp_stopwatch插件来创建一个基本的计时器功能。你可以根据需要进一步扩展和自定义这个示例。