


Flutter日程管理插件calendar_agenda的使用
Flutter日程管理插件calendar_agenda的使用
介绍
calendar_agenda 是一个带有多种可定制样式的日程管理小部件。
安装
-
依赖安装 在
pubspec.yaml文件中添加依赖:dependencies: flutter: sdk: flutter calendar_agenda: <version> -
安装包 运行以下命令以安装包:
flutter pub get -
导入库 在你的项目中导入库:
import 'package:calendar_agenda/calendar_agenda.dart';
样式示例
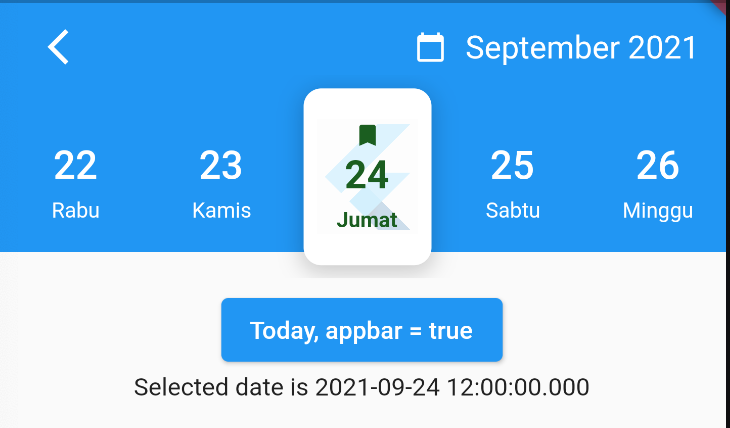
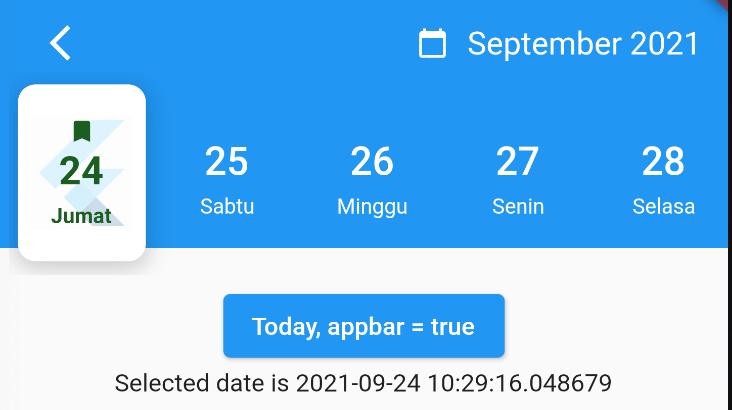
选中日期位置
- 中心
- 左边
- 右边

日历滚动方向
- 垂直滚动
- 水平滚动

示例代码
下面是一个完整的示例代码,展示如何在 Flutter 应用中使用 calendar_agenda 插件。
import 'dart:math';

import 'package:calendar_agenda/calendar_agenda.dart';
import 'package:flutter/material.dart';

void main() {
  runApp(MyApp());
}

class MyApp extends StatelessWidget {
  [@override](/user/override)
  Widget build(BuildContext context) {
    return MaterialApp(
      title: 'Flutter Demo',
      theme: ThemeData(
        primarySwatch: Colors.blue,
      ),
      home: ExamplePage(),
    );
  }
}

class ExamplePage extends StatefulWidget {
  const ExamplePage({Key? key}) : super(key: key);

  [@override](/user/override)
  _ExamplePageState createState() => _ExamplePageState();
}

class _ExamplePageState extends State<ExamplePage> {
  CalendarAgendaController _calendarAgendaControllerAppBar = CalendarAgendaController();
  CalendarAgendaController _calendarAgendaControllerNotAppBar = CalendarAgendaController();

  late DateTime _selectedDateAppBBar;
  late DateTime _selectedDateNotAppBBar;

  Random random = new Random();

  [@override](/user/override)
  void initState() {
    super.initState();
    _selectedDateAppBBar = DateTime.now();
    _selectedDateNotAppBBar = DateTime.now();
  }

  [@override](/user/override)
  Widget build(BuildContext context) {
    return Scaffold(
      appBar: AppBar(
        title: Text('Calendar Agenda Example'),
      ),
      body: SingleChildScrollView(
        child: Column(
          children: [
            CalendarAgenda(
              controller: _calendarAgendaControllerAppBar,
              appbar: true,
              selectedDayPosition: SelectedDayPosition.right,
              leading: IconButton(
                icon: Icon(Icons.arrow_back_ios_new, color: Colors.white),
                onPressed: () {},
              ),
              weekDay: WeekDay.long,
              fullCalendarScroll: FullCalendarScroll.horizontal,
              fullCalendarDay: WeekDay.long,
              selectedDateColor: Colors.green.shade900,
              locale: 'id',
              initialDate: DateTime.now(),
              calendarEventColor: Colors.green,
              firstDate: DateTime.now().subtract(Duration(days: 140)),
              lastDate: DateTime.now().add(Duration(days: 60)),
              events: List.generate(
                100,
                (index) => DateTime.now().subtract(Duration(days: index * random.nextInt(5))),
              ),
              onDateSelected: (date) {
                setState(() {
                  _selectedDateAppBBar = date;
                });
              },
              calendarLogo: Image.network(
                'https://www.kindpng.com/picc/m/355-3557482_flutter-logo-png-transparent-png.png',
                scale: 5.0,
              ),
              selectedDayLogo: NetworkImage(
                'https://www.kindpng.com/picc/m/355-3557482_flutter-logo-png-transparent-png.png',
                scale: 15.0,
              ),
            ),
            ElevatedButton(
              onPressed: () {
                _calendarAgendaControllerAppBar.goToDay(DateTime.now());
              },
              child: Text("Today, appbar = true"),
            ),
            Text('Selected date is $_selectedDateAppBBar'),
            SizedBox(height: 20.0),
            CalendarAgenda(
              controller: _calendarAgendaControllerNotAppBar,
              leading: SizedBox(
                width: MediaQuery.of(context).size.width * 0.3,
                child: Text(
                  "Agenda anda hari ini adalah sebagai berikut",
                  style: TextStyle(color: Colors.white),
                  overflow: TextOverflow.ellipsis,
                ),
              ),
              // fullCalendar: false,
              locale: 'en',
              weekDay: WeekDay.long,
              fullCalendarDay: WeekDay.short,
              selectedDateColor: Colors.blue.shade900,
              initialDate: DateTime.now(),
              firstDate: DateTime.now().subtract(Duration(days: 140)),
              lastDate: DateTime.now().add(Duration(days: 4)),
              events: List.generate(
                100,
                (index) => DateTime.now().subtract(Duration(days: index * random.nextInt(5))),
              ),
              onDateSelected: (date) {
                setState(() {
                  _selectedDateNotAppBBar = date;
                });
              },
              calendarLogo: Image.network(
                'https://www.kindpng.com/picc/m/355-3557482_flutter-logo-png-transparent-png.png',
                scale: 5.0,
              ),
            ),
            ElevatedButton(
              onPressed: () {
                _calendarAgendaControllerNotAppBar.goToDay(DateTime.now());
              },
              child: Text("Today, appbar = false (default value)"),
            ),
            Text('Selected date is $_selectedDateNotAppBBar'),
            SizedBox(height: 20.0),
          ],
        ),
      ),
    );
  }
}
更多关于Flutter日程管理插件calendar_agenda的使用的实战教程也可以访问 https://www.itying.com/category-92-b0.html

更多关于Flutter日程管理插件calendar_agenda的使用的实战系列教程也可以访问 https://www.itying.com/category-92-b0.html
在Flutter中,calendar_agenda 是一个用于显示和管理日程的插件。该插件提供了一个可滚动的日历视图,用户可以在其中查看和选择日期,并与日程安排进行交互。以下是如何在Flutter项目中使用 calendar_agenda 插件的步骤:
1. 添加依赖
首先,在你的 pubspec.yaml 文件中添加 calendar_agenda 插件的依赖:
dependencies:
  flutter:
    sdk: flutter
  calendar_agenda: ^0.2.0
然后运行 flutter pub get 来安装依赖。
2. 导入包
在你的 Dart 文件中导入 calendar_agenda 包:
import 'package:calendar_agenda/calendar_agenda.dart';
3. 使用 CalendarAgenda 组件
在 CalendarAgenda 组件中,你可以设置初始日期、选择日期时的回调函数以及其他自定义选项。
class ScheduleScreen extends StatefulWidget {
[@override](/user/override)
_ScheduleScreenState createState() => _ScheduleScreenState();
}
class _ScheduleScreenState extends State<ScheduleScreen> {
CalendarAgendaController _calendarAgendaControllerAppBar =
CalendarAgendaController();
DateTime _selectedDate = DateTime.now();
[@override](/user/override)
Widget build(BuildContext context) {
return Scaffold(
appBar: AppBar(
title: Text('Calendar Agenda'),
),
body: Column(
children: [
CalendarAgenda(
controller: _calendarAgendaControllerAppBar,
appbar: false,
selectedDayPosition: SelectedDayPosition.center,
leading: IconButton(
icon: Icon(Icons.arrow_back_ios),
onPressed: () {},
),
trailing: IconButton(
icon: Icon(Icons.arrow_forward_ios),
onPressed: () {},
),
weekDay: WeekDay.short,
initialDate: DateTime.now(),
firstDate: DateTime.now().subtract(Duration(days: 140)),
lastDate: DateTime.now().add(Duration(days: 60)),
onDateSelected: (date) {
setState(() {
_selectedDate = date;
});
},
calendarStyle: CalendarStyle(
selectedColor: Colors.blue,
),
calendarEventColor: Colors.red,
backgroundColor: Colors.white,
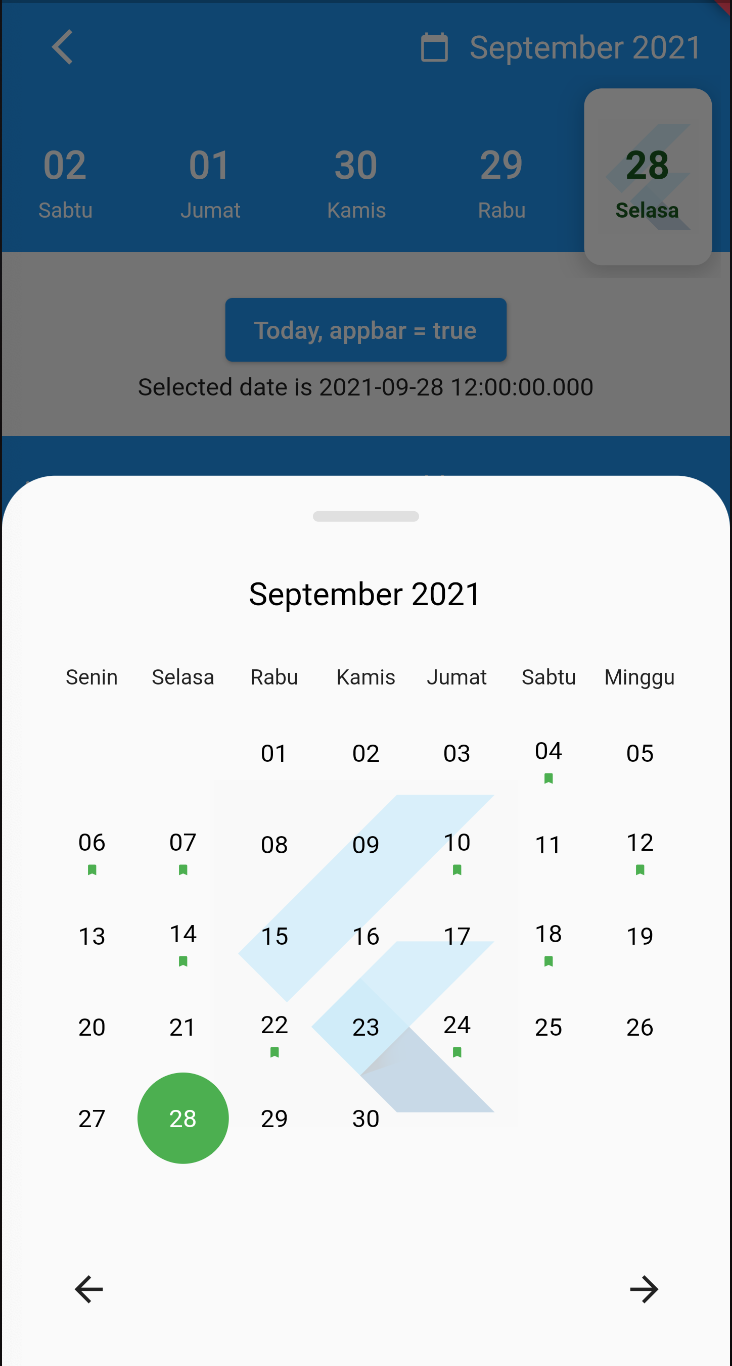
fullCalendar: false,
),
Expanded(
child: Center(
child: Text(
'Selected Date: ${_selectedDate.toString()}',
style: TextStyle(fontSize: 20),
),
),
),
],
),
);
}
}
4. 运行项目
运行你的 Flutter 项目,你将看到一个带有可滚动日历的界面。用户可以选择日期,并在 onDateSelected 回调中处理选中的日期。
5. 自定义选项
CalendarAgenda 提供了许多自定义选项,例如:
appbar: 是否显示 AppBar。selectedDayPosition: 选中日期的位置。leading和trailing: 添加前导和尾部按钮。weekDay: 星期的显示格式。initialDate: 初始日期。firstDate和lastDate: 可选择的日期范围。calendarStyle: 自定义日历的样式。calendarEventColor: 日历事件的显示颜色。backgroundColor: 背景颜色。fullCalendar: 是否展开完整的日历。
6. 处理日期选择
在 onDateSelected 回调中,你可以处理用户选择的日期,并更新 UI 或执行其他操作。
onDateSelected: (date) {
  setState(() {
    _selectedDate = date;
  });
  // 执行其他操作,例如加载该日期的日程安排
},
7. 控制日历
你可以使用 CalendarAgendaController 来控制日历的行为,例如滚动到特定日期。
_calendarAgendaControllerAppBar.setSelectedDate(DateTime(2023, 10, 15));
8. 处理事件标记
你可以通过 CalendarEvent 类来标记特定日期的事件,并在日历中显示。
CalendarEvent event = CalendarEvent(date: DateTime(2023, 10, 15), eventTitle: 'Meeting');

CalendarAgenda(
  events: [event],
  // 其他属性
);
9. 自定义事件显示
你可以在 CalendarAgenda 中使用 eventBuilder 自定义事件的显示方式。
eventBuilder: (date, events) {
  return Center(
    child: Text(
      events.isNotEmpty ? events.first.eventTitle : '',
      style: TextStyle(color: Colors.white),
    ),
  );
},
10. 完整的示例
以下是一个完整的示例,展示了如何使用 calendar_agenda 插件:
import 'package:flutter/material.dart';
import 'package:calendar_agenda/calendar_agenda.dart';

void main() {
  runApp(MyApp());
}

class MyApp extends StatelessWidget {
  [@override](/user/override)
  Widget build(BuildContext context) {
    return MaterialApp(
      title: 'Calendar Agenda Demo',
      theme: ThemeData(
        primarySwatch: Colors.blue,
      ),
      home: ScheduleScreen(),
    );
  }
}

class ScheduleScreen extends StatefulWidget {
  [@override](/user/override)
  _ScheduleScreenState createState() => _ScheduleScreenState();
}

class _ScheduleScreenState extends State<ScheduleScreen> {
  CalendarAgendaController _calendarAgendaControllerAppBar =
      CalendarAgendaController();
  DateTime _selectedDate = DateTime.now();

  [@override](/user/override)
  Widget build(BuildContext context) {
    return Scaffold(
      appBar: AppBar(
        title: Text('Calendar Agenda'),
      ),
      body: Column(
        children: [
          CalendarAgenda(
            controller: _calendarAgendaControllerAppBar,
            appbar: false,
            selectedDayPosition: SelectedDayPosition.center,
            leading: IconButton(
              icon: Icon(Icons.arrow_back_ios),
              onPressed: () {},
            ),
            trailing: IconButton(
              icon: Icon(Icons.arrow_forward_ios),
              onPressed: () {},
            ),
            weekDay: WeekDay.short,
            initialDate: DateTime.now(),
            firstDate: DateTime.now().subtract(Duration(days: 140)),
            lastDate: DateTime.now().add(Duration(days: 60)),
            onDateSelected: (date) {
              setState(() {
                _selectedDate = date;
              });
            },
            calendarStyle: CalendarStyle(
              selectedColor: Colors.blue,
            ),
            calendarEventColor: Colors.red,
            backgroundColor: Colors.white,
            fullCalendar: false,
          ),
          Expanded(
            child: Center(
              child: Text(
                'Selected Date: ${_selectedDate.toString()}',
                style: TextStyle(fontSize: 20),
              ),
            ),
          ),
        ],
      ),
    );
  }
}