Flutter原生UI组件库插件nativebase_flutter的使用
Flutter原生UI组件库插件nativebase_flutter的使用

NativeBase + Flutter = 💙
NativeBase 是一个基于React和React Native的设计系统和通用组件库。NativeBase在React和React Native社区中获得了广泛的认可。我们GeekyAnts正在尝试将这一设计系统引入到Flutter中。因此,我们发布了alpha版本的Flutter插件,邀请Flutter开发者尝试此包以构建UI。
NativeBase设计系统建立在Material设计系统之上,并采用基于令牌的UI开发方式。
此alpha版本包含最少的NativeBase小部件:
原始小部件
复合小部件
安装指南
在你的pubspec.yaml文件中添加以下依赖项:
nativebase_flutter: 0.1.0-alpha.0
然后在你的main.dart文件中导入该包:
import 'package:nativebase_flutter/nativebase_flutter.dart';
接着,在Widget树中注入NativeBaseProvider:
// 这个widget是应用的根节点。
[@override](/user/override)
Widget build(BuildContext context) {
  return MaterialApp(
    title: 'Flutter Demo',
    home: NativeBaseProvider(
      theme: appTheme,
      child: const NativeBaseExample(),
    ),
  );
}
注意:为了正确解析主题中的令牌,必须将NativeBaseProvider放置在Widget树的顶层。
你也可以通过NativeBaseProvider类的of方法访问NativeBase Tokens:
NativeBaseProvider.of(context).component.heading.md.fontSize;
NativeBaseProvider.of(context).component.heading.md.letterSpacing;
上述代码片段将返回Heading组件的md大小下的fontSize和letterSpacing值。
注意:NativeBase令牌解析引擎会从主题中解析令牌。
NativeBase设计系统Figma工具包

NativeBase组件库提供了模块化且可访问的组件,使设计师和开发者更容易在他们的React和React Native应用程序中设计和构建所有组件。
使用NativeBase构建

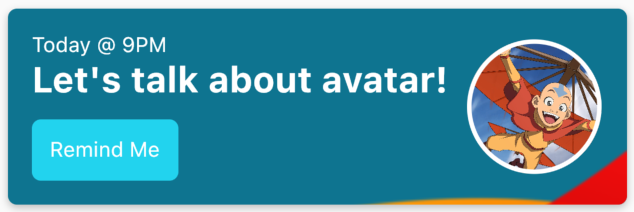
代码示例
Widget card() {
  var img = 'https://tinyurl.com/4e7fty6f';
  return NBCard(
    m: '2',
    bgImage: img,
    color: 'cyan.700',
    child: Row(
      children: [
        Column(
          crossAxisAlignment: CrossAxisAlignment.start,
          mainAxisSize: MainAxisSize.min,
          children: [
            Row(
              children: const [
                Box(
                  child: NBText(
                    text: "Today @ 9PM",
                    color: 'white',
                  ),
                ),
              ],
            ),
            const Heading(
              text: "Let's talk about avatar!",
              color: 'white',
            ),
            const Box(
              alignment: 'center',
              mt: '3',
              color: 'cyan.400',
              p: '3',
              borderRadius: '6',
              child: NBText(
                text: "Remind Me",
                textTransform: 'capital',
                color: 'white',
              ),
            ),
          ],
        ),
        Box(
          ml: '3',
          h: '90',
          w: '90',
          p: '10',
          borderWidth: '3',
          borderColor: 'white',
          bgImage: 'https://tinyurl.com/2vfrtp7d',
          borderRadius: 'full',
        ),
      ],
    ),
  );
}
完整示例代码
import 'package:flutter/material.dart';
import 'package:nativebase_flutter/nativebase_flutter.dart';

void main() {
  runApp(const MyApp());
}

class MyApp extends StatelessWidget {
  const MyApp({super.key});

  [@override](/user/override)
  Widget build(BuildContext context) {
    return MaterialApp(
      title: 'Flutter Demo',
      home: NativeBaseProvider(
        theme: appTheme,
        child: const NativeBaseExample(),
      ),
    );
  }
}

class NativeBaseExample extends StatefulWidget {
  const NativeBaseExample({super.key});

  [@override](/user/override)
  State<NativeBaseExample> createState() => _NativeBaseExampleState();
}

class _NativeBaseExampleState extends State<NativeBaseExample> {
  Widget card() {
    NativeBaseProvider.of(context).component.heading.md.letterSpacing;
    var img = 'https://tinyurl.com/4e7fty6f';
    return NBCard(
      m: '2',
      bgImage: img,
      color: 'cyan.700',
      child: Row(
        children: [
          Column(
            crossAxisAlignment: CrossAxisAlignment.start,
            mainAxisSize: MainAxisSize.min,
            children: [
              Row(
                children: const [
                  Box(
                    child: NBText(
                      text: "Today @ 9PM",
                      color: 'white',
                    ),
                  ),
                ],
              ),
              const Heading(
                text: "Let's talk about avatar!",
                color: 'white',
              ),
              const Box(
                alignment: 'center',
                mt: '3',
                color: 'cyan.400',
                p: '3',
                borderRadius: '6',
                child: NBText(
                  text: "Remind Me",
                  textTransform: 'capital',
                  color: 'white',
                ),
              ),
            ],
          ),
          const Box(
            ml: '3',
            h: '90',
            w: '90',
            p: '10',
            borderWidth: '3',
            borderColor: 'white',
            bgImage: 'https://tinyurl.com/2vfrtp7d',
            borderRadius: 'full',
          ),
        ],
      ),
    );
  }

  [@override](/user/override)
  Widget build(BuildContext context) {
    return Scaffold(
      body: Center(
        child: Column(
          mainAxisAlignment: MainAxisAlignment.center,
          children: const [
            NBCard(
              shadow: '1',
              child: NBText(
                text: "This Card looks awesome",
              ),
            )
          ],
        ),
      ),
    );
  }
}
更多关于Flutter原生UI组件库插件nativebase_flutter的使用的实战教程也可以访问 https://www.itying.com/category-92-b0.html
更多关于Flutter原生UI组件库插件nativebase_flutter的使用的实战系列教程也可以访问 https://www.itying.com/category-92-b0.html
NativeBase 是一个流行的 React Native UI 组件库,但如果你在 Flutter 中开发,你可以使用 nativebase_flutter 插件来使用类似的组件。nativebase_flutter 提供了许多预先设计好的 UI 组件,可以帮助你快速构建美观的应用程序。
以下是如何在 Flutter 项目中使用 nativebase_flutter 插件的步骤:
1. 添加依赖
首先,你需要在 pubspec.yaml 文件中添加 nativebase_flutter 依赖:
dependencies:
  flutter:
    sdk: flutter
  nativebase_flutter: ^1.0.0  # 请使用最新版本
然后运行 flutter pub get 来获取依赖。
2. 导入包
在你的 Dart 文件中导入 nativebase_flutter 包:
import 'package:nativebase_flutter/nativebase_flutter.dart';
3. 使用组件
nativebase_flutter 提供了许多常用的 UI 组件,例如 Button、Text、Container、Input 等。你可以在你的 Flutter 应用中使用这些组件。
以下是一个简单的示例,展示了如何使用 NativeBase 的 Button 和 Text 组件:
import 'package:flutter/material.dart';
import 'package:nativebase_flutter/nativebase_flutter.dart';

void main() {
  runApp(MyApp());
}

class MyApp extends StatelessWidget {
  [@override](/user/override)
  Widget build(BuildContext context) {
    return MaterialApp(
      home: Scaffold(
        appBar: AppBar(
          title: Text('NativeBase Flutter Example'),
        ),
        body: Center(
          child: Column(
            mainAxisAlignment: MainAxisAlignment.center,
            children: <Widget>[
              NativeText(
                'Hello, NativeBase!',
                style: TextStyle(fontSize: 24),
              ),
              SizedBox(height: 20),
              NativeButton(
                onPressed: () {
                  print('Button Pressed!');
                },
                child: NativeText('Click Me'),
              ),
            ],
          ),
        ),
      ),
    );
  }
}
4. 自定义主题
nativebase_flutter 允许你自定义主题以适应你的应用程序设计。你可以通过 NativeBaseTheme 来设置全局主题。
import 'package:flutter/material.dart';
import 'package:nativebase_flutter/nativebase_flutter.dart';

void main() {
  runApp(MyApp());
}

class MyApp extends StatelessWidget {
  [@override](/user/override)
  Widget build(BuildContext context) {
    return MaterialApp(
      theme: NativeBaseTheme(
        primaryColor: Colors.blue,
        accentColor: Colors.orange,
      ),
      home: Scaffold(
        appBar: AppBar(
          title: Text('NativeBase Flutter Example'),
        ),
        body: Center(
          child: NativeButton(
            onPressed: () {
              print('Button Pressed!');
            },
            child: NativeText('Click Me'),
          ),
        ),
      ),
    );
  }
}


