HarmonyOS鸿蒙Next中【快应用】画布生成图片分辨率计算
HarmonyOS鸿蒙Next中【快应用】画布生成图片分辨率计算 【现象描述】
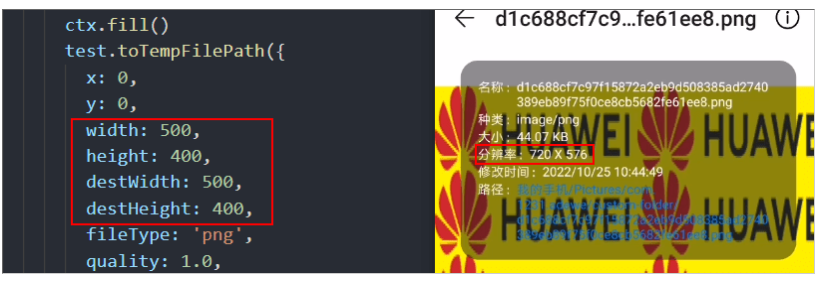
使用toTempFilePath()把当前画布指定区域的内容导出生成指定大小的图片,最终保存到手机上的分辨率和设置的destWidth(输出的图片的宽度)、destHeight(输出的图片的高度)不一致的问题。
如图:

【计算方法】
通过device.getInfo获取windowWidth、windowHeight、windowLogicWidth、windowLogicHeight。
公式为: (1)输出的图片的宽度:windowWidthdestWidth/ windowLogicWidth (2)输出的图片的高度:windowHeight destHeight/ windowLogicHeight
以上图demo为例:

即: 输出的图片的宽度:1080500/750=720 输出的图片的高度:1995400/1385=576
Demo如下:
<template>
  <!-- There can only be one root node in the template -->
  <div class="container">
    <text class="text">{{message}}</text>
    <image src="../../Common/logo.png" id="image" style="margin-top: 20px"></image>
    <canvas id="1Canvas" style="background-color: #FFFF00; margin-top: 20px" onlongtap="longtapfun" ontouchmove="touchmove" ontouchstart="touchstart"></canvas>
    <input class="buttons" type="button" onclick="click1" value="drawfillStyleforColor">
    <image src="{{imageSrc}}" id="image2" style="margin-top: 20px"></image>
  </div>
</template>

<style>
  .container {
    flex-direction: column;
    justify-content: center;
    align-content: center;
    align-items: center;
  }
  .title {
    font-size: 100px;
  }
  #1Canvas {
    width: 500px;
    height: 200px;
  }
  .text {
    font-size: 50px;
    color: #0000ff;
    border: 1px;
  }
</style>

<script>
  import media from '@system.media';
  import device from '@system.device'
  module.exports = {
    data: {
      title: 'World',
      message: '',
      testparams: '2',
      imageSrc: ''
    },
    onInit() {
      this.$page.setTitleBar({
        text: 'Canvas',
        textColor: '#ffffff',
        backgroundColor: '#007DFF',
        backgroundOpacity: 0.5
      })
      this.getInfo();
    },
    touchstart: function(e) {
      console.log('yyyy' + 'bindtouchstart' + 'e.changedTouches.length =' + e.changedTouches.length)
    },
    touchmove: function(e) {
      console.log('yyyy' + 'bindtouchmove' + ' e.changedTouches.length =' + e.changedTouches.length + e.changedTouches[0].identifier)
    },
    // 获取设备信息
    getInfo() {
      device.getInfo({
        success: function (ret) {
          console.log("handling success:", JSON.stringify(ret));
        },
        fail: function (erromsg, errocode) {
          console.log("message:", erromsg, errocode);
        }
      })
    },
    click1: function () {
      this.message = 'drawfillStyleforColor'
      var test = this.$element('1Canvas')
      var ctx = test.getContext('2d')
      console.log('ctx.fillStyle 555  >> ' + ctx.fillStyle)
      var img = new Image()
      img.src = 'https://developer.huawei.com/dev_index/img/logo_ch.png'
      img.onload = () => {
        console.log('Image load success.')
        var pat = ctx.createPattern(img, 'repeat')
        ctx.rect(0, 0, 500, 200)
        ctx.fillStyle = pat
        console.log('ctx.fillStyle 666  >> ' + ctx.fillStyle)
        ctx.fill()
        test.toTempFilePath({
          x: 0,
          y: 0,
          width: 500,
          height: 400,
          destWidth: 500,
          destHeight: 400,
          fileType: 'png',
          quality: 1.0,
          success: (data) => {
            this.imageSrc = data.uri
            console.log(`Canvas toTempFilePath success ${data.uri}`)
            console.log(`Canvas toTempFilePath success ${data.tempFilePath}`)
          },
          fail: (data) => {
            console.log('Canvas toTempFilePath data =' + data)
          },
          complete: () => {
            console.log('Canvas toTempFilePath complete.')
          }
        })
      }
      img.onerror = function () {
        console.log('Image load fail.')
      }
      media.saveToPhotosAlbum({
        uri: this.imageSrc,
        folderName: 'custom-folder',
        success: function (data) { console.log("save success: "); },
        fail: function (data, code) {
          console.log("handling fail, code=" + code);
        }
      })
    },
    saveToPhotosAlbum() {},
    errorfun: function () {
      console.log('canvas onerror')
    },
    longtapfun: function () {
      console.log('canvas longtap')
    }
  }
</script>
更多关于HarmonyOS鸿蒙Next中【快应用】画布生成图片分辨率计算的实战教程也可以访问 https://www.itying.com/category-93-b0.html
更多关于HarmonyOS鸿蒙Next中【快应用】画布生成图片分辨率计算的实战系列教程也可以访问 https://www.itying.com/category-93-b0.html
在HarmonyOS鸿蒙Next中,快应用画布生成图片的分辨率计算主要取决于画布的宽度和高度。画布的宽度和高度可以通过Canvas组件的width和height属性进行设置。生成的图片分辨率即为画布的宽度乘以高度。例如,如果画布宽度为800像素,高度为600像素,那么生成的图片分辨率为800x600像素。开发者可以根据实际需求调整画布尺寸,以获得所需分辨率的图片。


