HarmonyOS鸿蒙Next ArkUI 文本展示系列:通过属性字符串设置Text样式、交互行为
HarmonyOS鸿蒙Next ArkUI 文本展示系列:通过属性字符串设置Text样式、交互行为 在“属性字符串简介,认识属性字符串”这一章中,介绍了属性字符串的能力范围和使用范式。这一章展开介绍属性字符串的各种能力。
一、设置字符样式
Text自身设置字符样式的能力,属性字符串都能覆盖。字符样式包括:字体样式、装饰线、基线偏移量、字符间距、行高、背景色,通过不同的StyledStringValue,属性字符串都可以达成对应效果,还可以通过TextStyle实现属性字符串的文本描边。
| 样式 | StyledStringValue |
|---|---|
| 字体样式 | TextStyle |
| 装饰线 | DecorationStyle |
| 基线偏移量 | BaselineOffsetStyle |
| 字符间距 | LetterSpacingStyle |
| 阴影 | TextShadowStyle |
| 行高 | LineHeightStyle |
| 超链接样式 | UrlStyle |
| 背景色 | BackgroundColorStyle |
1.1、StyledStringValue的最小粒度是styledKey
同一个字符设置相同的styledKey,只能有一个生效,最后设置的styledKey会把前面的设置的覆盖掉。
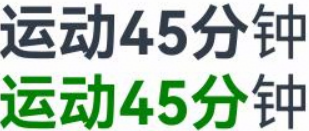
这里用两个StyledString举例,第一个StyledString在相同的位置设置了两次StyledStringKey.FONT,第二个StyledString只设置一次StyledStringKey.FONT,包含了fontColor和fontWeight。
示例代码 1 StyledStringValue的最小粒度是styledKey
@Entry
@Component
struct demo {
  controller1: TextController = new TextController()
  controller3: TextController = new TextController()
  textStyleAttrsFont1: TextStyle =
    new TextStyle({ fontColor: Color.Green, }); // TextStyle只设置颜色
  textStyleAttrsFont2: TextStyle =
    new TextStyle({ fontWeight: FontWeight.Bold, }); // TextStyle只设置字重
  textStyleAttrsFont3: TextStyle =
    new TextStyle({ fontColor: Color.Green, fontWeight: FontWeight.Bold, }); // TextStyle同时设置颜色和字重
  spanStyle1: SpanStyle = {
    start: 0,
    length: 5,
    styledKey: StyledStringKey.FONT,
    styledValue: this.textStyleAttrsFont1
  };
  spanStyle2: SpanStyle = {
    start: 0,
    length: 5,
    styledKey: StyledStringKey.FONT,
    styledValue: this.textStyleAttrsFont2
  };
  spanStyle3: SpanStyle = {
    start: 0,
    length: 5,
    styledKey: StyledStringKey.FONT,
    styledValue: this.textStyleAttrsFont3
  };
  arrayStyled1: Array<StyleOptions> = [this.spanStyle1, this.spanStyle2] // 设置了两个TextStyle,碰巧都在第0~5个字符上
  styledString1: StyledString = new StyledString("运动45分钟", this.arrayStyled1);
  arrayStyled3: Array<StyleOptions> = [this.spanStyle3]
  styledString3: StyledString = new StyledString("运动45分钟", this.arrayStyled3);

  onPageShow(): void {
    this.controller1.setStyledString(this.styledString1) // 只有第二个TextStyle的字重生效了
    this.controller3.setStyledString(this.styledString3)
  }

  build() {
    Column() {
      Text(undefined, { controller: this.controller1 })
      Text(undefined, { controller: this.controller3 })
    }
  }
}
效果如下

1.2、属性字符串样式与Text样式冲突时,以属性字符串样式为准
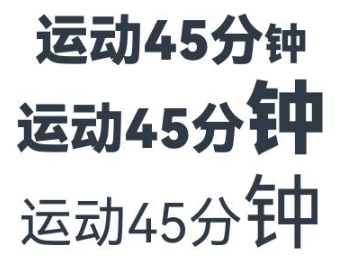
这里的冲突,指Text的属性的一个具体样式和某个StyledStringValue中具体的属性不一样。比如Text.font接口,包含{size,weight,family,style},属性字符串的TextStyle也可以设置fontSize、fontWeight、fontFamily、fontStyle。当Text.font({size})和TextStyle({fontSize})和不一样时,属性字符串生效的区间以TextStyle为准,属性字符串不生效的区间就是Text设置的字号。
下面以Text.size,Text.font和TextStyle为例,说明属性字符串的样式会覆盖Text样式。
示例代码 2 以Text.size,Text.font和TextStyle为例,说明属性字符串的样式会覆盖Text样式
import { LengthMetrics } from '@kit.ArkUI';

@Entry
@Component
struct demo {
  controller1: TextController = new TextController()
  controller2: TextController = new TextController()
  controller3: TextController = new TextController()
  textStyleAttrsFont1: TextStyle =
    new TextStyle({ fontSize: LengthMetrics.fp(20), }); // TextStyle设置字号是20fp,默认情况下是16fp
  textStyleAttrsFont2: TextStyle =
    new TextStyle({ fontSize: LengthMetrics.fp(20), });
  textStyleAttrsFont3: TextStyle =
    new TextStyle({ fontSize: LengthMetrics.fp(20), });
  spanStyle1: SpanStyle = {
    start: 0,
    length: 5,
    styledKey: StyledStringKey.FONT,
    styledValue: this.textStyleAttrsFont1
  };
  spanStyle2: SpanStyle = {
    start: 0,
    length: 5,
    styledKey: StyledStringKey.FONT,
    styledValue: this.textStyleAttrsFont2
  };
  spanStyle3: SpanStyle = {
    start: 0,
    length: 5,
    styledKey: StyledStringKey.FONT,
    styledValue: this.textStyleAttrsFont3
  };
  arrayStyled1: Array<StyleOptions> = [this.spanStyle1]
  styledString1: StyledString = new StyledString("运动45分钟", this.arrayStyled1);
  arrayStyled2: Array<StyleOptions> = [this.spanStyle2]
  styledString2: StyledString = new StyledString("运动45分钟", this.arrayStyled2);
  arrayStyled3: Array<StyleOptions> = [this.spanStyle3]
  styledString3: StyledString = new StyledString("运动45分钟", this.arrayStyled3);

  onPageShow(): void {
    this.controller1.setStyledString(this.styledString1)
    this.controller2.setStyledString(this.styledString2)
    this.controller3.setStyledString(this.styledString3) // fontSize和fontSize冲突
  }

  build() {
    Column() {
      Text(undefined, { controller: this.controller1 })
        .font({ weight: FontWeight.Bolder }) // TextStyle的fontSize 和 Text.font({weight}) 不冲突
      Text(undefined, { controller: this.controller2 })
        .font({ weight: FontWeight.Bolder, size: 30 })
      // TextStyle的fontSize 和 Text.font({size})冲突,TextStyle的fontSize和Text.font({weight})不冲突
      Text(undefined, { controller: this.controller3 })
        .fontSize(30) // TextStyle的fontSize 和 Text.fontSize 冲突
    }
    .padding(10)
  }
}
效果如下

二、设置段落样式
段落样式 只对应 ParagraphStyle
段落之间以 \n 分割,将ParagraphStyle附加到段落开头、末尾或之间的任何位置,均会应用样式,非段落区间内则不会应用样式。 给同一个段落设置多个样式,则只有第一个设置的样式会生效。
段落的demo参考设置段落样式
三、插入图片
属性字符串可以通过ImageAttachMent插入图片,轻松完成图文混排。
需要注意:
1、如果在同一个位置插入多个图片,这些图片之间是覆盖关系,只显示插入的最后一张图片。
2、如果在constructor中直接把ImageAttachMent、CustomSpan作为入参,此时constructor的styles设置的样式不生效。需要在构造之后,通过setStyle等方法添加styles指定样式,才能显示效果。
3.1 如何给ImageAttachMent设置styles
3.1.1 错误写法
下面这个demo,展示了ImageAttachMent对应styles不生效的例子
@Entry
@Component
struct demo {
  controller: TextController = new TextController()
  image: ImageAttachment = new ImageAttachment({
    resourceValue: $r('app.media.startIcon'),
    size: { width: 50, height: 50 },
  })
  spanStyle: SpanStyle = {
    start: 0,
    length: 1,
    styledKey: StyledStringKey.GESTURE,
    styledValue: new GestureStyle({
      onClick: () => {
        this.getUIContext().getPromptAction().showToast({ message: 'clickGestureAttr object trigger click event' });
      }
    })
  };
  arrayList: Array<StyleOptions> = [this.spanStyle]
  // ImageAttachMent对应styles不生效
  mutableStyledString: MutableStyledString = new MutableStyledString(this.image, this.arrayList);

  onPageShow(): void {
    this.controller.setStyledString(this.mutableStyledString)
  }

  build() {
    Column() {
      // 点击图片没有弹窗
      Text(undefined, { controller: this.controller })
        .borderWidth(1)
    }.padding(50)
  }
}
3.1.1 正确写法
下面是是styles有效的做法,点击图片会出现弹窗。
@Entry
@Component
struct demo {
  controller: TextController = new TextController()
  image: ImageAttachment = new ImageAttachment({
    resourceValue: $r('app.media.startIcon'),
    size: { width: 50, height: 50 },
  })
  spanStyle: SpanStyle = {
    start: 0,
    length: 1,
    styledKey: StyledStringKey.GESTURE,
    styledValue: new GestureStyle({
      onClick: () => {
        this.getUIContext().getPromptAction().showToast({ message: 'clickGestureAttr object trigger click event' });
      }
    })
  };
  arrayList: Array<StyleOptions> = [this.spanStyle]
  mutableStyledString: MutableStyledString = new MutableStyledString(this.image);

  onPageShow(): void {
    // 通过setStyle方法,给图片添加样式
    this.mutableStyledString.setStyle(this.spanStyle)
    this.controller.setStyledString(this.mutableStyledString)
  }

  build() {
    Column() {
      // 点击图片出现弹窗
      Text(undefined, { controller: this.controller })
        .borderWidth(1)
    }.padding(50)
  }
}
更多关于HarmonyOS鸿蒙Next ArkUI 文本展示系列:通过属性字符串设置Text样式、交互行为的实战教程也可以访问 https://www.itying.com/category-93-b0.html


