


HarmonyOS鸿蒙Next应用开发中类似点9图的处理(draw9patch)
HarmonyOS鸿蒙Next应用开发中类似点9图的处理(draw9patch)
鸿蒙应用开发中类似点9图的处理(draw9patch)

Image组件提供与点九图相同功能的API设置,通过设置resizable属性来配置ResizableOptions,即图像拉伸时的大小调整选项。ResizableOptions的参数slice包含top、left、bottom和right四个属性,分别表示图片在上下左右四个方向拉伸时保持不变的距离。
@Entry
@Component
struct NineMapPrinciple {
  build() {
    Row() {
      Image($r('app.media.startIcon'))
        .resizable({ slice: { top: 10, left: 10, bottom: 50, right: 50 } })
    }
    .height('50%')
  }
}
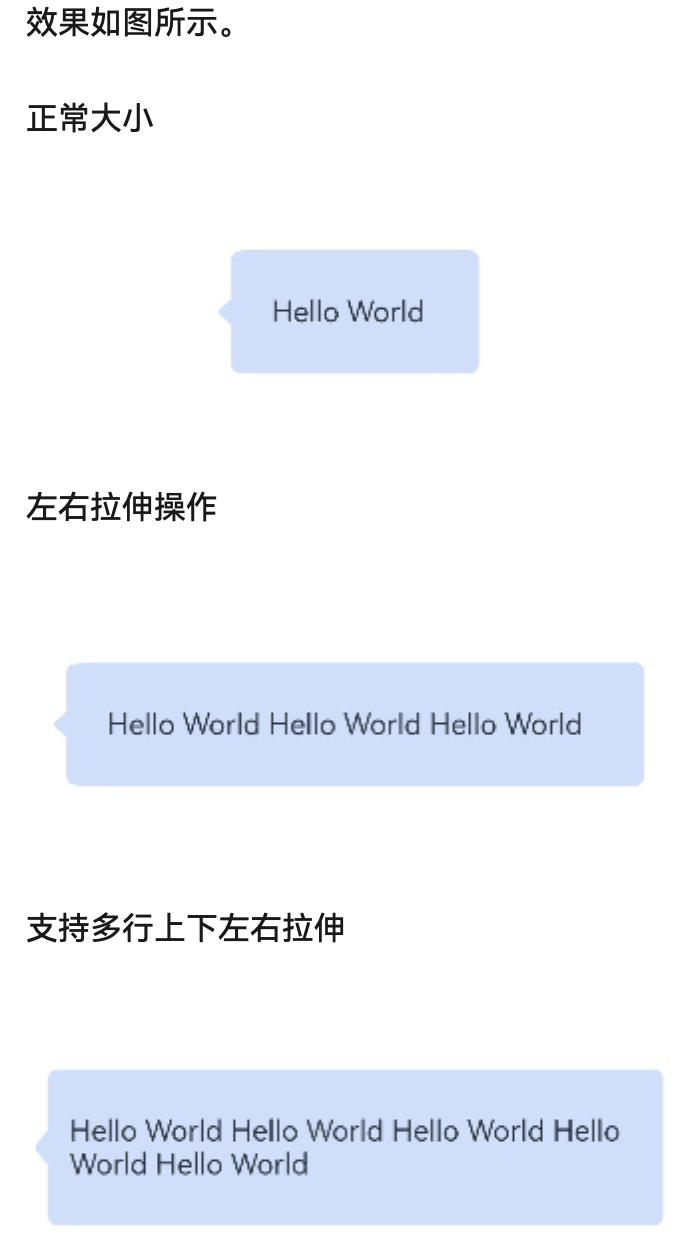
点九图的常见用法是实现聊天气泡的拉伸效果,参考代码如下:
@Entry
@Component
struct ChatBubbleStretchDemo {
  @State text: string = 'Hello World Hello World Hello World Hello World';
  @State left: number = 10;
  @State right: number = 10;
  @State top: number = 10;
  @State bottom: number = 10;
  @State line: number = 2;
  @State textSize: SizeOptions = this.getUIContext().getMeasureUtils().measureTextSize({
    textContent: this.text
  });
  build() {
    Column() {
      Stack() {
        Image($r('app.media.lightBluexhdpi'))
          .width(this.getUIContext().px2vp(Number(`${this.textSize.width}`)) < 350 ? 60 + px2vp
          (Number(`${this.textSize.width}`)) : 350)
          .height(this.text.length < 40 ? 50 + px2vp(Number(`${this.textSize.height}`))
            : 50 + (this.getUIContext().px2vp(Number(`${this.textSize.height}`)) * this.line))
          // The reason for using the px unit is that the image itself is a physical pixel, and the segmentation algorithm is executed on the image itself. Therefore, these values are ultimately converted into physical pixel values.
          // Therefore, these divided lines must not exceed the size of the picture itself.
          .resizable({
            slice: {
              top: `${this.top}px`,
              left: `${this.left}px`,
              bottom: `${this.bottom}px`,
              right: `${this.right}px`
            }
          })
        Text(this.text)
      }
      .width(350)
      .height(200)
    }
    .height('100%')
    .width('100%')
  }
}
更多关于HarmonyOS鸿蒙Next应用开发中类似点9图的处理(draw9patch)的实战系列教程也可以访问 https://www.itying.com/category-93-b0.html

一、结论
首先在鸿蒙中是不支持安卓 .9图的图片直接使用。只有类似拉伸的处理方案,鸿蒙提供的Image组件有与点九图相同功能的API设置。
可以通过设置resizable属性来设置ResizableOptions,也就是图像拉伸时可调整大小的图像选项。ResizableOptions的参数slice中有top、left、bottom和right四个属性,分别代表图片上下左右四个方向拉伸时保持不变距离。
二、代码实现和详细解释
在 ArkUI 的resizable属性的slice参数通过设置四个方向的切割边距,将图片划分为 9 个区域进行拉伸或缩放:
import { MeasureText } from '@kit.ArkUI'

@Entry
@Component
struct D9Page {

  @State text: string = 'Hello World Hello World Hello World Hello World Hello World Hello World Hello World Hello World Hello World Hello Hello World Hello World Hello World Hello World Hello World Hello World Hello World Hello World Hello World Hello World Hello World Hello World Hello World Hello World Hello World Hello World Hello World Hello World Hello World Hello World';
  @State left: number = 10;
  @State right: number = 10;
  @State top: number = 10;
  @State bottom: number = 10;
  @State line: number = 2;
  @State textSize: SizeOptions = MeasureText.measureTextSize({
    textContent: this.text,
    fontSize: px2fp(52)
  });

  build() {
    Column() {
      Stack() {
        Image($r("app.media.icon_qipao"))

          .width(px2vp(Number(`${this.textSize.width}`)) < 350 ? 60 + px2vp
          (Number(`${this.textSize.width}`)) : 350)
          .height(this.text.length < 40 ? 50 + px2vp(Number(`${this.textSize.height}`))
            : 50 + (px2vp(Number(`${this.textSize.height}`)) * this.line))
          .resizable({
            slice: {
              top: this.top,
              left: this.left,
              bottom: this.bottom,
              right: this.right
            }
          })
        Text(this.text + " " + this.line)
      }
      .width(350)
      .height(200)
    }
    .height('100%')
    .width('100%')
  }

}

在HarmonyOS Next中,类似Android点9图的功能可通过NinePatchDrawable实现。开发者需将PNG图像转换为.9.png格式,并使用工具标记可拉伸区域和内容填充区域。在代码中,通过NinePatchDrawable.createFromStream加载资源,或直接在XML中用<nine-patch>引用。系统会根据标记自动适配不同尺寸,确保UI元素不失真。

在HarmonyOS Next应用开发中,处理类似Android点九图(.9.png)的拉伸需求,核心方案是使用可拉伸像素图(PixelMap) 配合 九宫格(NinePatch)拉伸 技术。
系统提供了 ohos.graphics.image.PixelMap 和相关的 DecodingOptions 来实现这一功能。关键步骤如下:
-
资源准备:将你的可拉伸图像(如带透明区域的PNG)放置在项目的
resources/base/media/目录下。 -
解码与设置拉伸区域:通过
ImageSource创建PixelMap时,使用DecodingOptions指定图像的“九宫格”信息。- 核心属性:
DecodingOptions.ninePatch。这是一个Rect对象,用于定义图像中可拉伸内容的区域。 - Rect参数:
Rect的四个值(left, top, right, bottom)定义了图像中一个矩形区域。这个矩形区域在图像拉伸时会进行缩放,而矩形外的四个边角区域(左上、右上、左下、右下)将保持原始尺寸不变,从而保证边角不变形。
简单示例代码(ArkTS):
import image from '@ohos.multimedia.image'; import common from '@ohos.app.ability.common'; // 1. 获取资源管理器 let context = ... // 获取UIAbilityContext或组件上下文 let resourceManager = context.resourceManager; // 2. 获取图像资源的ArrayBuffer let resource = await resourceManager.getMediaContent($r('app.media.my_stretchable_image').id); let buffer = resource.buffer; // 3. 创建ImageSource let imageSource = image.createImageSource(buffer); // 4. 创建DecodingOptions,并设置九宫格区域 // 例如,对于一个100x100的图片,定义中心50x50的区域为可拉伸区域 let decodingOptions: image.DecodingOptions = { desiredSize: { width: 200, height: 200 }, // 指定目标尺寸,拉伸会发生在此过程中 ninePatch: { left: 25, top: 25, right: 75, bottom: 75 } // 定义可拉伸内容区 }; // 5. 创建已应用九宫格拉伸规则的PixelMap let pixelMap: image.PixelMap = await imageSource.createPixelMap(decodingOptions); // 6. 将PixelMap设置为Image组件或其他支持PixelMap的组件(如Button背景) // 例如,在Image组件中 Image(pixelMap) .width(200) // 最终显示尺寸 .height(200) - 核心属性:
-
应用场景:此方法常用于设置 Button、Panel、Dialog 等组件的可变背景,这些背景需要随内容大小变化而平滑拉伸,同时保持边角(如圆角、阴影)的形态不变。
与Android点九图的区别:
- 无专用文件格式:HarmonyOS Next不依赖
.9.png这种特殊格式。它使用标准的PNG图像,通过代码在解码时动态定义拉伸区域。 - 更灵活的编程控制:拉伸区域 (
Rect) 在运行时通过参数定义,这意味着你可以根据不同的状态或配置动态改变拉伸行为,而无需准备多张图片。
注意事项:
- 确保定义的
ninePatch矩形区域在图像实际像素范围内。 - 此技术适用于需要纯色或简单渐变填充区域的拉伸。对于复杂图案,仍需注意拉伸后的视觉效果。
- 在UI组件的
backgroundImage等属性中,可以直接使用PixelMap对象。
通过上述方法,你可以高效地实现与点九图相同的视觉效果,并利用HarmonyOS的声明式UI框架进行灵活集成。