


HarmonyOS 鸿蒙Next中使用 TextInput 创建动态搜索框
HarmonyOS 鸿蒙Next中使用 TextInput 创建动态搜索框
如何使用 TextInput 快速创建动态搜索框?

如何理解你这个动态搜索框?
TextInput $$双向绑定你设定的值,输入框内容变了,值也变,省掉change事件,算不算动态。
更多关于HarmonyOS 鸿蒙Next中使用 TextInput 创建动态搜索框的实战系列教程也可以访问 https://www.itying.com/category-93-b0.html

实现思路
一、定义状态变量进行用户输入记录
二、布局 TextInput 和清除按钮
三、绑定值与事件,为 TextInput 添加 onChange 回调。当用户输入时,这个回调会被触发,我们可以在回调函数中更新 @State 变量(this.searchText = value)。
四、条件渲染清除按钮,清除按钮只在输入框有内容时才显示。
使用场景
使用的场景特别多,几乎现有的app或者网站都有全局搜索,用于搜索应用内的所有内容。不论是列表过滤、表单过滤、商品过滤 等都适用。
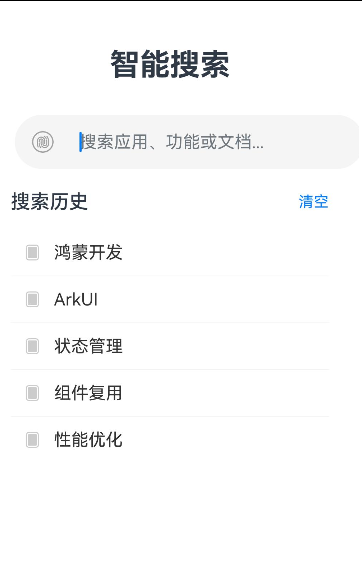
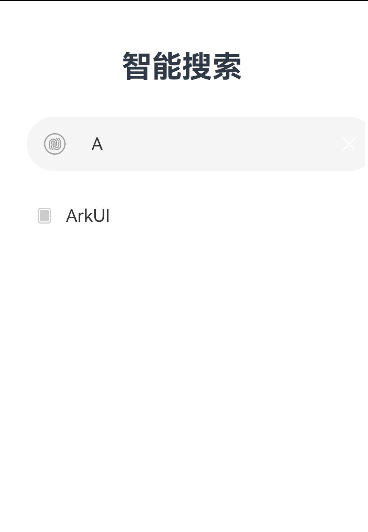
实现效果
完整代码
import promptAction from '@ohos.promptAction';

@Entry
@Component
struct TextInputDemoPage {
  [@State](/user/State) searchText: string = '';
  // 模拟搜索历史数据
  [@State](/user/State) searchHistory: string[] = ['鸿蒙开发', 'ArkUI', '状态管理', '组件复用', '性能优化'];
  [@State](/user/State) filteredHistory: string[] = [];

  // 页面初始化时,显示全部历史
  aboutToAppear() {
    this.filteredHistory = this.searchHistory;
  }

  build() {
    Column() {
      Text('智能搜索')
        .fontSize(28)
        .fontWeight(FontWeight.Bold)
        .margin({ top: 50, bottom: 30 })


      Stack({ alignContent: Alignment.End }) {
        // 输入框容器,用于统一管理样式和背景
        Row() {

          Image($r('sys.media.ohos_user_auth_icon_fingerprint'))
            .width(20)
            .height(20)
            .fillColor('#999999')
            .margin({ left: 16, right: 8 })

          TextInput({ placeholder: '搜索应用、功能或文档...' })
            .width('100%')
            .backgroundColor(Color.Transparent) // 背景由父容器Row提供
            .fontSize(16)
            .fontColor('#333333')
            .caretColor('#007DFF') // 光标颜色
            .onChange((value: string) => {
              this.searchText = value;
              // 4. 实时过滤搜索历史
              if (value) {
                this.filteredHistory = this.searchHistory.filter(item => item.includes(value));
              } else {
                this.filteredHistory = this.searchHistory;
              }
            })
        }
        .width('90%')
        .height(50)
        .backgroundColor('#F5F5F5')
        .borderRadius(25)
        .alignItems(VerticalAlign.Center)

        if (this.searchText) {
          Image($r('sys.media.ohos_ic_public_cancel_filled'))
            .width(18)
            .height(18)
            .fillColor(Color.White)
            .margin({ right: 16 })
              // 使用动画让出现/消失更平滑
            .transition({ type: TransitionType.All, opacity: 1, scale: { x: 1.0, y: 1.0 } })
            .onClick(() => {
              animateTo({ duration: 200 }, () => {
                this.searchText = '';
                this.filteredHistory = this.searchHistory;
              })
            })
        }
      }
      .width('100%')
      .height(50)
      .margin({ bottom: 20 })

      Column() {
        if (!this.searchText) {
          // 无输入时,显示搜索历史标题
          Row() {
            Text('搜索历史')
              .fontSize(18)
              .fontWeight(FontWeight.Medium)
            Blank()
            Text('清空')
              .fontSize(14)
              .fontColor('#007DFF')
              .onClick(() => {
                this.searchHistory = [];
                this.filteredHistory = [];
                promptAction.showToast({ message: '历史已清空' });
              })
          }
          .width('90%')
          .alignItems(VerticalAlign.Center)
          .margin({ bottom: 15 })
        }

        // 显示过滤后的历史记录或搜索结果
        List() {
          ForEach(this.filteredHistory, (item: string) => {
            ListItem() {
              Row() {
                Image($r('sys.media.ohos_ic_window_menu_waterfall'))
                  .width(16)
                  .height(16)
                  .fillColor('#CCCCCC')
                  .margin({ right: 12 })
                Text(item)
                  .fontSize(16)
                  .fontColor('#333333')
              }
              .width('100%')
              .padding(12)
              .onClick(() => {
                promptAction.showToast({ message: `搜索: ${item}` });
              })
            }
          })
        }
        .width('90%')
        .listDirection(Axis.Vertical)
        .divider({ strokeWidth: 0.5, color: '#F0F0F0' }) // 分割线
        .layoutWeight(1)
      }
      .width('100%')
      .layoutWeight(1)
      .padding({ left: 16, right: 16 })
    }
    .width('100%')
    .height('100%')
    .justifyContent(FlexAlign.Start)
    .backgroundColor('#FFFFFF')
  }
}

在HarmonyOS Next中,使用TextInput组件创建动态搜索框,主要涉及TextInput的属性和事件绑定。通过设置onChange事件监听输入内容变化,实时更新搜索关键词。结合@State装饰器管理输入框的状态,实现动态响应。可以搭配Search组件或自定义布局优化搜索框样式。

在HarmonyOS Next中,使用TextInput组件创建动态搜索框的核心在于监听输入内容变化并实时处理数据。以下是实现步骤和关键代码:
- 基础布局:使用
TextInput作为搜索输入框,通常配合搜索图标。
TextInput({ placeholder: '请输入关键词' })
  .onChange((value: string) => {
    // 触发搜索逻辑
    this.searchText = value;
  })
- 动态搜索实现:通过
@State装饰器绑定输入值,利用onChange回调触发过滤函数。
@State searchText: string = '';
private sourceData: string[] = []; // 原始数据

build() {
  TextInput({ text: this.searchText })
    .onChange((value: string) => {
      this.searchText = value;
      this.performSearch();
    })
}

performSearch() {
  // 过滤数据逻辑
  const filtered = this.sourceData.filter(item =>
    item.includes(this.searchText)
  );
}
-
性能优化:对于高频输入,建议添加防抖处理(如使用
setTimeout或工具函数控制触发频率)。 -
完整示例:可结合
List组件展示实时搜索结果,通过@State驱动UI更新。
注意:动态搜索需根据实际场景调整过滤算法,大数据量建议在后台线程处理。