


Golang中提升2位数字验证码OCR识别准确率的技巧
Golang中提升2位数字验证码OCR识别准确率的技巧 大家好,Go 社区的朋友们,
我正在开发一个需要通过简单验证码(CAPTCHA)验证系统的机器人。该系统每 15 分钟会显示一张包含两位数字的图片,我需要捕获并正确输入这个数字。
我使用 Go 语言截取屏幕上显示验证码的特定区域,然后应用 OCR(光学字符识别)库来提取数字。然而,OCR 的结果并不稳定:
- 有时只检测到一个数字,
- 有时数字被误读,
- 有时甚至完全识别不出任何文本。 尽管不要求 100% 准确,但我还是希望尽可能提升 OCR 的性能。
为了解决这个问题,我也咨询了 AI 助手,获取了一些关于图像预处理和 OCR 最佳实践的建议,但我更希望能从有实际经验的 Go 开发者那里得到更多实用的建议。
我的问题:
- 在将图像送入 OCR 引擎之前,有哪些最佳实践可以预处理图像以提高识别准确率?(例如:二值化、去噪、调整大小、阈值处理)
- 对于简单的数字验证码,Go 语言中有哪些推荐的、表现更好的 OCR 库?
- 针对此类任务,训练一个自定义的 OCR 模型或使用基于机器学习的方法是否有益?
- 任何技巧或示例项目都将不胜感激!
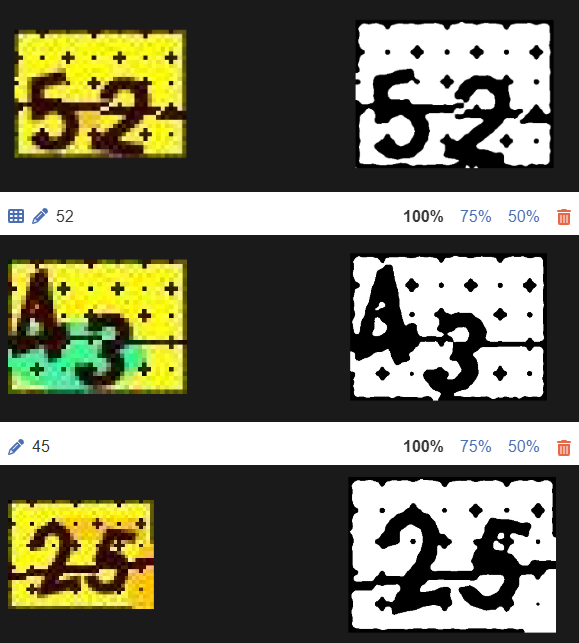
下面,我分享三个用于图像处理的函数,以及几张示例结果图片。在我分享的示例图片中,OCR 正确地将 52 识别为 52,但将 25 误读为 28,将 43 误读为 45。
提前感谢大家的帮助!
func gorselIsle(dosyaYolu string,) (string, error) {
	img, err := imaging.Open(dosyaYolu)
	if err != nil {
		return "", fmt.Errorf("görsel açma hatası: %v", err)
	}

	img = imaging.Resize(img, img.Bounds().Dx()*10, 0, imaging.Lanczos)
	// img = imaging.Grayscale(img)

	img = imaging.AdjustContrast(img, 100)


	img = pikselleriFiltrele(img)

	tempYol := "temp_grayscale.jpg"
	err = imaging.Save(img, tempYol)
	if err != nil {
		return "", fmt.Errorf("görsel kaydetme hatası: %v", err)
	}
	return tempYol, nil
}
func pikselleriFiltrele(img image.Image) *image.NRGBA {
	bounds := img.Bounds()
	filtered := imaging.New(bounds.Dx(), bounds.Dy(), image.White)


	tolerans := 25

	hedefR, hedefG, hedefB := uint32(0), uint32(0), uint32(0)

	for y := bounds.Min.Y; y < bounds.Max.Y; y++ {
		for x := bounds.Min.X; x < bounds.Max.X; x++ {
			r, g, b, _ := img.At(x, y).RGBA()

			// RGBA 16-bit formatında (0-65535), 8-bit'e çevirelim
			r8 := r >> 8
			g8 := g >> 8
			b8 := b >> 8

			// Tolerans içinde mi kontrolü
			if absDiff(r8, hedefR) <= tolerans &&
				absDiff(g8, hedefG) <= tolerans &&
				absDiff(b8, hedefB) <= tolerans {
				// Hedef renge yakınsa: siyah
				filtered.Set(x, y, image.Black)
			}
		}
	}

	return filtered
}
func metinTani(dosyaYolu  string) (string, error) {
	// Tesseract OCR işlemi


    cmd = exec.Command("tesseract", dosyaYolu, "stdout", "--psm", "8", "-l", "digits", "-c", "tessedit_char_whitelist=0123456789")

	var out strings.Builder
	var stderr strings.Builder
	cmd.Stdout = &out
	cmd.Stderr = &stderr

	err := cmd.Run()
	if err != nil {
		return "", fmt.Errorf("tesseract hatası: %v - %s", err, stderr.String())
	}

	return strings.TrimSpace(out.String()), nil
}
更多关于Golang中提升2位数字验证码OCR识别准确率的技巧的实战教程也可以访问 https://www.itying.com/category-94-b0.html
1 回复

更多关于Golang中提升2位数字验证码OCR识别准确率的技巧的实战系列教程也可以访问 https://www.itying.com/category-94-b0.html
针对两位数字验证码的OCR识别,以下是一些在Go语言中提升准确率的技术方案:
1. 图像预处理优化
import (
    "github.com/disintegration/imaging"
    "golang.org/x/image/draw"
    "image"
    "image/color"
    "math"
)

// 增强的预处理函数
func enhanceImagePreprocessing(img image.Image) image.Image {
    // 1. 转换为灰度图(减少颜色维度)
    gray := imaging.Grayscale(img)

    // 2. 调整对比度(增强数字与背景的差异)
    enhanced := imaging.AdjustContrast(gray, 50)

    // 3. 自适应阈值二值化(比固定阈值更鲁棒)
    binary := adaptiveThreshold(enhanced, 19, 10.0)

    // 4. 降噪处理
    denoised := removeNoise(binary, 2)

    // 5. 调整大小(保持合适分辨率)
    resized := imaging.Resize(denoised, 0, 100, imaging.Lanczos)

    return resized
}

// 自适应阈值二值化
func adaptiveThreshold(img image.Image, blockSize int, c float64) *image.Gray {
    bounds := img.Bounds()
    gray := image.NewGray(bounds)

    for y := bounds.Min.Y; y < bounds.Max.Y; y++ {
        for x := bounds.Min.X; x < bounds.Max.X; x++ {
            // 计算局部区域的平均值
            sum := 0.0
            count := 0

            for dy := -blockSize / 2; dy <= blockSize/2; dy++ {
                for dx := -blockSize / 2; dx <= blockSize/2; dx++ {
                    nx, ny := x+dx, y+dy
                    if nx >= bounds.Min.X && nx < bounds.Max.X &&
                       ny >= bounds.Min.Y && ny < bounds.Max.Y {
                        r, _, _, _ := img.At(nx, ny).RGBA()
                        sum += float64(r >> 8)
                        count++
                    }
                }
            }

            avg := sum / float64(count)
            r, _, _, _ := img.At(x, y).RGBA()
            pixelValue := float64(r >> 8)

            // 应用阈值
            if pixelValue > avg-c {
                gray.SetGray(x, y, color.Gray{Y: 255}) // 白色背景
            } else {
                gray.SetGray(x, y, color.Gray{Y: 0})   // 黑色数字
            }
        }
    }
    return gray
}

// 降噪函数(去除孤立像素点)
func removeNoise(img *image.Gray, threshold int) *image.Gray {
    bounds := img.Bounds()
    result := image.NewGray(bounds)

    for y := bounds.Min.Y; y < bounds.Max.Y; y++ {
        for x := bounds.Min.X; x < bounds.Max.X; x++ {
            // 检查3x3邻域
            blackCount := 0
            for dy := -1; dy <= 1; dy++ {
                for dx := -1; dx <= 1; dx++ {
                    nx, ny := x+dx, y+dy
                    if nx >= bounds.Min.X && nx < bounds.Max.X &&
                       ny >= bounds.Min.Y && ny < bounds.Max.Y {
                        if img.GrayAt(nx, ny).Y < 128 {
                            blackCount++
                        }
                    }
                }
            }

            // 如果黑色像素太少,认为是噪声
            if blackCount >= threshold {
                result.SetGray(x, y, img.GrayAt(x, y))
            } else {
                result.SetGray(x, y, color.Gray{Y: 255}) // 设为白色
            }
        }
    }
    return result
}
2. OCR库推荐与配置优化
import (
    "os/exec"
    "strings"
    "fmt"
)

// 优化的Tesseract配置
func optimizedOCR(dosyaYolu string) (string, error) {
    // 使用更合适的PSM模式
    // PSM 7: 将图像视为单行文本
    // PSM 8: 将图像视为单个单词
    // PSM 10: 将图像视为单个字符
    cmd := exec.Command("tesseract",
        dosyaYolu,
        "stdout",
        "--psm", "7",           // 单行文本模式
        "--oem", "3",           // 使用LSTM引擎
        "-l", "eng",            // 英文引擎对数字识别更好
        "-c", "tessedit_char_whitelist=0123456789",
        "-c", "tessedit_do_invert=0",
        "-c", "classify_bln_numeric_mode=1",
        "-c", "textord_min_linesize=2.5",
        "-c", "textord_heavy_nr=1",
    )

    var out strings.Builder
    var stderr strings.Builder
    cmd.Stdout = &out
    cmd.Stderr = &stderr

    err := cmd.Run()
    if err != nil {
        return "", fmt.Errorf("tesseract hatası: %v - %s", err, stderr.String())
    }

    result := strings.TrimSpace(out.String())

    // 后处理:确保输出是两位数字
    if len(result) == 1 {
        // 如果只识别到一个数字,尝试不同的PSM模式
        result = fallbackOCR(dosyaYolu)
    } else if len(result) > 2 {
        // 如果识别到多个字符,取前两个数字
        digits := ""
        for _, r := range result {
            if r >= '0' && r <= '9' && len(digits) < 2 {
                digits += string(r)
            }
        }
        result = digits
    }

    return result, nil
}

// 备用OCR策略
func fallbackOCR(dosyaYolu string) string {
    // 尝试不同的PSM模式
    psms := []string{"8", "10", "13"}

    for _, psm := range psms {
        cmd := exec.Command("tesseract",
            dosyaYolu,
            "stdout",
            "--psm", psm,
            "-l", "eng",
            "-c", "tessedit_char_whitelist=0123456789",
        )

        var out strings.Builder
        cmd.Stdout = &out
        cmd.Run()

        result := strings.TrimSpace(out.String())
        if len(result) == 2 && result[0] >= '0' && result[0] <= '9' &&
           result[1] >= '0' && result[1] <= '9' {
            return result
        }
    }
    return ""
}
3. 集成多个OCR引擎提高鲁棒性
import (
    "github.com/otiai10/gosseract/v2"
    "github.com/kellydunn/golang-geo"
)

// 多引擎OCR投票系统
func multiEngineOCR(imgPath string) (string, error) {
    results := make([]string, 0)

    // 引擎1: Tesseract
    result1, _ := tesseractOCR(imgPath)
    if isValidTwoDigit(result1) {
        results = append(results, result1)
    }

    // 引擎2: Gosseract (Tesseract的Go绑定)
    result2, _ := gosseractOCR(imgPath)
    if isValidTwoDigit(result2) {
        results = append(results, result2)
    }

    // 投票选择最可能的结果
    if len(results) > 0 {
        return voteResult(results), nil
    }

    return "", fmt.Errorf("所有OCR引擎都识别失败")
}

func gosseractOCR(imgPath string) (string, error) {
    client := gosseract.NewClient()
    defer client.Close()

    client.SetImage(imgPath)
    client.SetLanguage("eng")
    client.SetWhitelist("0123456789")

    text, err := client.Text()
    if err != nil {
        return "", err
    }

    return strings.TrimSpace(text), nil
}

func voteResult(results []string) string {
    freq := make(map[string]int)
    for _, r := range results {
        freq[r]++
    }

    maxFreq := 0
    bestResult := ""
    for r, count := range freq {
        if count > maxFreq {
            maxFreq = count
            bestResult = r
        }
    }

    return bestResult
}

func isValidTwoDigit(s string) bool {
    if len(s) != 2 {
        return false
    }
    return s[0] >= '0' && s[0] <= '9' && s[1] >= '0' && s[1] <= '9'
}
4. 基于模板匹配的备选方案
// 对于固定字体和位置的验证码,模板匹配可能更可靠
func templateMatchingOCR(img image.Image, templates map[string]image.Image) string {
    // 将图像分割为两个数字
    bounds := img.Bounds()
    width := bounds.Dx()

    leftDigit := imaging.Crop(img, image.Rect(0, 0, width/2, bounds.Dy()))
    rightDigit := imaging.Crop(img, image.Rect(width/2, 0, width, bounds.Dy()))

    // 分别匹配每个数字
    digit1 := matchDigit(leftDigit, templates)
    digit2 := matchDigit(rightDigit, templates)

    return digit1 + digit2
}

func matchDigit(img image.Image, templates map[string]image.Image) string {
    bestMatch := ""
    bestScore := -1.0

    for digit, template := range templates {
        score := computeSimilarity(img, template)
        if score > bestScore {
            bestScore = score
            bestMatch = digit
        }
    }

    return bestMatch
}

func computeSimilarity(img1, img2 image.Image) float64 {
    // 实现简单的相似度计算(如SSIM或直方图匹配)
    bounds := img1.Bounds()
    totalPixels := bounds.Dx() * bounds.Dy()
    matchingPixels := 0

    for y := bounds.Min.Y; y < bounds.Max.Y; y++ {
        for x := bounds.Min.X; x < bounds.Max.X; x++ {
            r1, g1, b1, _ := img1.At(x, y).RGBA()
            r2, g2, b2, _ := img2.At(x, y).RGBA()

            // 简化相似度计算
            if abs(int(r1>>8)-int(r2>>8)) < 50 &&
               abs(int(g1>>8)-int(g2>>8)) < 50 &&
               abs(int(b1>>8)-int(b2>>8)) < 50 {
                matchingPixels++
            }
        }
    }

    return float64(matchingPixels) / float64(totalPixels)
}

func abs(x int) int {
    if x < 0 {
        return -x
    }
    return x
}
5. 完整的工作流程示例
func processCaptcha(imagePath string) (string, error) {
    // 1. 加载图像
    img, err := imaging.Open(imagePath)
    if err != nil {
        return "", err
    }

    // 2. 预处理
    processed := enhanceImagePreprocessing(img)

    // 3. 保存预处理后的图像
    tempPath := "processed_captcha.png"
    imaging.Save(processed, tempPath)

    // 4. 使用优化的OCR
    result, err := optimizedOCR(tempPath)
    if err != nil {
        return "", err
    }

    // 5. 验证结果
    if len(result) == 2 && isValidTwoDigit(result) {
        return result, nil
    }

    // 6. 备用方案:多引擎OCR
    return multiEngineOCR(tempPath)
}
关键改进点:
- 使用自适应阈值替代固定阈值
- 添加降噪处理
- 优化Tesseract参数(PSM 7 + LSTM引擎)
- 实现多引擎投票机制
- 添加结果验证和后处理
这些技术组合可以显著提升两位数字验证码的识别准确率。对于示例中的数字误读问题(25→28,43→45),自适应阈值和降噪处理特别有效。