


Golang中如何使用Bubbletea和Lipgloss实现样式堆叠
Golang中如何使用Bubbletea和Lipgloss实现样式堆叠 想要实现的目标: 在其他彩色输出之上生成彩色输出,同时保留底层未被覆盖的输出。
我的尝试: 如下所示,其中 model 是 Bubbletea 的模型接口实现
import gloss "github.com/charmbracelet/lipgloss"

func (m model) View() string {
	diagStyle := gloss.NewStyle().
		Background(gloss.Color("#0000aa"))
	r1Style := gloss.NewStyle().
		Inherit(diagStyle).
		Foreground(gloss.Color("#ffff00"))
	r2Style := gloss.NewStyle().
		Inherit(diagStyle).
		Foreground(gloss.Color("#ff0000"))
	r3Style := gloss.NewStyle().
		Inherit(diagStyle).
		Foreground(gloss.Color("#ffffff"))
	out := diagStyle.
		Width(30).
		Height(5).
		Padding(1, 2).
		Render(
			gloss.JoinVertical(gloss.Left,
				r1Style.Render("Alice"),
				r2Style.Render("Bob"),
				r3Style.Render("Charlie"),
			),
		)
	return out
}
产生了带有伪影的以下输出:
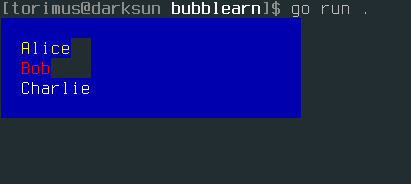
如何修复它,以保留底层 diagStyle 的蓝色背景色?(在 Alice 和 Bob 之后)
更多关于Golang中如何使用Bubbletea和Lipgloss实现样式堆叠的实战教程也可以访问 https://www.itying.com/category-94-b0.html

请注意,任何因类似问题而找到这里的人:
它不起作用的原因是Lipgloss库仅支持2D。 简单地堆叠样式在其他样式之上并未实现。缺少处理内容重叠的逻辑。如果你计划在TUI中创建对话框之上的对话框,那么你只能靠自己,或者最好考虑其他方案。
更多关于Golang中如何使用Bubbletea和Lipgloss实现样式堆叠的实战系列教程也可以访问 https://www.itying.com/category-94-b0.html


好消息,
即将发布的主要版本 2 最终引入了用于样式重叠(合成层)的 3D 逻辑:
Release v2.0.0-beta.2 · charmbracelet/lipgloss
当前热门:Lip Gloss v2 Beta 2
此版本基于上一个 Beta 1 版本构建。它包含了用于合成层和视图的新 API、表格增强功能以及一系列错误修复。

在 Bubbletea 中使用 Lipgloss 实现样式堆叠时,需要确保子元素的样式不会覆盖父元素的背景。你的代码中,r1Style、r2Style 和 r3Style 继承了 diagStyle,但默认情况下,继承不会保留背景色。以下是修复方案:
import gloss "github.com/charmbracelet/lipgloss"

func (m model) View() string {
    diagStyle := gloss.NewStyle().
        Background(gloss.Color("#0000aa"))
    r1Style := gloss.NewStyle().
        Inherit(diagStyle).
        Foreground(gloss.Color("#ffff00")).
        Background(gloss.Color("#0000aa"))  // 显式设置背景色
    r2Style := gloss.NewStyle().
        Inherit(diagStyle).
        Foreground(gloss.Color("#ff0000")).
        Background(gloss.Color("#0000aa"))  // 显式设置背景色
    r3Style := gloss.NewStyle().
        Inherit(diagStyle).
        Foreground(gloss.Color("#ffffff")).
        Background(gloss.Color("#0000aa"))  // 显式设置背景色

    out := diagStyle.
        Width(30).
        Height(5).
        Padding(1, 2).
        Render(
            gloss.JoinVertical(gloss.Left,
                r1Style.Render("Alice"),
                r2Style.Render("Bob"),
                r3Style.Render("Charlie"),
            ),
        )
    return out
}
或者,使用 gloss.Place 来叠加样式,避免继承问题:
func (m model) View() string {
    baseStyle := gloss.NewStyle().
        Width(30).
        Height(5).
        Padding(1, 2).
        Background(gloss.Color("#0000aa"))

    textStyle := gloss.NewStyle().
        Foreground(gloss.Color("#ffff00"))

    content := gloss.JoinVertical(gloss.Left,
        textStyle.Render("Alice"),
        textStyle.Foreground(gloss.Color("#ff0000")).Render("Bob"),
        textStyle.Foreground(gloss.Color("#ffffff")).Render("Charlie"),
    )

    out := baseStyle.Render(content)
    return out
}
另一个方案是使用 gloss.NewStyle().Copy() 来复制样式,而不是继承:
func (m model) View() string {
    diagStyle := gloss.NewStyle().
        Background(gloss.Color("#0000aa"))

    r1Style := diagStyle.Copy().
        Foreground(gloss.Color("#ffff00"))
    r2Style := diagStyle.Copy().
        Foreground(gloss.Color("#ff0000"))
    r3Style := diagStyle.Copy().
        Foreground(gloss.Color("#ffffff"))

    out := diagStyle.
        Width(30).
        Height(5).
        Padding(1, 2).
        Render(
            gloss.JoinVertical(gloss.Left,
                r1Style.Render("Alice"),
                r2Style.Render("Bob"),
                r3Style.Render("Charlie"),
            ),
        )
    return out
}
这些方法都能确保背景色在整个输出中保持一致,消除伪影。