


HarmonyOS 鸿蒙Next系统与mqttx双通信
HarmonyOS 鸿蒙Next系统与mqttx双通信 服务端:鸿蒙系统 5.0.13.230
客户端:mqttx 3.1.1
功能:客户端发布主题为WSD的信息,服务端接收数据并在预览器渲染显示。
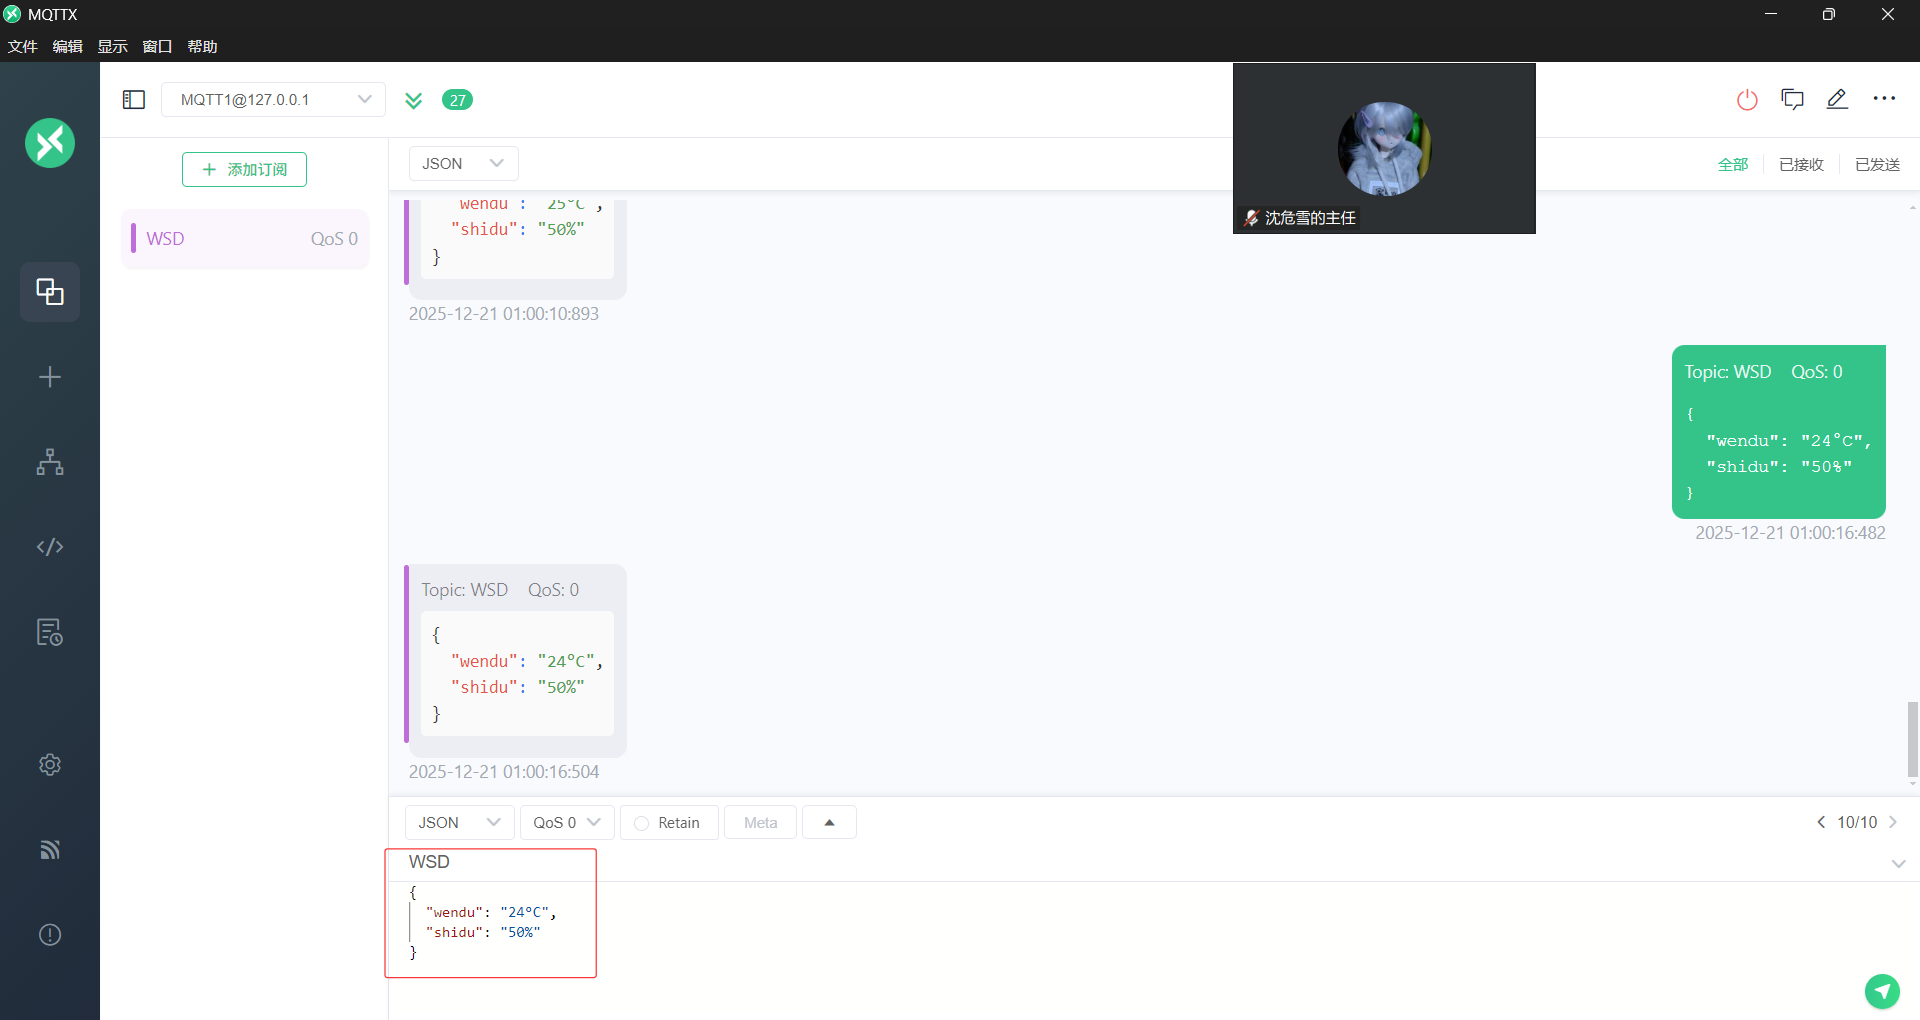 客户端界面
客户端界面
问题1:双端连接失败,数据无法显示
问题2:出错日志如下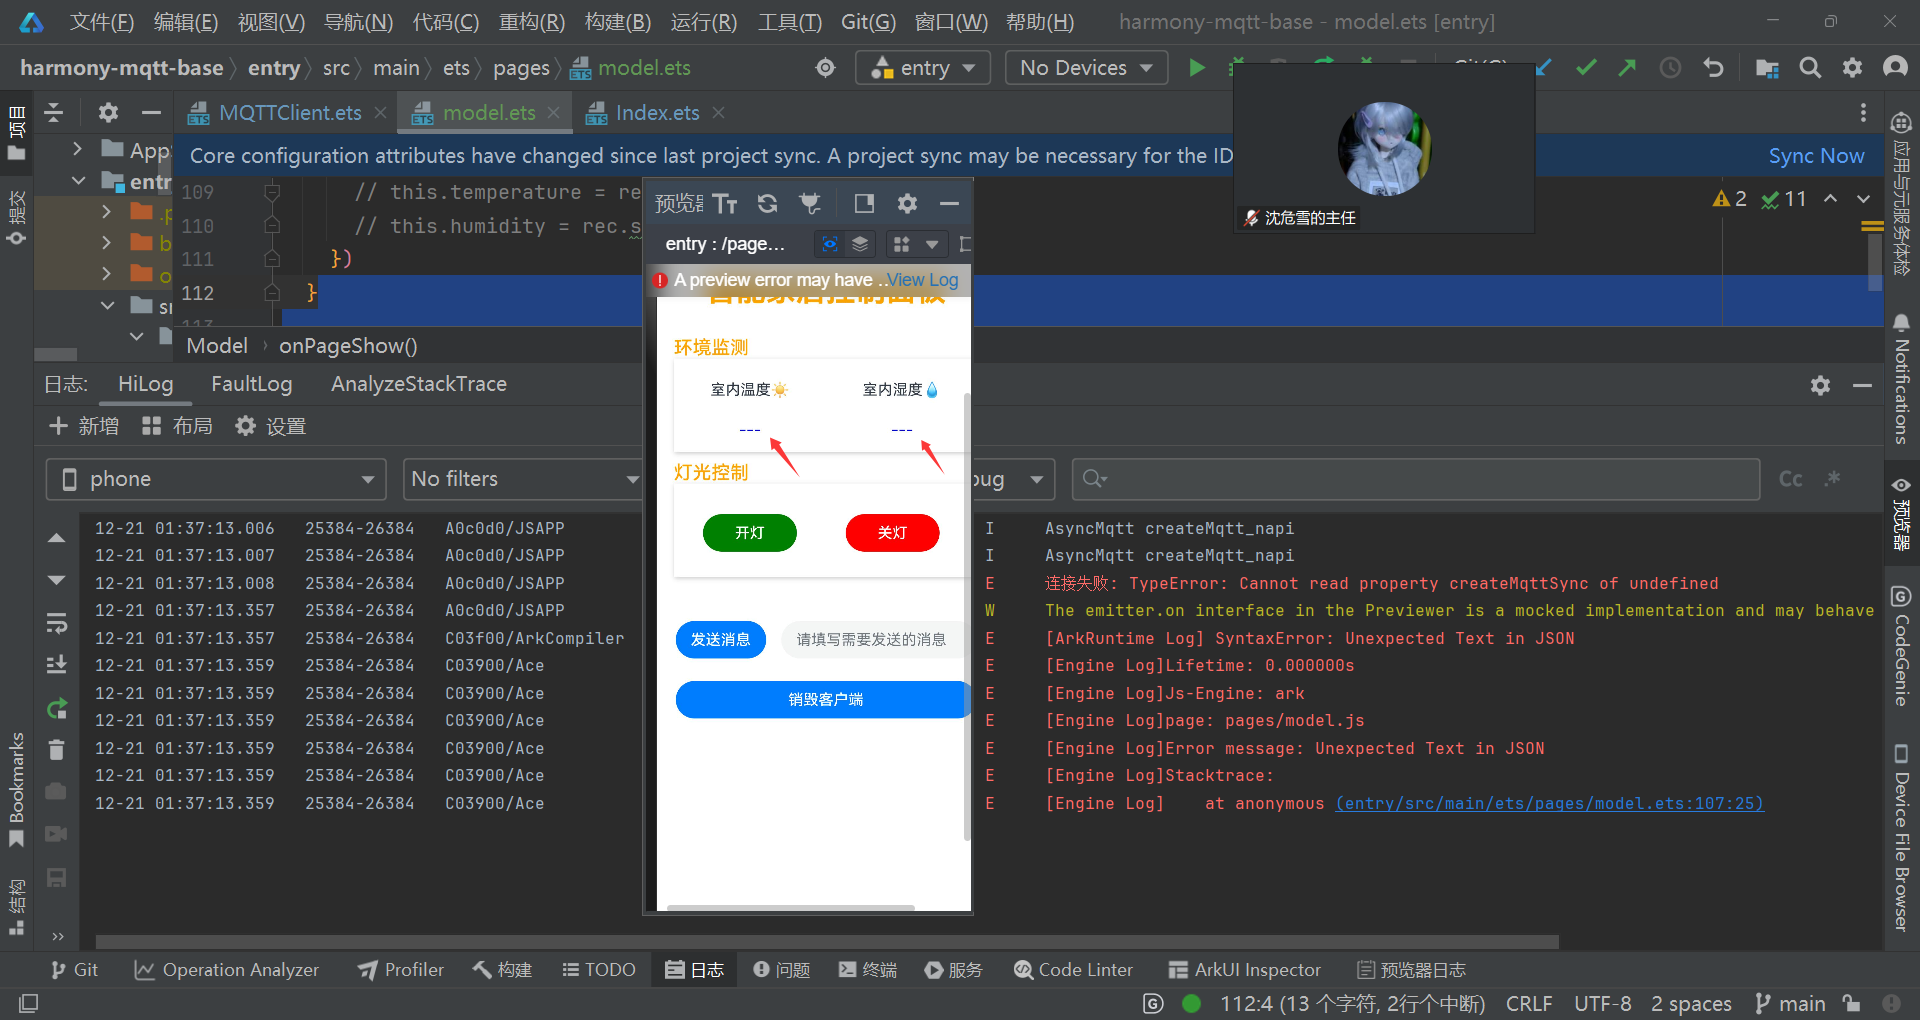 服务端界面
服务端界面
MQTTClient.ets
import {
  MqttAsync,
  MqttClient,
  MqttMessage,
  MqttQos,
  MqttResponse,
  MqttSubscribeOptions,
} from '@ohos/mqtt';
import emitter from '@ohos.events.emitter';


// 事件id
const EVENTID = 1001


interface MQTTOptionsType {
  url?: string
  clientId?: string
  userName?: string
  password?: string
  topic?: string
  qos?: MqttQos | undefined
}

class MQTTClient {
  on // 创建mqtt实例
  (arg0: string, arg1: (payload: string) => void) {
    throw new Error('Method not implemented.');
  }
  private static instance: MQTTClient
  private mqttClient: MqttClient | null = null
  private url: string =
    '' // 以null结尾的字符串,指定客户端将连接到的服务器。它采取的形式protocol://host:port.protocol必须是tcp、ssl、ws或wss。对于主机,可以指定IP地址或主机名。例如,tcp://localhost:1883
  private clientId: string = '' // 客户端连接到服务器时传递给服务器的客户端标识符。它是一个以空结尾的UTF-8编码字符串
  private userName: string = '' // 客户端用户名
  private password: string = '' // 客户端密码
  private topic: string = '' // 主题名称
  private qos: MqttQos | undefined = undefined // 消息的服务质量设置 0 最多一次 1 至少一次 2 近一次

  constructor(mqttOptions: MQTTOptionsType) {
    mqttOptions.url && (this.url = mqttOptions.url)
    mqttOptions.clientId && (this.clientId = mqttOptions.clientId)
    mqttOptions.userName && (this.userName = mqttOptions.userName)
    mqttOptions.password && (this.password = mqttOptions.password)
    mqttOptions.topic && (this.topic = mqttOptions.topic)
    mqttOptions.qos && (this.qos = mqttOptions.qos)

    this.init()
  }

  // 静态方法获取唯一实例
  public static getInstance(mqttOptions: MQTTOptionsType): MQTTClient {
    if (!MQTTClient.instance) {
      MQTTClient.instance = new MQTTClient(mqttOptions)
    }
    return MQTTClient.instance
  }

  // 初始化方法
  async init() {
    this.createMqttClient() // 创建mqtt实例
    await this.connectMqtt() // 连接服务器
    await this.subscribe() // 订阅主题
    this.messageArrived() // 监听订阅主题
  }

  // 创建mqtt实例
  public createMqttClient() {
    this.mqttClient = MqttAsync.createMqtt({
      url: this.url,
      clientId: this.clientId,
      persistenceType: 1 // 客户端使用的持久性类型,0=默认值:使用默认(基于文件系统)持久性机制。1=在内存持久性中使用。2=使用特定于应用程序的持久性实现
    })
  }

  // 连接服务器
  public async connectMqtt() {
    if (!this.mqttClient) {
      return
    }
    await this.mqttClient.connect({
      userName: this.userName,
      password: this.password,
      connectTimeout: 30, // 设置连接超时时间,默认
      automaticReconnect: true, // 是否在连接丢失的情况下自动重新连接
      MQTTVersion: 0, // 设置要在连接上使用的MQTT版本, 0=默认值:从3.1.1开始,如果失败,则返回到3.1,3=仅尝试版本3.1,4=仅尝试3.1.1版本
      // sslOptions:{
      //   enableServerCertAuth: true, // 是否开启服务端证书认证,默认为false
      //    trustStore: fileDir + "/ca.crt" // CA证书的沙箱路径
      // }
    }).then((res: MqttResponse) => {
      console.info('MQTT服务器连接连接成功:' + JSON.stringify(res.message))
    }).catch((err: Error) => {
      console.error('MQTT服务器连接连接失败:' + JSON.stringify(err))
    })
  }

  // 订阅主题
  public async subscribe() {
    if (!this.mqttClient) {
      return
    }
    let subscribeOption: MqttSubscribeOptions = {
      topic: this.topic,
      qos: this.qos as MqttQos
    }
    await this.mqttClient.subscribe(subscribeOption).then((res: MqttResponse) => {
      console.info('MQTT订阅主题成功:', JSON.stringify(res.message))
    }).catch((err: Error) => {
      console.error('MQTT订阅主题失败:', JSON.stringify(err))
    })
    // 监听订阅主题
    this.messageArrived()
  }

  // 监听订阅主题
  public messageArrived() {
    if (!this.mqttClient) {
      return
    }
    // 监听主题发送消息
    this.mqttClient.messageArrived((err: Error, data: MqttMessage) => {
      if (err) {
        console.error('MQTT接收消息失败:', JSON.stringify(err))
      } else {
        console.info('MQTT接收消息成功:', JSON.stringify(data))
        // 发送消息至线程
        emitter.emit({
          eventId: EVENTID,
          priority: emitter.EventPriority.LOW // 表示事件优于IDLE优先级投递,事件的默认优先级是LOW。
        }, {
          data: {
            content: data.payload,
          }
        })
      }
    })
  }

  /**
   * 发送消息
   * @param pic 订阅的主题
   * @param msg 消息内容
   * @param qo qos
   */
  public async pushMessage(msg: string, pic: string = this.topic, qo: MqttQos = this.qos as MqttQos) {
    if (!this.mqttClient) {
      return
    }
    await this.mqttClient.publish({
      topic: pic,
      qos: qo,
      payload: msg
    }).then((data: MqttResponse) => {
      console.info("MQTT消息发送成功:", JSON.stringify(data))
    }).catch((err: Error) => {
      console.error("MQTT消息发送失败:", JSON.stringify(err))
    })
  }

  // 销毁客户端实例
  public async destroy() {
    if (!this.mqttClient) {
      return
    }
    await this.mqttClient.destroy().then((data: boolean) => {
      if (data) {
        console.info('MQTT实例销毁成功')
        emitter.off(EVENTID)
      } else {
        console.error('MQTT实例销毁失败')
      }
    })

  }
}

export {
  MQTTClient, EVENTID, MQTTOptionsType
}
modle.ets
import { MQTTClient, MQTTOptionsType, EVENTID, } from  './MQTTClient'
import { emitter } from '@kit.BasicServicesKit'
import promptAction from '@ohos.promptAction'
import {
  MqttAsync,
  MqttClient,
  MqttMessage,
  MqttQos,
  MqttResponse,
  MqttSubscribeOptions,
} from '@ohos/mqtt';


const MQTTOption: MQTTOptionsType = {
  url: 'mqtt://10.19.229.161:1883',
  clientId: 'mqttx_yaya' + Math.random().toString(36).substr(2),
  userName: 'yaya',
  password: '123456',
  topic: 'WSD',
  qos: 0
}

const MQTTInstance: MQTTClient = MQTTClient.getInstance(MQTTOption)

interface SensorData {
  wendu: '0';
  shidu:'0';
  msg: '';
}

@Entry
@Component
struct Model {
  @State receiveMsg: string[] = []//接收信息
  @State sendMsg: string = ''//发送信息
  @State temperature: string = "---" // 温度显示
  @State humidity: string = "---"    // 湿度显示
  @State connectStatus: string = '' // 连接状态

  // 法一:private handleReceivedMessage(content: string[]) {
  //   console.info('处理接收到的消息:', content);
  //   this.receiveMsg = content; // 更新UI数据
  // }
  // aboutToAppear() {
  //   this.initMqttConnection()
  // }
  // private async initMqttConnection() {
  //   try {
  //     await MQTTInstance.init()
  //   } catch (error) {
  //     console.error('连接异常:', error)
  //   }
  // }
  // async init() {
  //   console.debug('[MQTT] 开始创建客户端')
  //   MQTTInstance.createMqttClient()
  //   console.debug('[MQTT] 客户端创建完成')
  //
  //   console.debug('[MQTT] 开始连接服务器')
  //   await MQTTInstance.connectMqtt()
  //   console.debug('[MQTT] 服务器连接成功')
  //
  //   console.debug('[MQTT] 开始订阅主题')
  //   await MQTTInstance.subscribe()
  //   console.debug('[MQTT] 主题订阅完成')
  //
  //   console.debug('[MQTT] 启动消息监听')
  //   MQTTInstance.messageArrived()
  // }
  aboutToAppear(){
    MQTTInstance.init().then(()=>{
      this.connectStatus='已连接'
      promptAction.showToast({
        message: "MQTT初始化成功",
        duration: 2000 })
      console.log('MQTT初始化成功')
    }).catch((err: Error)=> {
      this.connectStatus='未连接'
      promptAction.showToast({
        message:'${err.code}',
        duration: 2000 })
      console.error('连接失败:', err)
    });
  }//法二

  // onPageShow(): void {
  //   // 在MQTT消息接收回调中修改如下代码
  //   MQTTInstance.on('message', (payload: string) => {
  //     try {
  //       // 添加格式校验
  //       if (payload.startsWith('{') && payload.endsWith('}')) {
  //         const data: SensorData = JSON.parse(payload);
  //         this.temperature = `${data.wendu}`;
  //         this.humidity = `${data.shidu}`;
  //         this.receiveMsg.push(data.msg);
  //       } else {
  //         console.error("Received non-JSON message:", payload);
  //       }
  //     } catch (e) {
  //       console.error("JSON parse error:", e);
  //     }
  //   });法一
  onPageShow(): void {
    emitter.on({
      eventId: EVENTID
    }, (data) => {
      this.receiveMsg = JSON.parse(data.toString())
      console.log(JSON.stringify(this.receiveMsg))
      // this.temperature = rec.wendu;
      // this.humidity = rec.shidu;
    })
  }

  build() {
    Column(){
      Row(){
        Text('智能家居控制面板')
          .fontSize(32)
          .fontWeight(FontWeight.Bold)
          .fontColor(Color.Orange)
          .margin({ bottom: 10})
      }//标题
      .padding(20)
      .width('100%')
      .justifyContent(FlexAlign.Center)
      Row(){
        Column(){
          Text('环境监测')
            .fontSize(20)
            .fontWeight(FontWeight.Medium)
            .width('90%')
            .fontColor(Color.Orange)
            .align(Alignment.Start)
          Row(){
            Column(){
              Text('室内温度☀')
                .flexGrow(1)
                .textAlign(TextAlign.Center)
                .padding({top:0})
              Text(this.temperature)
                .fontColor(Color.Blue)
                .textAlign(TextAlign.Center)
            }
            .width(100)
            .height(100)
            .padding({ top:0, left: 20, right: 20,bottom:15})
            .layoutWeight(1)
            .justifyContent(FlexAlign.SpaceBetween)  // 主轴居中
            .width(90)
            .backgroundColor(Color.White)
            //室内温度
            Column(){
              Text('室内湿度💧')
                .flexGrow(1)
                .textAlign(TextAlign.Center)
                .padding({top:0})
              Text(this.humidity)
                .fontColor(Color.Blue)
                .textAlign(TextAlign.Center)
            }
            .padding({ top:0, left: 20, right: 20,bottom:15})
            .width(100)
            .height(100)
            .layoutWeight(1)
            .justifyContent(FlexAlign.SpaceAround)
            .backgroundColor(Color.White)
          }
          .width('90%')
          .shadow({
            radius: 12,       // 阴影模糊半径(推荐8-12)
            color: '#33000000',  // 透明度20%的黑色阴影
            offsetX: 2,      // 水平偏移量(正值向右)
            offsetY: 4       // 垂直偏移量(正值向下)
          })
        }
      }//环境监测
      .backgroundColor(Color.White)

      Row(){
        Column(){
          Text('灯光控制')
            .fontSize(20)
            .fontWeight(FontWeight.Medium)
            .width('90%')
            .fontColor(Color.Orange)
            .align(Alignment.Start)
          Row(){
            Column(){
              Button('开灯')
                .onClick(() => {
                  if (this.sendMsg) {
                    MQTTInstance.pushMessage(this.sendMsg)
                    this.sendMsg = '开灯'
                  }
                })
                .backgroundColor(Color.Green)
                .width(100)
                .borderRadius(1)
            }
            .height(100)
            .padding({ top:5, left: 20, right: 20,bottom:0 })
            .layoutWeight(1)
            .justifyContent(FlexAlign.SpaceAround)
            .backgroundColor(Color.White)
            //室内温度
            Column(){
              Button('关灯')
                .backgroundColor(Color.Red)
                .width(100)
                .borderRadius(0)
                .onClick(() => {
                  if (this.sendMsg) {
                    MQTTInstance.pushMessage(this.sendMsg)
                    this.sendMsg = '关灯'
                  }
                })
            }
            .height(100)
            .padding({top:5,left: 0, right: 20 ,bottom:0})
            .layoutWeight(1)
            .justifyContent(FlexAlign.SpaceAround)
            .backgroundColor(Color.White)
          }
          .width('90%')
          .shadow({
            radius: 12,       // 阴影模糊半径(推荐8-12)
            color: '#33000000',  // 透明度20%的黑色阴影
            offsetX: 2,      // 水平偏移量(正值向右)
            offsetY: 4       // 垂直偏移量(正值向下)
          })
        }
      }//灯光控制
      .backgroundColor(Color.White)
      .height(100)
      .margin({top:10,bottom:50})

      Row(){
        Column({ space: 24 }) {
          // Row() {
          //   Text('接收到的消息:')
          //   TextInput({ text: this.receiveMsg, placeholder: '接收到的消息' })
          //     .layoutWeight(1)
          // }
          Row({ space: 16 }) {
            Button('发送消息')
              .onClick(() => {
                if (this.sendMsg) {
                  MQTTInstance.pushMessage(this.sendMsg)
                  this.sendMsg = ''
                }
              })
            TextInput({ text: $$this.sendMsg, placeholder: '请填写需要发送的消息' })
              .layoutWeight(1)
          }
          .width('100%')
          Button('销毁客户端')
            .width('100%')
            .onClick(() => {
              MQTTInstance.destroy()
            })
        }
        .padding(20)
        .width('100%')
      }//调试信息
    }
  }
}
更多关于HarmonyOS 鸿蒙Next系统与mqttx双通信的实战教程也可以访问 https://www.itying.com/category-93-b0.html

鸿蒙Next系统支持MQTT通信,可通过MQTTX客户端实现双向消息传递。系统内置MQTT协议栈,提供MQTT客户端API,支持连接、订阅、发布等操作。MQTTX作为MQTT客户端工具,可与鸿蒙设备建立连接,进行消息收发。鸿蒙应用需配置MQTT连接参数,包括服务器地址、端口、客户端ID等。消息传输支持QoS级别,确保可靠性。鸿蒙的MQTT实现基于系统级能力,不依赖Java或C语言。
更多关于HarmonyOS 鸿蒙Next系统与mqttx双通信的实战系列教程也可以访问 https://www.itying.com/category-93-b0.html

根据你提供的代码和错误信息,问题主要出现在MQTT连接阶段。从日志截图可以看到连接失败的错误信息。
核心问题分析:
-
连接失败的根本原因:你的MQTT客户端配置使用了
mqtt://10.19.229.161:1883,但服务端(HarmonyOS应用)实际上也需要连接到一个真正的MQTT Broker服务器。从代码看,你的应用是作为MQTT客户端,而不是服务端。 -
代码逻辑问题:
- 在
MQTTClient.ets的init()方法中,你在连接前就调用了subscribe()和messageArrived() - 连接是异步操作,但你没有等待连接成功就进行订阅
- 在
解决方案:
修改MQTTClient.ets中的init()方法:
async init() {
    await this.createMqttClient() // 创建mqtt实例
    await this.connectMqtt() // 连接服务器
    await this.subscribe() // 订阅主题
    this.messageArrived() // 监听订阅主题
}

// 修改createMqttClient为异步
public async createMqttClient() {
    this.mqttClient = await MqttAsync.createMqtt({
        url: this.url,
        clientId: this.clientId,
        persistenceType: 1
    })
}
网络权限配置:
确保在module.json5中已添加网络权限:
{
  "module": {
    "requestPermissions": [
      {
        "name": "ohos.permission.INTERNET"
      }
    ]
  }
}
MQTT Broker确认:
确保10.19.229.161:1883确实运行着MQTT Broker服务(如EMQX、Mosquitto等),并且客户端可以访问该地址。
调试建议:
- 在
connectMqtt()的catch块中添加更详细的错误日志 - 使用ping或telnet测试MQTT Broker的可达性
- 检查MQTT Broker的认证配置(用户名/密码是否正确)
连接失败通常是由于网络不可达、Broker未运行或认证失败导致的。请先确保MQTT Broker服务正常运行且配置正确。