


HarmonyOS鸿蒙Next中关于RelativeContainer
HarmonyOS鸿蒙Next中关于RelativeContainer
HarmonyOS中,RelativeContainer 如何实现链中组件不同宽度比?

楼主您好,请问通过chainWeight对形成链的组件进行重新布局设置尺寸权重,来实现组件宽度比设置能否满足您的诉求。
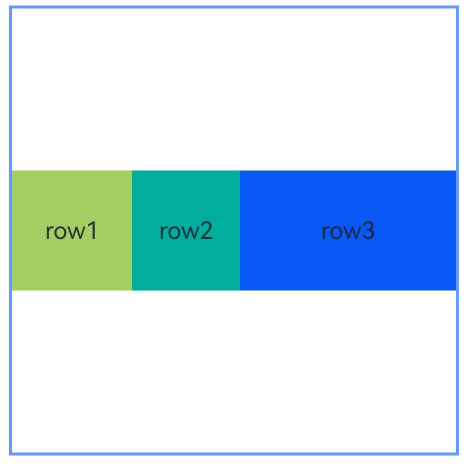
本示例展示了链中节点使用chainWeight设置尺寸权重的用法:
@Entry
@Component
struct Index {
  build() {
    Row() {
      RelativeContainer() {
        Row() {
          Text('row1')
        }
        .justifyContent(FlexAlign.Center)
        .width(80)
        .height(80)
        .backgroundColor('#a3cf62')
        .alignRules({
          left: { anchor: "__container__", align: HorizontalAlign.Start },
          right: { anchor: "row2", align: HorizontalAlign.Start },
          center: { anchor: "__container__", align: VerticalAlign.Center },
        })
        .id("row1")
        .chainMode(Axis.Horizontal, ChainStyle.PACKED)

        Row() {
          Text('row2')
        }
        .justifyContent(FlexAlign.Center)
        .width(80)
        .height(80)
        .backgroundColor('#00ae9d')
        .alignRules({
          left: { anchor: "row1", align: HorizontalAlign.End },
          right: { anchor: "row3", align: HorizontalAlign.Start },
          top: { anchor: "row1", align: VerticalAlign.Top }
        })
        .id("row2")
        .chainWeight({ horizontal: 1 })

        Row() {
          Text('row3')
        }
        .justifyContent(FlexAlign.Center)
        .width(80)
        .height(80)
        .backgroundColor('#0a59f7')
        .alignRules({
          left: { anchor: "row2", align: HorizontalAlign.End },
          right: { anchor: "__container__", align: HorizontalAlign.End },
          top: { anchor: "row1", align: VerticalAlign.Top }
        })
        .id("row3")
        .chainWeight({ horizontal: 2 })
      }
      .width(300).height(300)
      .margin({ left: 50 })
      .border({ width: 2, color: "#6699FF" })
    }
    .height('100%')
  }
}
更多关于HarmonyOS鸿蒙Next中关于RelativeContainer的实战系列教程也可以访问 https://www.itying.com/category-93-b0.html

可以通过 通用属性 的 chainWeight 进行设置
效果图:
示例代码:
// xxx.ets
@Entry
@Component
struct PositionExample1 {
  build() {
    Column() {
      Column({ space: 10 }) {
        // 元素内容<元素宽高,设置内容在与元素内的对齐方式
        Text('align').fontSize(9).fontColor(0xCCCCCC).width('90%')
        Stack() {
          Text('First show in bottom end').height('65%').backgroundColor(0xD2B48C)
          Text('Second show in bottom end').backgroundColor(0xF5DEB3).opacity(0.9)
        }.width('90%').height(50).margin({ top: 5 }).backgroundColor(0xFFE4C4)
        .align(Alignment.BottomEnd)
        Stack() {
          Text('top start')
        }.width('90%').height(50).margin({ top: 5 }).backgroundColor(0xFFE4C4)
        .align(Alignment.TopStart)

        // 父容器设置direction为Direction.Ltr,子元素从左到右排列
        Text('direction').fontSize(9).fontColor(0xCCCCCC).width('90%')
        Row() {
          Text('1').height(50).width('25%').fontSize(16).backgroundColor(0xF5DEB3)
          Text('2').height(50).width('25%').fontSize(16).backgroundColor(0xD2B48C)
          Text('3').height(50).width('25%').fontSize(16).backgroundColor(0xF5DEB3)
          Text('4').height(50).width('25%').fontSize(16).backgroundColor(0xD2B48C)
        }
        .width('90%')
        .direction(Direction.Ltr)
        // 父容器设置direction为Direction.Rtl,子元素从右到左排列
        Row() {
          Text('1').height(50).width('25%').fontSize(16).backgroundColor(0xF5DEB3).textAlign(TextAlign.End)
          Text('2').height(50).width('25%').fontSize(16).backgroundColor(0xD2B48C).textAlign(TextAlign.End)
          Text('3').height(50).width('25%').fontSize(16).backgroundColor(0xF5DEB3).textAlign(TextAlign.End)
          Text('4').height(50).width('25%').fontSize(16).backgroundColor(0xD2B48C).textAlign(TextAlign.End)
        }
        .width('90%')
        .direction(Direction.Rtl)
      }
    }
    .width('100%').margin({ top: 5 })
  }
}

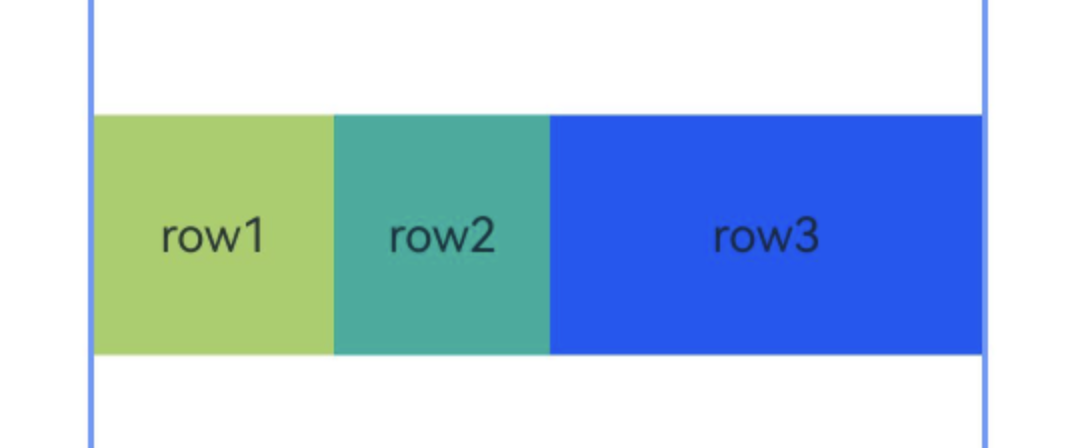
效果如图:
参考代码:
@Entry
@Component
struct Index {
  build() {
    Row() {
      RelativeContainer() {
        Row() {
          Text('row1')
        }
        .justifyContent(FlexAlign.Center)
        .width(80)
        .height(80)
        .backgroundColor('#a3cf62')
        .alignRules({
          left: { anchor: "__container__", align: HorizontalAlign.Start },
          right: { anchor: "row2", align: HorizontalAlign.Start },
          center: { anchor: "__container__", align: VerticalAlign.Center },
        })
        .id("row1")
        .chainMode(Axis.Horizontal, ChainStyle.PACKED)

        Row() {
          Text('row2')
        }
        .justifyContent(FlexAlign.Center)
        .width(80)
        .height(80)
        .backgroundColor('#00ae9d')
        .alignRules({
          left: { anchor: "row1", align: HorizontalAlign.End },
          right: { anchor: "row3", align: HorizontalAlign.Start },
          top: { anchor: "row1", align: VerticalAlign.Top }
        })
        .id("row2")
        .chainWeight({ horizontal: 1 })

        Row() {
          Text('row3')
        }
        .justifyContent(FlexAlign.Center)
        .width(80)
        .height(80)
        .backgroundColor('#0a59f7')
        .alignRules({
          left: { anchor: "row2", align: HorizontalAlign.End },
          right: { anchor: "__container__", align: HorizontalAlign.End },
          top: { anchor: "row1", align: VerticalAlign.Top }
        })
        .id("row3")
        .chainWeight({ horizontal: 2 })
      }
      .width(300).height(300)
      .margin({ left: 50 })
      .border({ width: 2, color: "#6699FF" })
    }
    .height('100%')
  }
}

找HarmonyOS工作还需要会Flutter技术的哦,有需要Flutter教程的可以学学大地老师的教程,很不错,B站免费学的哦:https://www.bilibili.com/video/BV1S4411E7LY/?p=17

相对布局 (RelativeContainer)中,链的形成依赖于组件之间的关联关系。以组件A和组件B构成的最简水平链为例,其依赖关系为:锚点1 <-- 组件A <—> 组件B --> 锚点2,即A具有left锚点,B具有right锚点,同时A的right锚点与B的HorizontalAlign.Start对齐,B的left锚点与A的HorizontalAlign.End对齐。
-
链的方向和格式在链头组件的chainMode接口中声明;链内元素的bias属性全部失效,链头元素的bias属性作为整个链的bias生效。链头是指在满足成链规则时链的第一个组件(在水平方向上,从左边开始,镜像语言中从右边开始;在垂直方向上,从上边开始)。
-
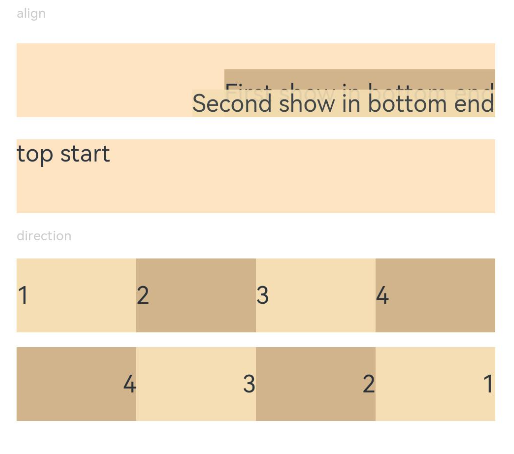
如果链内所有元素的size超出链的锚点约束,超出部分将被均匀分配到链的两侧。在PACKED链中,可以通过Bias设置超出部分的分布。 官方示例如下:
@Entry @Component struct RelativeChainModeExample { build() { Row() { RelativeContainer() { Row() { Text(‘row1’) } .justifyContent(FlexAlign.Center) .width(80) .height(80) .backgroundColor(’#a3cf62’) .alignRules({ left: { anchor: ‘container’, align: HorizontalAlign.Start }, right: { anchor: ‘row2’, align: HorizontalAlign.Start }, top: { anchor: ‘container’, align: VerticalAlign.Top } }) .id(‘row1’) .chainMode(Axis.Horizontal, ChainStyle.SPREAD) Row() { Text(‘row2’) } .justifyContent(FlexAlign.Center) .width(80) .height(80) .backgroundColor(’#00ae9d’) .alignRules({ left: { anchor: ‘row1’, align: HorizontalAlign.End }, right: { anchor: ‘row3’, align: HorizontalAlign.Start }, top: { anchor: ‘row1’, align: VerticalAlign.Top } }) .id(‘row2’) Row() { Text(‘row3’) } .justifyContent(FlexAlign.Center) .width(80) .height(80) .backgroundColor(’#0a59f7’) .alignRules({ left: { anchor: ‘row2’, align: HorizontalAlign.End }, right: { anchor: ‘container’, align: HorizontalAlign.End }, top: { anchor: ‘row1’, align: VerticalAlign.Top } }) .id(‘row3’) Row() { Text(‘row4’) } .justifyContent(FlexAlign.Center) .width(80) .height(80) .backgroundColor(’#a3cf62’) .alignRules({ left: { anchor: ‘container’, align: HorizontalAlign.Start }, right: { anchor: ‘row5’, align: HorizontalAlign.Start }, center: { anchor: ‘container’, align: VerticalAlign.Center } }) .id(‘row4’) .chainMode(Axis.Horizontal, ChainStyle.SPREAD_INSIDE) Row() { Text(‘row5’) } .justifyContent(FlexAlign.Center) .width(80) .height(80) .backgroundColor(’#00ae9d’) .alignRules({ left: { anchor: ‘row4’, align: HorizontalAlign.End }, right: { anchor: ‘row6’, align: HorizontalAlign.Start }, top: { anchor: ‘row4’, align: VerticalAlign.Top } }) .id(‘row5’) Row() { Text(‘row6’) } .justifyContent(FlexAlign.Center) .width(80) .height(80) .backgroundColor(’#0a59f7’) .alignRules({ left: { anchor: ‘row5’, align: HorizontalAlign.End }, right: { anchor: ‘container’, align: HorizontalAlign.End }, top: { anchor: ‘row4’, align: VerticalAlign.Top } }) .id(‘row6’) Row() { Text(‘row7’) } .justifyContent(FlexAlign.Center) .width(80) .height(80) .backgroundColor(’#a3cf62’) .alignRules({ left: { anchor: ‘container’, align: HorizontalAlign.Start }, right: { anchor: ‘row8’, align: HorizontalAlign.Start }, bottom: { anchor: ‘container’, align: VerticalAlign.Bottom } }) .id(‘row7’) .chainMode(Axis.Horizontal, ChainStyle.PACKED) Row() { Text(‘row8’) } .justifyContent(FlexAlign.Center) .width(80) .height(80) .backgroundColor(’#00ae9d’) .alignRules({ left: { anchor: ‘row7’, align: HorizontalAlign.End }, right: { anchor: ‘row9’, align: HorizontalAlign.Start }, top: { anchor: ‘row7’, align: VerticalAlign.Top } }) .id(‘row8’) Row() { Text(‘row9’) } .justifyContent(FlexAlign.Center) .width(80) .height(80) .backgroundColor(’#0a59f7’) .alignRules({ left: { anchor: ‘row8’, align: HorizontalAlign.End }, right: { anchor: ‘container’, align: HorizontalAlign.End }, top: { anchor: ‘row7’, align: VerticalAlign.Top } }) .id(‘row9’) } .width(300).height(300) .margin({ left: 50 }) .border({ width: 2, color: ‘#6699FF’ }) } .height(‘100%’) } }
你是说的chainWeight 属性吧
@Entry
@Component
struct Index {
  build() {
    Row() {
      RelativeContainer() {
        Row() {
          Text('row1')
        }
        .justifyContent(FlexAlign.Center)
        .width(80)
        .height(80)
        .backgroundColor('#a3cf62')
        .alignRules({
          left: { anchor: "__container__", align: HorizontalAlign.Start },
          right: { anchor: "row2", align: HorizontalAlign.Start },
          center: { anchor: "__container__", align: VerticalAlign.Center },
        })
        .id("row1")
        .chainMode(Axis.Horizontal, ChainStyle.PACKED)
        Row() {
          Text('row2')
        }
        .justifyContent(FlexAlign.Center)
        .width(80)
        .height(80)
        .backgroundColor('#00ae9d')
        .alignRules({
          left: { anchor: "row1", align: HorizontalAlign.End },
          right: { anchor: "row3", align: HorizontalAlign.Start },
          top: { anchor: "row1", align: VerticalAlign.Top }
        })
        .id("row2")
        .chainWeight({ horizontal: 1 })
        Row() {
          Text('row3')
        }
        .justifyContent(FlexAlign.Center)
        .width(80)
        .height(80)
        .backgroundColor('#0a59f7')
        .alignRules({
          left: { anchor: "row2", align: HorizontalAlign.End },
          right: { anchor: "__container__", align: HorizontalAlign.End },
          top: { anchor: "row1", align: VerticalAlign.Top }
        })
        .id("row3")
        .chainWeight({ horizontal: 2 })
      }
      .width(300).height(300)
      .margin({ left: 50 })
      .border({ width: 2, color: "#6699FF" })
    }
    .height('100%')
  }
}

RelativeContainer是HarmonyOS NEXT中的布局容器,用于实现相对布局。它允许组件通过锚点规则(如alignRules)相互关联定位,无需嵌套即可构建复杂界面。开发者需为容器内各组件设置ID及相对位置约束,如“在某某组件左侧”或“在容器顶部”。此布局方式灵活,能适配不同屏幕尺寸。

在HarmonyOS Next的ArkUI中,RelativeContainer 组件本身并不直接提供类似 LinearLayout 中 layoutWeight 的属性来实现按比例分配空间。其核心布局逻辑是基于组件间的相对位置约束。
要实现链中组件具有不同的宽度比,通常需要结合使用 RelativeContainer 的约束规则和容器内组件的自身尺寸属性。以下是几种常见的实现思路:
1. 结合百分比宽度:
这是最直接的方法。您可以为链中的每个组件设置明确的宽度约束,使用相对于父容器 RelativeContainer 的百分比。
- 关键属性:
width属性设置为百分比字符串,例如'50%'。 - 实现方式: 首先,通过
alignRules将组件锚定到容器或相邻组件,形成水平或垂直链。然后,为每个组件指定一个具体的百分比宽度。例如,一个组件宽'30%',下一个宽'70%',它们即可按3:7的比例排列。 - 注意: 这种方法要求您明确知道每个组件的目标比例。
2. 利用空间占位组件(Spacer)与约束: 当比例关系复杂或需要动态调整时,可以引入不可见的“占位”组件来辅助定义空间区域。
- 实现方式: 创建一些宽度(或高度)设置为固定值或百分比的空白
Divider或Blank组件,将它们也作为节点加入RelativeContainer,并参与布局约束。通过控制这些占位组件的尺寸和位置,可以间接地影响其相邻目标组件的可用空间,从而实现非均匀的空间划分。 - 优点: 提供了更高的灵活性,可以构建更复杂的相对布局关系。
3. 嵌套布局容器:
对于需要严格比例划分的局部区域,更简洁的做法是在 RelativeContainer 内部嵌套使用专门负责比例分配的容器。
- 推荐容器:
Row或Column组件,结合justifyContent: FlexAlign.SpaceBetween或FlexAlign.SpaceEvenly以及子组件的layoutWeight属性,可以非常精准地实现按比例分配剩余空间。 - 工作流程: 在
RelativeContainer中确定某个区域(例如,一个锚定在左右边的容器),然后在该区域内部使用Row或Column并设置layoutWeight来实现宽度或高度的比例划分。这样既能利用RelativeContainer处理整体复杂相对关系,又能利用弹性布局处理局部比例问题。
总结与选择建议:
- 简单固定比例: 直接为
RelativeContainer中的组件设置 百分比宽度 最为简单。 - 复杂相对布局中的比例区域: 考虑在
RelativeContainer内 嵌套Row/Column并使用layoutWeight。这是将清晰的比例逻辑与灵活的相对定位结合的最佳实践。 - 非常特殊或动态的约束: 可以尝试使用 占位组件 技术来“引导”布局。
由于 RelativeContainer 的布局计算依赖于所有组件显式或隐式的尺寸以及它们之间的约束关系,设计时需要仔细规划每个组件的 alignRules 和尺寸设置,以确保最终渲染效果符合预期。