


HarmonyOS鸿蒙Next中flexGrow自动填充剩余空间的问题,求助
HarmonyOS鸿蒙Next中flexGrow自动填充剩余空间的问题,求助
// 渲染内容
  build() {
    // 线性布局
    Column() {
      // 标题栏
      this.customTitleBar();
      // 内容区 - 滚动
      List({ space: 0 }) {
        ForEach(this.leafData.slice(0, this.showCount), (item: LeafItem, index: number) => {
          ListItem() {
            Row() {
              Image($r('app.media.koala'))
                .width(item.height)
                .height(item.height)
              Row() {
                Text(`文案_${index++ }`)
                  .height(item.height)
              }
              .backgroundColor(item.color)
              .margin({ left: 12 })
              .flexGrow(1)
              .border({ width: { bottom: 1 }, color: $r('app.color.main_grey') })
            }
            .width('100%')
          }
          .padding(12)
          .borderRadius({
            topLeft: index === 0 ? 16 : 0,
            topRight: index === 0? 16 : 0,
            bottomLeft: index === this.leafData.length - 1 ? 16 : 0,
            bottomRight: index === this.leafData.length - 1 ? 16 : 0,
          })
          .width('100%')
          .backgroundColor(Color.White)
        })
      }
      .padding(16)
      .border({ width: 3, color: Color.Red, style: BorderStyle.Dashed })
      .backgroundColor($r('app.color.disabled_button_background'))
      .edgeEffect(EdgeEffect.Spring, { alwaysEnabled: true })
      .flexGrow(1)
    }
    .width('100%')
    .height('100%')
    .backgroundColor(Color.White)
  }
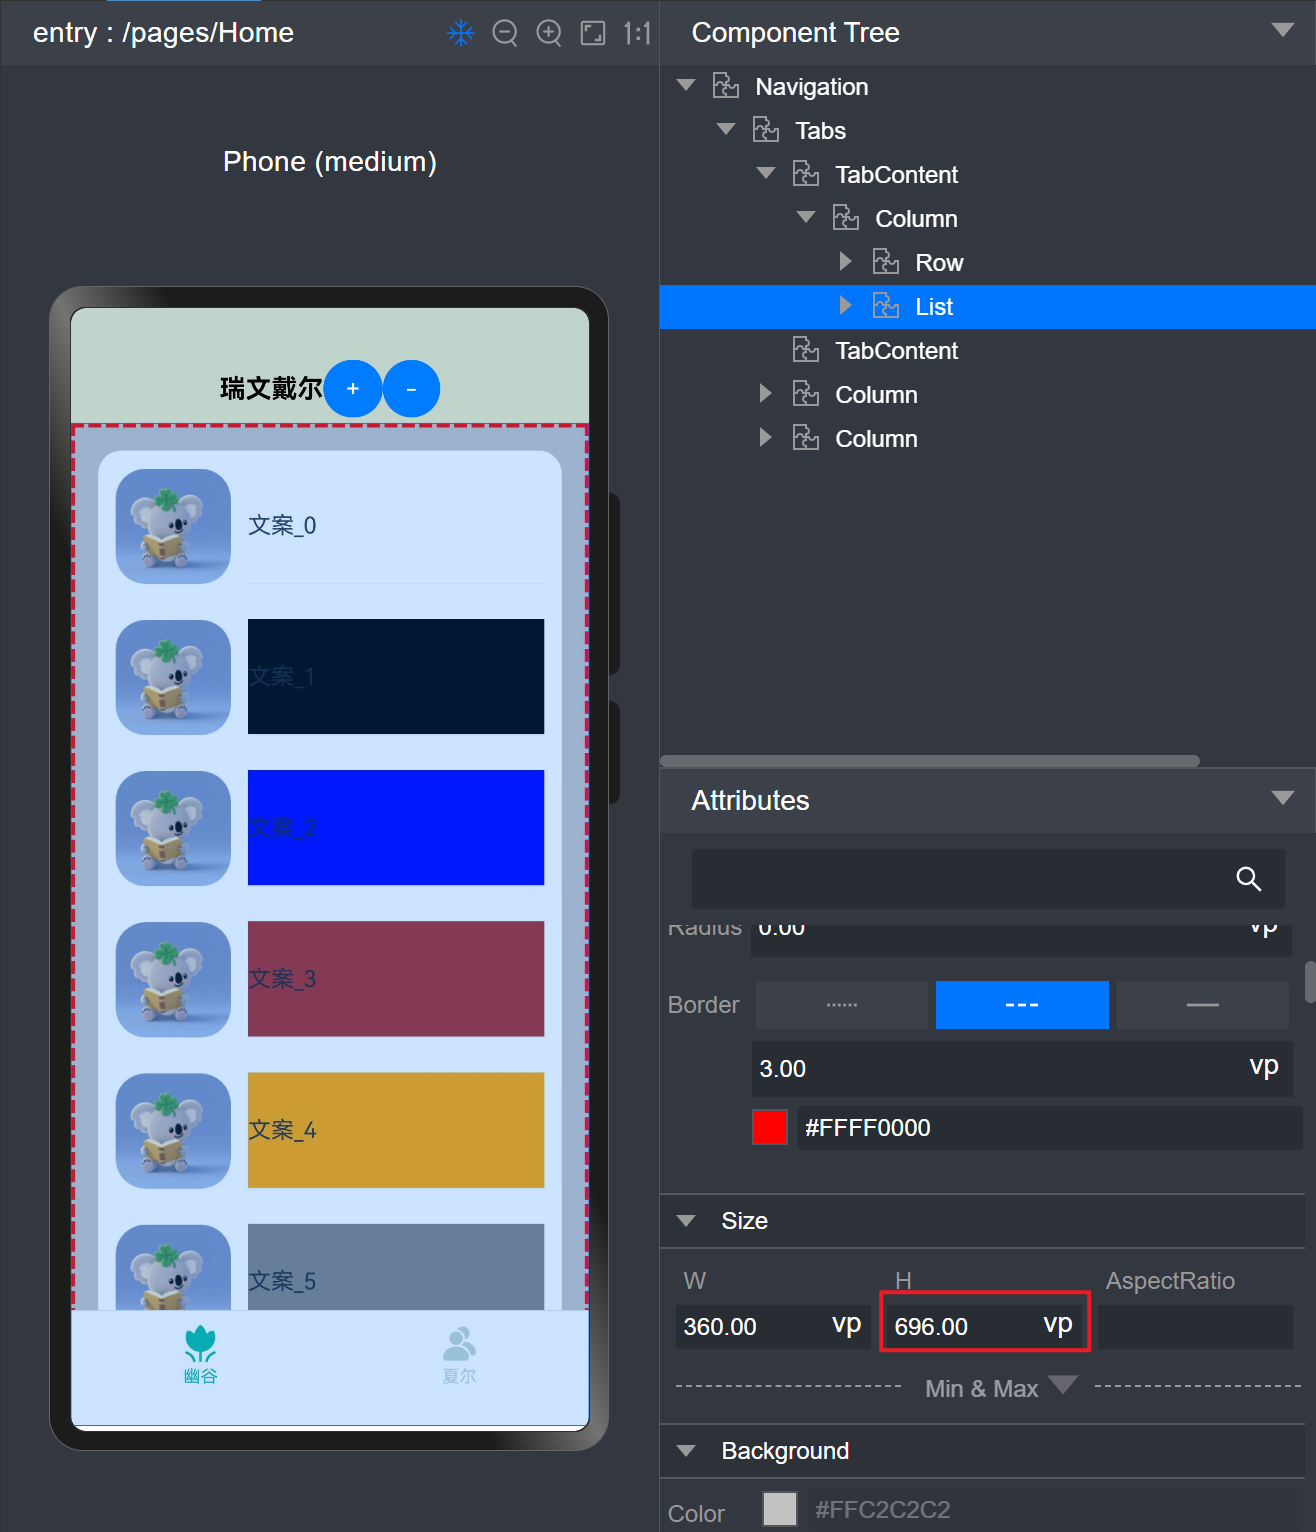
如视频,我在tab的内容区想实现固定标题和滚动内容区的效果,就像微信那样。
按推荐的线性布局方式,给List组件加了flexGrow(1)方法。理论上 List 组件会占满 Column中减去标题栏高度后的区域,如视频中红色虚线的框框。在List子组件高度累加不超过(Column - 标题栏总高度)时,是这样的。但是子组件高度累加超过时,就会增加List组件的实际高度,如视频上红色虚线框被增加了。我估计应该是跟Column的高度一致了。
怎么折腾都不行

再来几张图。 此问题 困扰我一整天。
更多关于HarmonyOS鸿蒙Next中flexGrow自动填充剩余空间的问题,求助的实战教程也可以访问 https://www.itying.com/category-93-b0.html

背景知识:
对比 flexGrow 与 layoutWeight
适用场景差异
flexGrow:仅在 Flex 容器中生效,按剩余空间比例分配1。
layoutWeight:支持更广的容器类型(如 Row、Column),按权重分配 整个容器空间。
行为差异
flexGrow 分配的是 剩余空间,而 layoutWeight 分配的是 全部空间(可能压缩其他子组件尺寸)。
问题解决:
代码如下:
import { UserEntity } from "../entity/UserEntity"

export class LeafItem {
    height: number = 50
    color: number = Color.Orange
}

@Component
export struct HomePage {
    @State message: string = "首页"
    @State leafData: Array<LeafItem> =
        [new LeafItem(), new LeafItem(), new LeafItem(), new LeafItem(), new LeafItem()]
    @State showCount: number = 3

    @Builder
    customTitleBar() {
        Row() {
            Text("标题")
                .textAlign(TextAlign.Center)
                .fontSize(20)
                .fontColor(Color.Black)
                .fontWeight(FontWeight.Bold)
                .textAlign(TextAlign.Center)
            Button("+")
                .onClick(() => {
                    this.showCount++;
                })
        }
        .width("100%")
        .justifyContent(FlexAlign.Center)
    }

    aboutToAppear(): void {
        for (let i = 0; i < 5; i++) {
            this.leafData.push(new LeafItem())
        }
    }

    build() {
        // 线性布局
        Column() {
            // 标题栏
            this.customTitleBar();
            // 内容区 - 滚动
            List({ space: 0 }) {
                ForEach(this.leafData.slice(0, this.showCount), (item: LeafItem, index: number) => {
                    ListItem() {
                        Row() {
                            Image($r('app.media.ic_friend_sel'))
                                .width(item.height)
                                .height(item.height)
                            Row() {
                                Text(`文案_${index++}`)
                                    .height(item.height)
                            }
                            .backgroundColor(item.color)
                            .margin({ left: 12 })
                            .flexGrow(1)
                            .border({ width: { bottom: 1 }, color: Color.Gray })
                        }
                        .width('100%')
                    }
                    .padding(12)
                    .borderRadius({
                        topLeft: index === 0 ? 16 : 0,
                        topRight: index === 0 ? 16 : 0,
                        bottomLeft: index === this.leafData.length - 1 ? 16 : 0,
                        bottomRight: index === this.leafData.length - 1 ? 16 : 0,
                    })
                    .width('100%')
                    .backgroundColor(Color.White)
                })
            }
            .padding(16)
            .border({ width: 3, color: Color.Red, style: BorderStyle.Dashed })
            .backgroundColor(Color.Pink)
            .edgeEffect(EdgeEffect.Spring, { alwaysEnabled: true })
            // 使用 layoutWeight 替换掉 flexGrow
            // .flexGrow(1)
            .layoutWeight(1)
        }.width('100%')
        .height('100%')
        .backgroundColor(Color.White)
    }
}
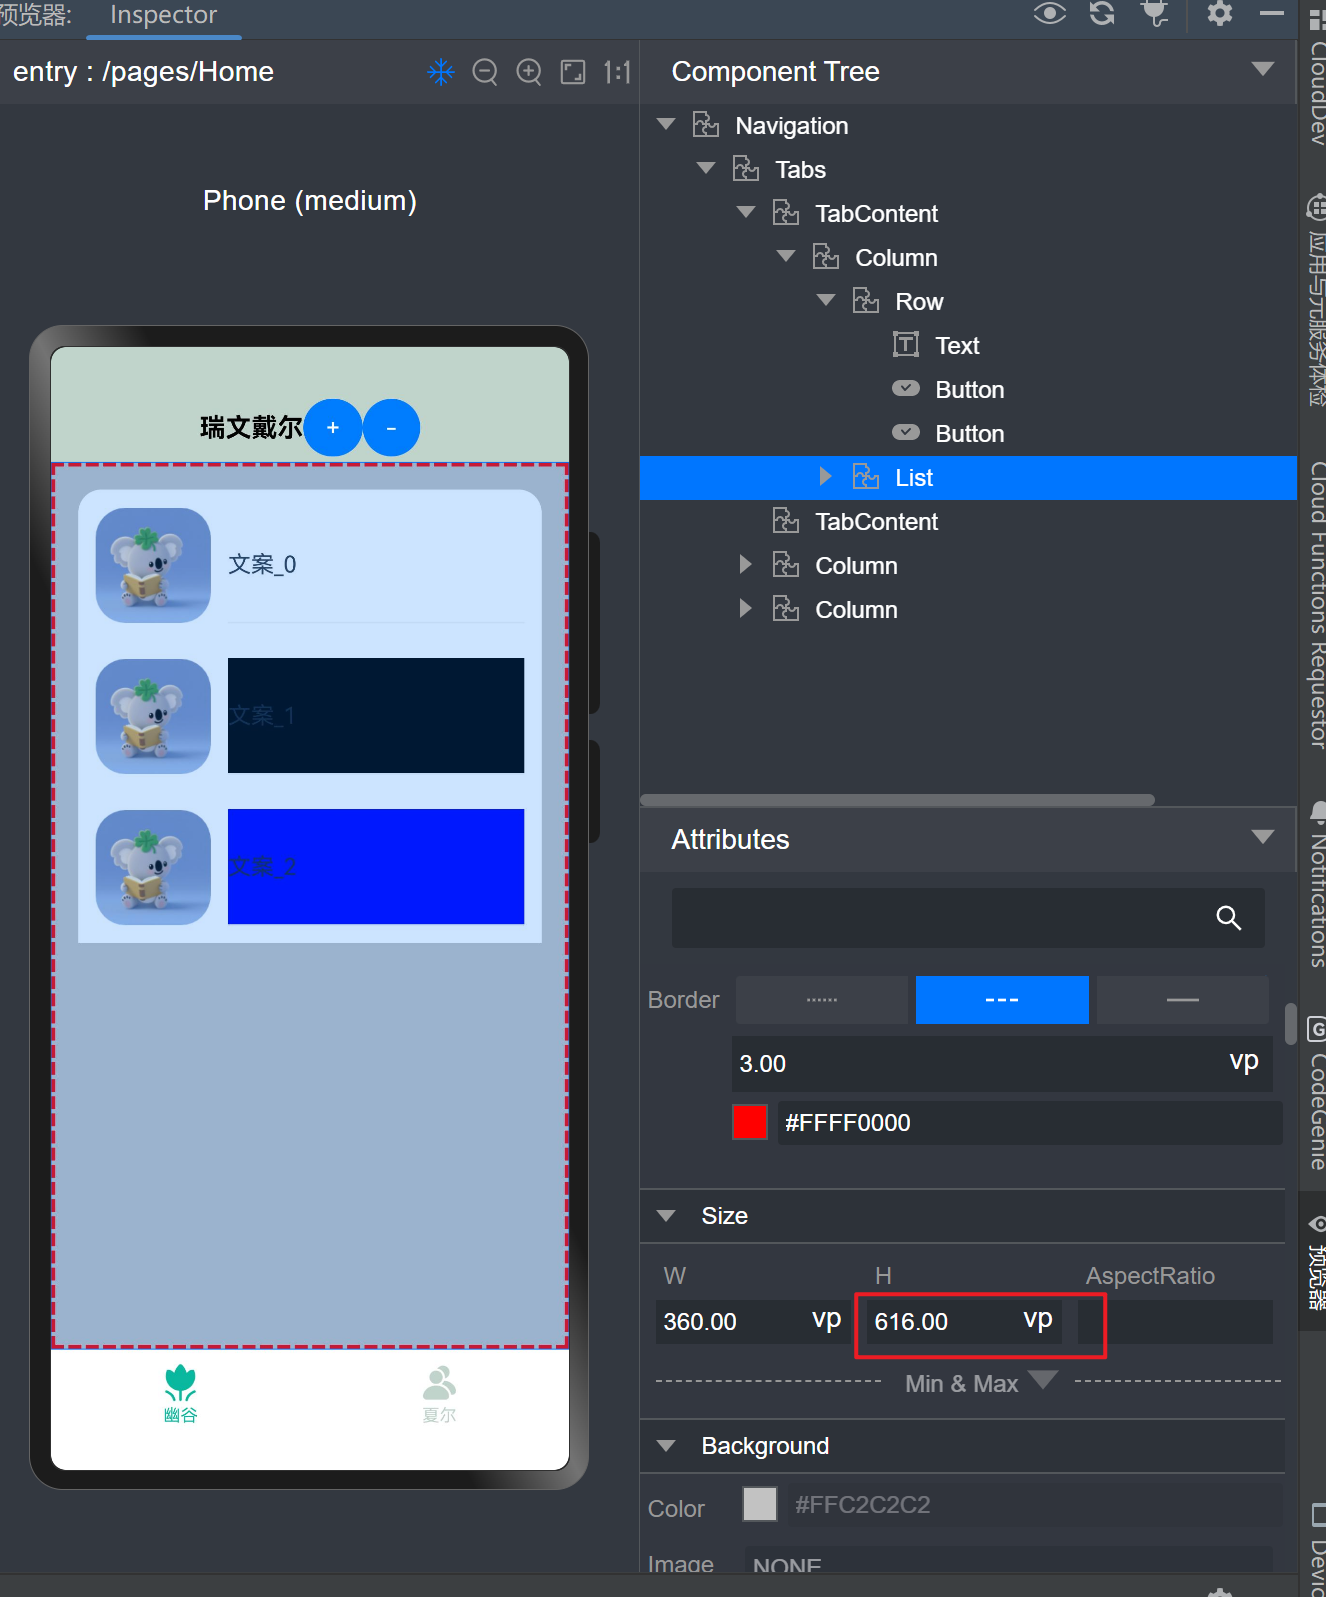
真机演示:
使用flexGrow:

使用layoutWeight:
注意:如果楼主一定要使用 flexGrow 属性,那就将顶部的 Column() 替换为 Flex({ direction: FlexDirection.Column })
更多关于HarmonyOS鸿蒙Next中flexGrow自动填充剩余空间的问题,求助的实战系列教程也可以访问 https://www.itying.com/category-93-b0.html


当 List 子项总高度超过父容器剩余空间时,如果你的Column高度没有约束,就会导致 flexGrow(1) 的 List 继续扩展高度。说白了就是和你布局嵌套方式和属性设置有关。
你可以通过 Flex 分配空间:
build() {

  Flex({ direction: FlexDirection.Column }) {

    // 标题栏固定高度
    this.customTitleBar()
      .height(60) // 设置固定高度

    // 内容区(占剩余空间)
    List({ space: 0 }) {
      // 列表项...
    }
    .flexGrow(1) // 强制占满剩余高度
  }
  .width('100%')
  .height('100%') // 约束父容器高度
}
给滚动容器设置高度,显式限制 List 的高度:
Column() {
  this.customTitleBar()
    .height(60)

  List({ space: 0 }) {
    // 列表项...
  }
  .height(0)       // 强制高度由 flexGrow 分配
  .flexGrow(1)    // 占满剩余空间
}
.width('100%')
.height('100%')
List({ space: 0 }) {
  ...
}. layoutweight(1)
layoutWeight 决定子组件在父容器主轴方向剩余空间的分配比例,忽略组件自身尺寸设置(如 width/height)
在HarmonyOS Next中,flexGrow属性用于控制Flex容器中组件的扩展比例,以填充剩余空间。当设置flexGrow大于0时,组件会根据比例分配额外空间。确保父容器为Flex布局,并检查子组件尺寸是否固定,避免冲突。若未生效,确认布局约束或使用调试工具查看样式计算。

在HarmonyOS Next中,flexGrow 用于在弹性布局中分配剩余空间。根据你的描述和代码,问题在于当 List 的子项总高度超过 Column 的剩余空间时,List 的高度被撑开了,而不是保持固定高度并内部滚动。
核心原因是 Column 作为弹性容器,默认的 alignItems 是 Start,这会导致子组件(如 List)在交叉轴上(这里是垂直方向)根据自身内容扩展。即使 List 设置了 flexGrow(1),它也只是在主轴(这里是垂直方向)上分配剩余空间,但当内容过多时,List 自身的高度会基于内容计算,从而突破 flexGrow 的限制。
解决方案是限制 List 的高度,使其不超过 Column 的剩余空间。在ArkUI中,可以使用 layoutWeight 或结合 flexGrow 与 constraintSize 来控制。但更直接的方法是使用 Scroll 和 Column 组合,或者调整 List 的布局约束。
在你的代码中,可以尝试以下修改:
-
为
List明确设置高度约束:使用.height('100%')或.constraintSize({ maxHeight: '100%' }),但注意这可能需要父容器有明确的高度。由于Column已经设置了height('100%'),List使用flexGrow(1)理论上应占满剩余空间,但实际中可能因内容而扩展。 -
使用
Scroll替代List的滚动:如果List的行为不符合预期,可以考虑用Scroll包裹一个Column来模拟列表,但这会失去List的复用优化。 -
检查布局层级:确保
List的父容器(即Column)的高度计算正确。你的代码中Column已设置height('100%'),这通常是有效的。 -
使用
layoutWeight:在弹性布局中,layoutWeight可以更稳定地分配空间。将List的flexGrow(1)替换为.layoutWeight(1),这能更强制地分配剩余空间,防止内容撑开。
修改建议:将 List 的 .flexGrow(1) 改为 .layoutWeight(1),并确保 Column 的 justifyContent 默认为 FlexStart(这符合你的需求)。如果问题依旧,可以尝试为 List 添加 .height('100%') 作为备用。
代码修改部分:
List({ space: 0 }) {
  // ... 内容
}
.layoutWeight(1) // 替代 .flexGrow(1)
// 其他样式保持不变
这样,List 会强制占用 Column 中的剩余空间,内容超出时内部滚动,而不会撑开容器。如果仍无效,可能需要检查 List 的子项高度计算是否正确,或考虑使用 Scroll 组件重新实现布局。