


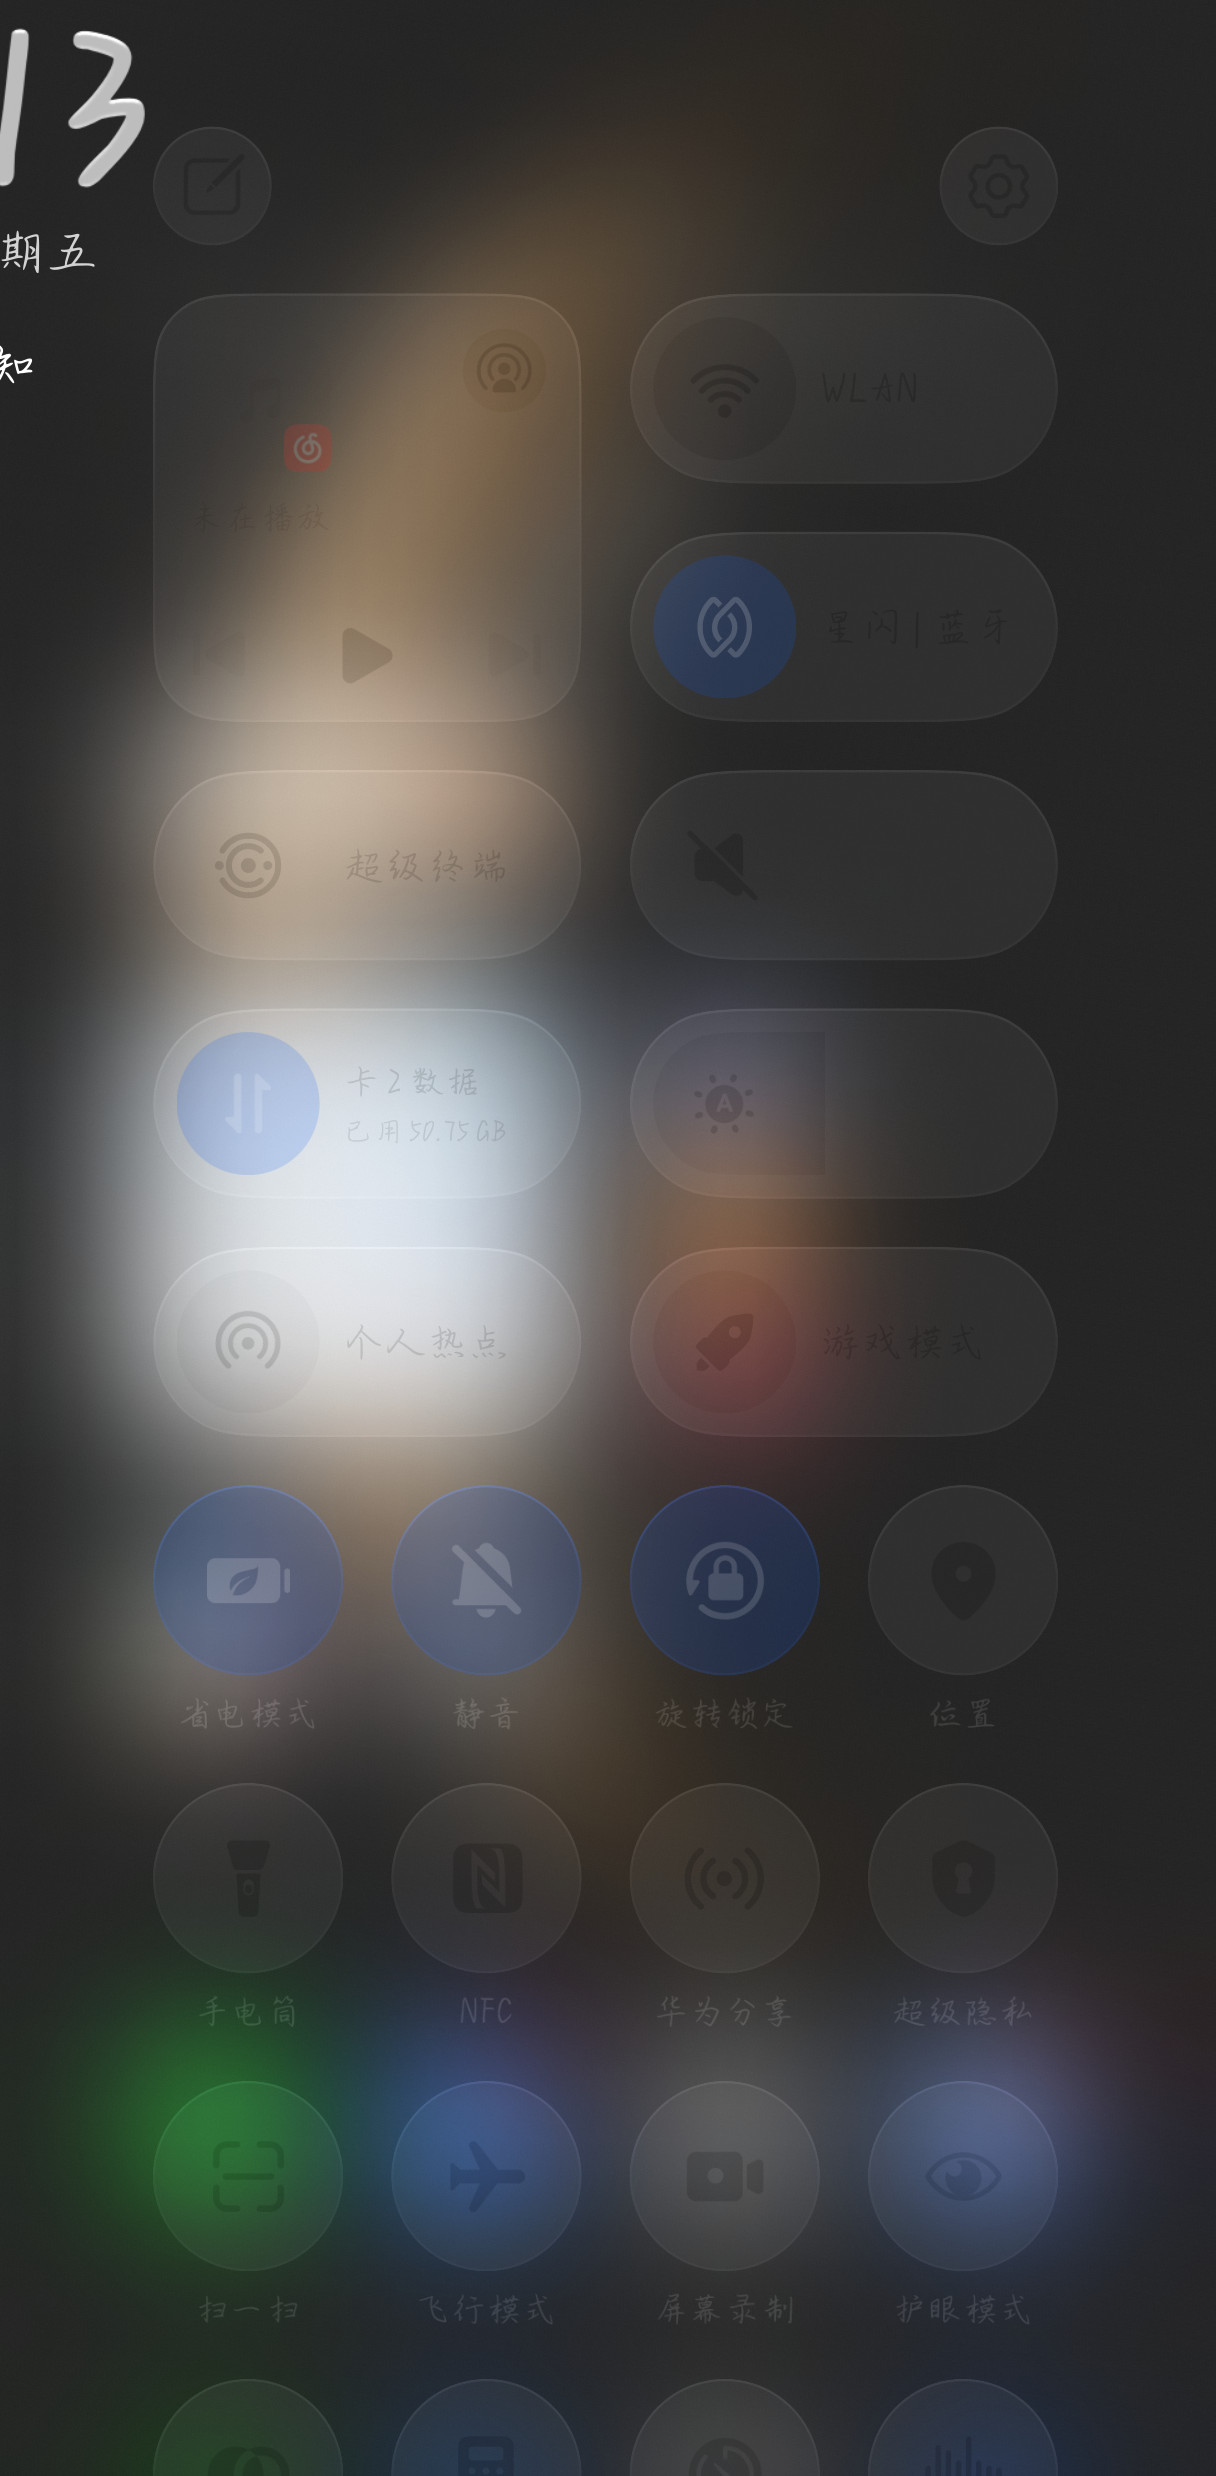
HarmonyOS鸿蒙Next中怎么实现类似华为控制中心左右切换页面的叠层效果。
HarmonyOS鸿蒙Next中怎么实现类似华为控制中心左右切换页面的叠层效果。
开发新手,打算做个类似的效果,但不知道用什么组件或是其他方法实现对应的动画效果
更多关于HarmonyOS鸿蒙Next中怎么实现类似华为控制中心左右切换页面的叠层效果。的实战教程也可以访问 https://www.itying.com/category-93-b0.html

主要涉及的技术点:
1、手势:通过 PanGesture 手势,让负一屏跟随手势显示和隐藏。
2、模糊处理:使用 backdropBlur 为组件添加背景模糊效果,支持自定义设置模糊半径和灰阶参数。半径越大越模糊
3、UI布局:整体采用Stack叠层显示,主页面、模糊背景页面、负一屏页面。
难点在于手势的控制,参考 如何处理PanGesture与其他手势冲突问题 的场景三。
为了演示,采用了屏幕截图,就一张图作为主页面,gif很失帧,已真机运行为准:
demo源码:https://github.com/iHongRen/harmony-study-demo
下面主功能实现代码并不多,大部分是负一屏的卡片UI代码。
/**
 * @fileName : BlurDemo.ets
 * @author : @cxy
 * @date : 2026/4/17
 * @description : 负一屏实现
 */
import { display, window } from "@kit.ArkUI"

@Entry
@Component
export struct BlurDemo {
  @State private translateX: number = 0
  private startTime: number = 0
  private startTranslateX: number = 0
  private contentWidth: number = 0
  private maxBlur: number = 50
  private duration: number = 300
  private threshold: number = 0.5
  private panOption: PanGestureOptions = new PanGestureOptions({
    direction: PanDirection.Left | PanDirection.Right
  })

  // 判断是否为快速滑动
  isSwipeGesture(distance: number, duration: number): boolean {
    const speed = distance / duration;
    return speed > 0.5; // 速度阈值
  }

  blurRadius(): number {
    return Math.max(0,
      Math.min(this.maxBlur, (this.contentWidth + this.translateX) / this.contentWidth * this.maxBlur))
  }

  shouldShowBlur(): boolean {
    return this.translateX > -this.contentWidth
  }

  aboutToAppear(): void {
    const width = this.getUIContext().px2vp(display.getDefaultDisplaySync().width)
    this.contentWidth = width
    this.translateX = -width

    const context = this.getUIContext().getHostContext()
    if (context) {
      // 开启沉浸式全屏
      window.getLastWindow(context).then((win) => {
        win.setWindowLayoutFullScreen(true)
      })
    }
  }

  build() {
    Column() {
      Stack() {
        this.mainBuilder()
        this.blurBuilder()
        this.sideBuilder()
      }
      // 使用单个PanGesture,通过速度判断区分拖拽和滑动
      .gesture(
        PanGesture(this.panOption)
          .onActionStart(() => {
            this.startTranslateX = this.translateX
            this.startTime = Date.now()
          })
          .onActionUpdate((event: GestureEvent) => {
            if (event) {
              this.updateOffsetByGesture(event.offsetX)
            }
          })
          .onActionEnd((event: GestureEvent) => {
            const duration = Date.now() - this.startTime
            const distance = Math.abs(event.offsetX)

            // 根据速度判断是滑动还是拖拽
            if (this.isSwipeGesture(distance, duration)) {
              // 快速滑动,执行切换操作
              this.handleSwipeGesture(event)
            } else {
              // 慢速移动,保持拖拽位置并吸附到边界
              this.snapToEdge()
            }
          })
      )
    }
  }

  @Builder
  mainBuilder() {
    Image($r('app.media.phone_bg'))
      .width('100%')
      .height('100%')
  }

  @Builder
  blurBuilder() {
    Stack()
      .width('100%')
      .height('100%')
      .backdropBlur(this.blurRadius())
      .visibility(this.shouldShowBlur() ? Visibility.Visible : Visibility.Hidden)
  }

  @Builder
  sideBuilder() {
    List({ space: 20 }) {
      ListItem() {
        this.sectionHeader()
      }

      ListItem() {
        this.weatherCard()
      }

      ListItem() {
        this.memoCard()
      }

      ListItem() {
        this.healthCard()
      }

      ListItem() {
        this.newsCard()
      }
    }
    .padding({ left: 20, right: 20 })
    .contentStartOffset(50)
    .contentEndOffset(50)
    .edgeEffect(EdgeEffect.Spring, { alwaysEnabled: true })
    .scrollBar(BarState.Off)
    .width('100%')
    .height('100%')
    .translate({ x: this.translateX })
  }

  @Builder
  sectionHeader() {
    Column({ space: 8 }) {
      Text('今日卡片')
        .fontSize(28)
        .fontWeight(FontWeight.Bold)
        .fontColor('#111111')

      Text('向右滑动打开负一屏,向左滑动隐藏它')
        .fontSize(14)
        .fontColor('#6e6e73')
        .lineHeight(20)
    }
    .width('100%')
  }

  @Builder
  weatherCard() {
    Column({ space: 12 }) {
      Row() {
        Column({ space: 6 }) {
          Text('天气提醒')
            .fontSize(18)
            .fontWeight(FontWeight.Medium)
            .fontColor('#1c1c1e')

          Text('今天多云,最高 21℃,适合出行')
            .fontSize(14)
            .fontColor('#6e6e73')
            .lineHeight(20)
        }

        Stack() {
          Text('☀')
            .fontSize(20)
            .fontColor(Color.White)
        }
        .width(42)
        .height(42)
        .borderRadius('50%')
        .backgroundColor('#FF9F0A')

      }
      .justifyContent(FlexAlign.SpaceBetween)

      this.cardDivider()

      Row({ space: 12 }) {
        this.smallInfoBlock('风速', '5 km/h', '#34C759')
        this.smallInfoBlock('湿度', '62%', '#5AC8FA')
      }
    }
    .width('100%')
    .padding({
      top: 22,
      bottom: 22,
      left: 18,
      right: 18
    })
    .backgroundColor('rgba(255,255,255,0.95)')
    .borderRadius(20)
    .shadow({
      color: 'rgba(0,0,0,0.08)',
      offsetY: 10,
      radius: 22
    })
  }

  @Builder
  memoCard() {
    Column({ space: 12 }) {
      Text('备忘录')
        .fontSize(18)
        .fontWeight(FontWeight.Medium)
        .fontColor('#1c1c1e')

      Text('15:00 产品评审会议17:30 线上读书会')
        .fontSize(14)
        .fontColor('#6e6e73')
        .lineHeight(22)

      Row({ space: 10 }) {
        Text('今天')
          .fontSize(11)
          .fontWeight(FontWeight.Medium)
          .fontColor('#ffffff')
          .backgroundColor('#34C759')
          .padding({
            left: 10,
            right: 10,
            top: 4,
            bottom: 4
          })
          .borderRadius(12)

        Text('会议')
          .fontSize(11)
          .fontWeight(FontWeight.Medium)
          .fontColor('#ffffff')
          .backgroundColor('#007AFF')
          .padding({
            left: 10,
            right: 10,
            top: 4,
            bottom: 4
          })
          .borderRadius(12)
      }
    }
    .width('100%')
    .padding({
      top: 22,
      bottom: 22,
      left: 18,
      right: 18
    })
    .backgroundColor('rgba(255,255,255,0.95)')
    .borderRadius(20)
    .shadow({
      color: 'rgba(0,0,0,0.08)',
      offsetY: 10,
      radius: 22
    })
  }

  @Builder
  healthCard() {
    Column({ space: 14 }) {
      Text('健康目标')
        .fontSize(18)
        .fontWeight(FontWeight.Medium)
        .fontColor('#1c1c1e')

      Row({ space: 14 }) {
        this.statBlock('步数', '8,432', '#34C759')
        this.statBlock('睡眠', '7.5h', '#5AC8FA')
      }
    }
    .width('100%')
    .padding({
      top: 22,
      bottom: 22,
      left: 18,
      right: 18
    })
    .backgroundColor('rgba(255,255,255,0.95)')
    .borderRadius(20)
    .shadow({
      color: 'rgba(0,0,0,0.08)',
      offsetY: 10,
      radius: 22
    })
  }

  @Builder
  newsCard() {
    Column({ space: 12 }) {
      Row() {
        Text('今日要闻')
          .fontSize(18)
          .fontWeight(FontWeight.Medium)
          .fontColor('#1c1c1e')

        Text('查看更多')
          .fontSize(13)
          .fontColor('#007AFF')
      }
      .justifyContent(FlexAlign.SpaceBetween)

      Text('直播带货热潮继续,关注购物节优惠与物流动态。')
        .fontSize(14)
        .fontColor('#6e6e73')
        .lineHeight(20)
    }
    .width('100%')
    .padding({
      top: 22,
      bottom: 22,
      left: 18,
      right: 18
    })
    .backgroundColor('rgba(255,255,255,0.95)')
    .borderRadius(20)
    .shadow({
      color: 'rgba(0,0,0,0.08)',
      offsetY: 10,
      radius: 22
    })
  }

  @Builder
  cardDivider() {
    Stack()
      .width('100%')
      .height(1)
      .backgroundColor('rgba(0,0,0,0.08)')
  }

  @Builder
  smallInfoBlock(title: string, value: string, color: string) {
    Column({ space: 6 }) {
      Text(title)
        .fontSize(12)
        .fontColor('#6e6e73')

      Text(value)
        .fontSize(16)
        .fontWeight(FontWeight.Bold)
        .fontColor(color)
    }
    .width('50%')
    .padding({
      top: 14,
      bottom: 14,
      left: 14,
      right: 14
    })
    .backgroundColor('rgba(255,255,255,0.95)')
    .borderRadius(18)
  }

  @Builder
  statBlock(title: string, value: string, color: string) {
    Column({ space: 6 }) {
      Text(title)
        .fontSize(12)
        .fontColor('#6e6e73')

      Text(value)
        .fontSize(20)
        .fontWeight(FontWeight.Bold)
        .fontColor(color)
    }
    .width('48%')
    .padding({
      top: 16,
      bottom: 16,
      left: 16,
      right: 16
    })
    .backgroundColor('rgba(255,255,255,0.95)')
    .borderRadius(18)
  }

  @Builder
  cardItem(title: string, subtitle: string, accentColor: string) {
    Column({ space: 10 }) {
      Row() {
        Stack()
          .width(8)
          .height(8)
          .borderRadius('50%')
          .backgroundColor(accentColor)

        Column({ space: 4 }) {
          Text(title)
            .fontSize(16)
            .fontWeight(FontWeight.Bold)
            .fontColor('#1c1c1e')

          Text(subtitle)
            .fontSize(13)
            .fontColor('#8e8e93')
            .lineHeight(20)
        }
      }
      .width('100%')

      Stack()
        .width('100%')
        .height(1)
        .backgroundColor('rgba(0,0,0,0.06)')
    }
    .width('100%')
    .padding({
      top: 18,
      bottom: 18,
      left: 18,
      right: 18
    })
    .backgroundColor('rgba(255,255,255,0.9)')
    .borderRadius(22)
    .shadow({
      color: 'rgba(0,0,0,0.08)',
      offsetY: 10,
      radius: 24
    })
  }

  private handleSwipeGesture(event: GestureEvent) {
    // 计算滑动角度
    const angle = Math.atan2(event.offsetY, event.offsetX) * 180 / Math.PI

    if (Math.abs(angle) < 45) {
      // 向右快速滑动,打开负一屏
      if (this.translateX < 0) {
        this.getUIContext().animateTo({
          duration: this.duration,
          curve: Curve.Friction
        }, () => {
          this.translateX = 0
        })
      }
    } else if (Math.abs(angle) > 135) {
      // 向左快速滑动,关闭负一屏
      this.getUIContext().animateTo({
        duration: this.duration,
        curve: Curve.Friction
      }, () => {
        this.translateX = -this.contentWidth
      })
    }
  }

  private updateOffsetByGesture(offsetX: number) {
    const newOffset = this.startTranslateX + offsetX
    // 直接限制在有效范围内,使拖动更跟手
    this.translateX = Math.max(-this.contentWidth, Math.min(0, newOffset))
  }

  private snapToEdge() {
    const threshold = -this.contentWidth * this.threshold

    let targetOffset: number = this.translateX

    if (this.translateX > threshold) {
      // 打开负一屏,执行动画到0
      targetOffset = 0
    } else {
      // 关闭负一屏,执行动画到-contentWidth
      targetOffset = -this.contentWidth
    }

    this.getUIContext().animateTo({
      duration: this.duration,
      curve: Curve.Friction
    }, () => {
      this.translateX = targetOffset
    })
  }
}
更多关于HarmonyOS鸿蒙Next中怎么实现类似华为控制中心左右切换页面的叠层效果。的实战系列教程也可以访问 https://www.itying.com/category-93-b0.html

结合了沉浸光感,一起做上去效果更好
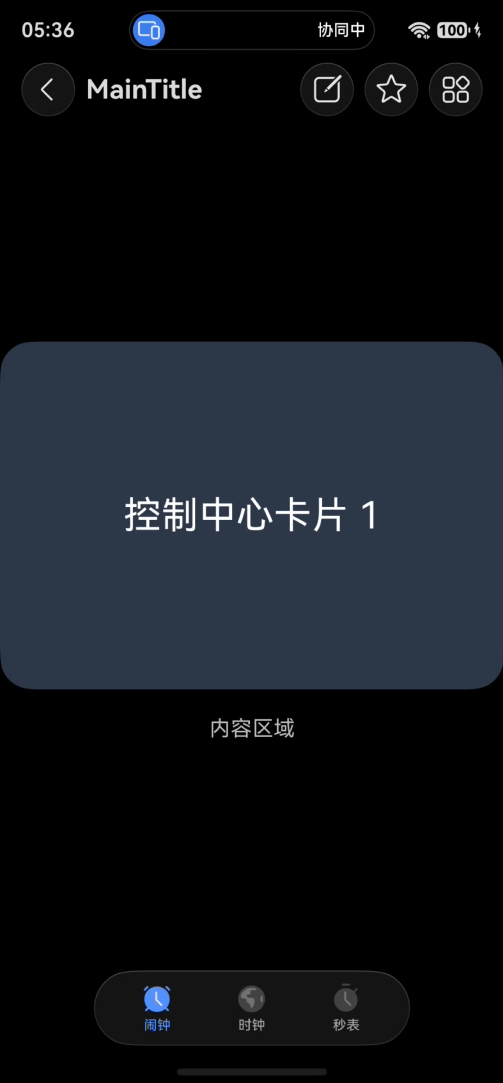
import { HdsAnimationMode, HdsNavigation, HdsNavigationTitleMode, HdsTabs, HdsTabsController, HdsNavigationMenuContentOptions, ScrollEffectType, hdsMaterial, } from '@kit.UIDesignKit';
import { SymbolGlyphModifier } from "@kit.ArkUI";

@Entry
@Component
struct Index {
  private scrollerForScroll: Scroller = new Scroller();
  private controller: HdsTabsController = new HdsTabsController();
  @State currentSwiperIndex: number = 0;

  aboutToAppear() {
    this.controller.applyHideAnimation(HdsAnimationMode.CLICK_ANIMATION);
    this.controller.applyShowAnimation(HdsAnimationMode.CLICK_ANIMATION);
  }

  private menus: HdsNavigationMenuContentOptions = {
    value: [{
      content: {
        label: 'menu1',
        icon: $r('sys.symbol.square_and_pencil'),
      }
    }, {
      content: {
        label: 'menu2',
        icon: $r('sys.symbol.star')
      },
    },{
      content: {
        label: 'menu3',
        icon: $r('sys.symbol.more')
      },
    }
    ],
  };

  // 计算卡片缩放
  private getScale(index: number): number {
    return index === this.currentSwiperIndex ? 1.0 : 0.85;
  }
  // 计算卡片水平偏移
  private getTranslateX(index: number): number {
    if (index === this.currentSwiperIndex) return 0;
    return index > this.currentSwiperIndex ? 25 : -25;
  }
  // 透明度
  private getOpacity(index: number): number {
    return index === this.currentSwiperIndex ? 1 : 0.82;
  }
  // 层级
  private getZIndex(index: number): number {
    return index === this.currentSwiperIndex ? 99 : 10;
  }
  // 卡片背景色
  private getCardBg(index: number): ResourceColor {
    const colorList: ResourceColor[] = ['#2D3748', '#3C4A60', '#4A3F5C'];
    return colorList[index % colorList.length];
  }

  @Builder
  SwiperCard(index: number) {
    Stack() {
      Text(`控制中心卡片 ${index + 1}`)
        .fontSize(28)
        .fontColor(Color.White)
    }
    .width('92%')
    .height(220)
    .borderRadius(24)
    .backgroundColor(this.getCardBg(index))
    .scale({ x: this.getScale(index), y: this.getScale(index) })
    .translate({ x: this.getTranslateX(index) })
    .opacity(this.getOpacity(index))
    .zIndex(this.getZIndex(index))
  }

  build() {
    HdsNavigation() {
      HdsTabs({ controller: this.controller }) {
        ForEach(MENU_CONFIG, (item: MenuItem) => {
          TabContent() {
            Stack() {
              Scroll(this.scrollerForScroll) {
                Column() {
                  // 嵌入:华为控制中心 叠层左右切换
                  Swiper() {
                    this.SwiperCard(0)
                    this.SwiperCard(1)
                    this.SwiperCard(2)
                  }
                  .width('100%')
                  .height(260)
                  .indicator(false)
                  .loop(false)
                  .itemSpace(8)
                  .onChange((idx: number) => {
                    this.currentSwiperIndex = idx;
                  })

                  // 原有占位内容
                  Text('内容区域')
                    .fontSize(16)
                    .margin({ top: 20 })
                }
                .width('100%')
              }
              .height('100%')
            }
            .expandSafeArea([SafeAreaType.SYSTEM], [SafeAreaEdge.BOTTOM])
          }
          .tabBar(new BottomTabBarStyle({
            normal: item.symbolGlyph, selected: item.symbolGlyph1
          }, item.label))
        })
      }
      .barOverlap(true)
      .vertical(false)
      .barPosition(BarPosition.End)
      .barFloatingStyle({
        barBottomMargin: 28,
        systemMaterialEffect:  {
          materialType: hdsMaterial.MaterialType.ADAPTIVE,
          materialLevel: hdsMaterial.MaterialLevel.ADAPTIVE
        }
      })
    }
    .mode(NavigationMode.Stack)
    .titleBar({
      content: {
        title: {
          mainTitle: 'MainTitle',
        },
        menu: this.menus,
      },
      style: {
        scrollEffectOpts: {
          enableScrollEffect: false,
          scrollEffectType: ScrollEffectType.GRADIENT_BLUR,
        },
        systemMaterialEffect: {
          materialType: hdsMaterial.MaterialType.ADAPTIVE,
          materialLevel: hdsMaterial.MaterialLevel.ADAPTIVE
        },
      },
      avoidLayoutSafeArea: false,
      enableComponentSafeArea: false,
    })
    .bindToScrollable([this.scrollerForScroll])
    .hideBackButton(false)
    .titleMode(HdsNavigationTitleMode.MINI)
    .ignoreLayoutSafeArea([LayoutSafeAreaType.SYSTEM], [LayoutSafeAreaEdge.TOP, LayoutSafeAreaEdge.BOTTOM])
    .backgroundColor(Color.Transparent)
  }
}

interface MenuItem {
  symbolGlyph: SymbolGlyphModifier,
  symbolGlyph1: SymbolGlyphModifier,
  label: string,
  defaultBgColor: ResourceColor,
  hoverBgColor: ResourceColor,
  pressBgColor: ResourceColor,
};

const MENU_CONFIG: MenuItem[] = [
  {
    symbolGlyph: new SymbolGlyphModifier($r('sys.symbol.alarm_fill_1')).renderingStrategy(SymbolRenderingStrategy.MULTIPLE_COLOR)
      .fontColor([$r('sys.color.ohos_id_color_bottom_tab_icon_off'),
        $r('sys.color.ohos_id_color_bottom_tab_icon_auxcolor_off02')]),
    symbolGlyph1: new SymbolGlyphModifier($r('sys.symbol.alarm_fill_1')).renderingStrategy(SymbolRenderingStrategy.MULTIPLE_COLOR)
      .fontColor([$r('sys.color.ohos_id_color_activated'), $r('sys.color.ohos_id_color_primary_contrary')]),
    label: '闹钟',
    defaultBgColor: Color.Transparent,
    hoverBgColor: $r('sys.color.ohos_id_color_hover'),
    pressBgColor: $r('sys.color.ohos_id_color_click_effect')
  },
  {
    symbolGlyph: new SymbolGlyphModifier($r('sys.symbol.worldclock_fill_2')).renderingStrategy(SymbolRenderingStrategy.MULTIPLE_COLOR)
      .fontColor([$r('sys.color.ohos_id_color_bottom_tab_icon_off'),
        $r('sys.color.ohos_id_color_bottom_tab_icon_auxcolor_off02')]),
    symbolGlyph1: new SymbolGlyphModifier($r('sys.symbol.worldclock_fill_2')).renderingStrategy(SymbolRenderingStrategy.MULTIPLE_COLOR)
      .fontColor([$r('sys.color.ohos_id_color_activated'), $r('sys.color.ohos_id_color_primary_contrary')]),
    label: '时钟',
    defaultBgColor: Color.Transparent,
    hoverBgColor: $r('sys.color.ohos_id_color_hover'),
    pressBgColor: $r('sys.color.ohos_id_color_click_effect')
  },
  {
    symbolGlyph: new SymbolGlyphModifier($r('sys.symbol.stopwatch_2')).renderingStrategy(SymbolRenderingStrategy.MULTIPLE_COLOR)
      .fontColor([$r('sys.color.ohos_id_color_bottom_tab_icon_off'),
        $r('sys.color.ohos_id_color_bottom_tab_icon_auxcolor_off02')]),
    symbolGlyph1: new SymbolGlyphModifier($r('sys.symbol.stopwatch_2')).renderingStrategy(SymbolRenderingStrategy.MULTIPLE_COLOR)
      .fontColor([$r('sys.color.ohos_id_color_activated'), $r('sys.color.ohos_id_color_primary_contrary')]),
    label: '秒表',
    defaultBgColor: Color.Transparent,
    hoverBgColor: $r('sys.color.ohos_id_color_hover'),
    pressBgColor: $r('sys.color.ohos_id_color_click_effect')
  }
];

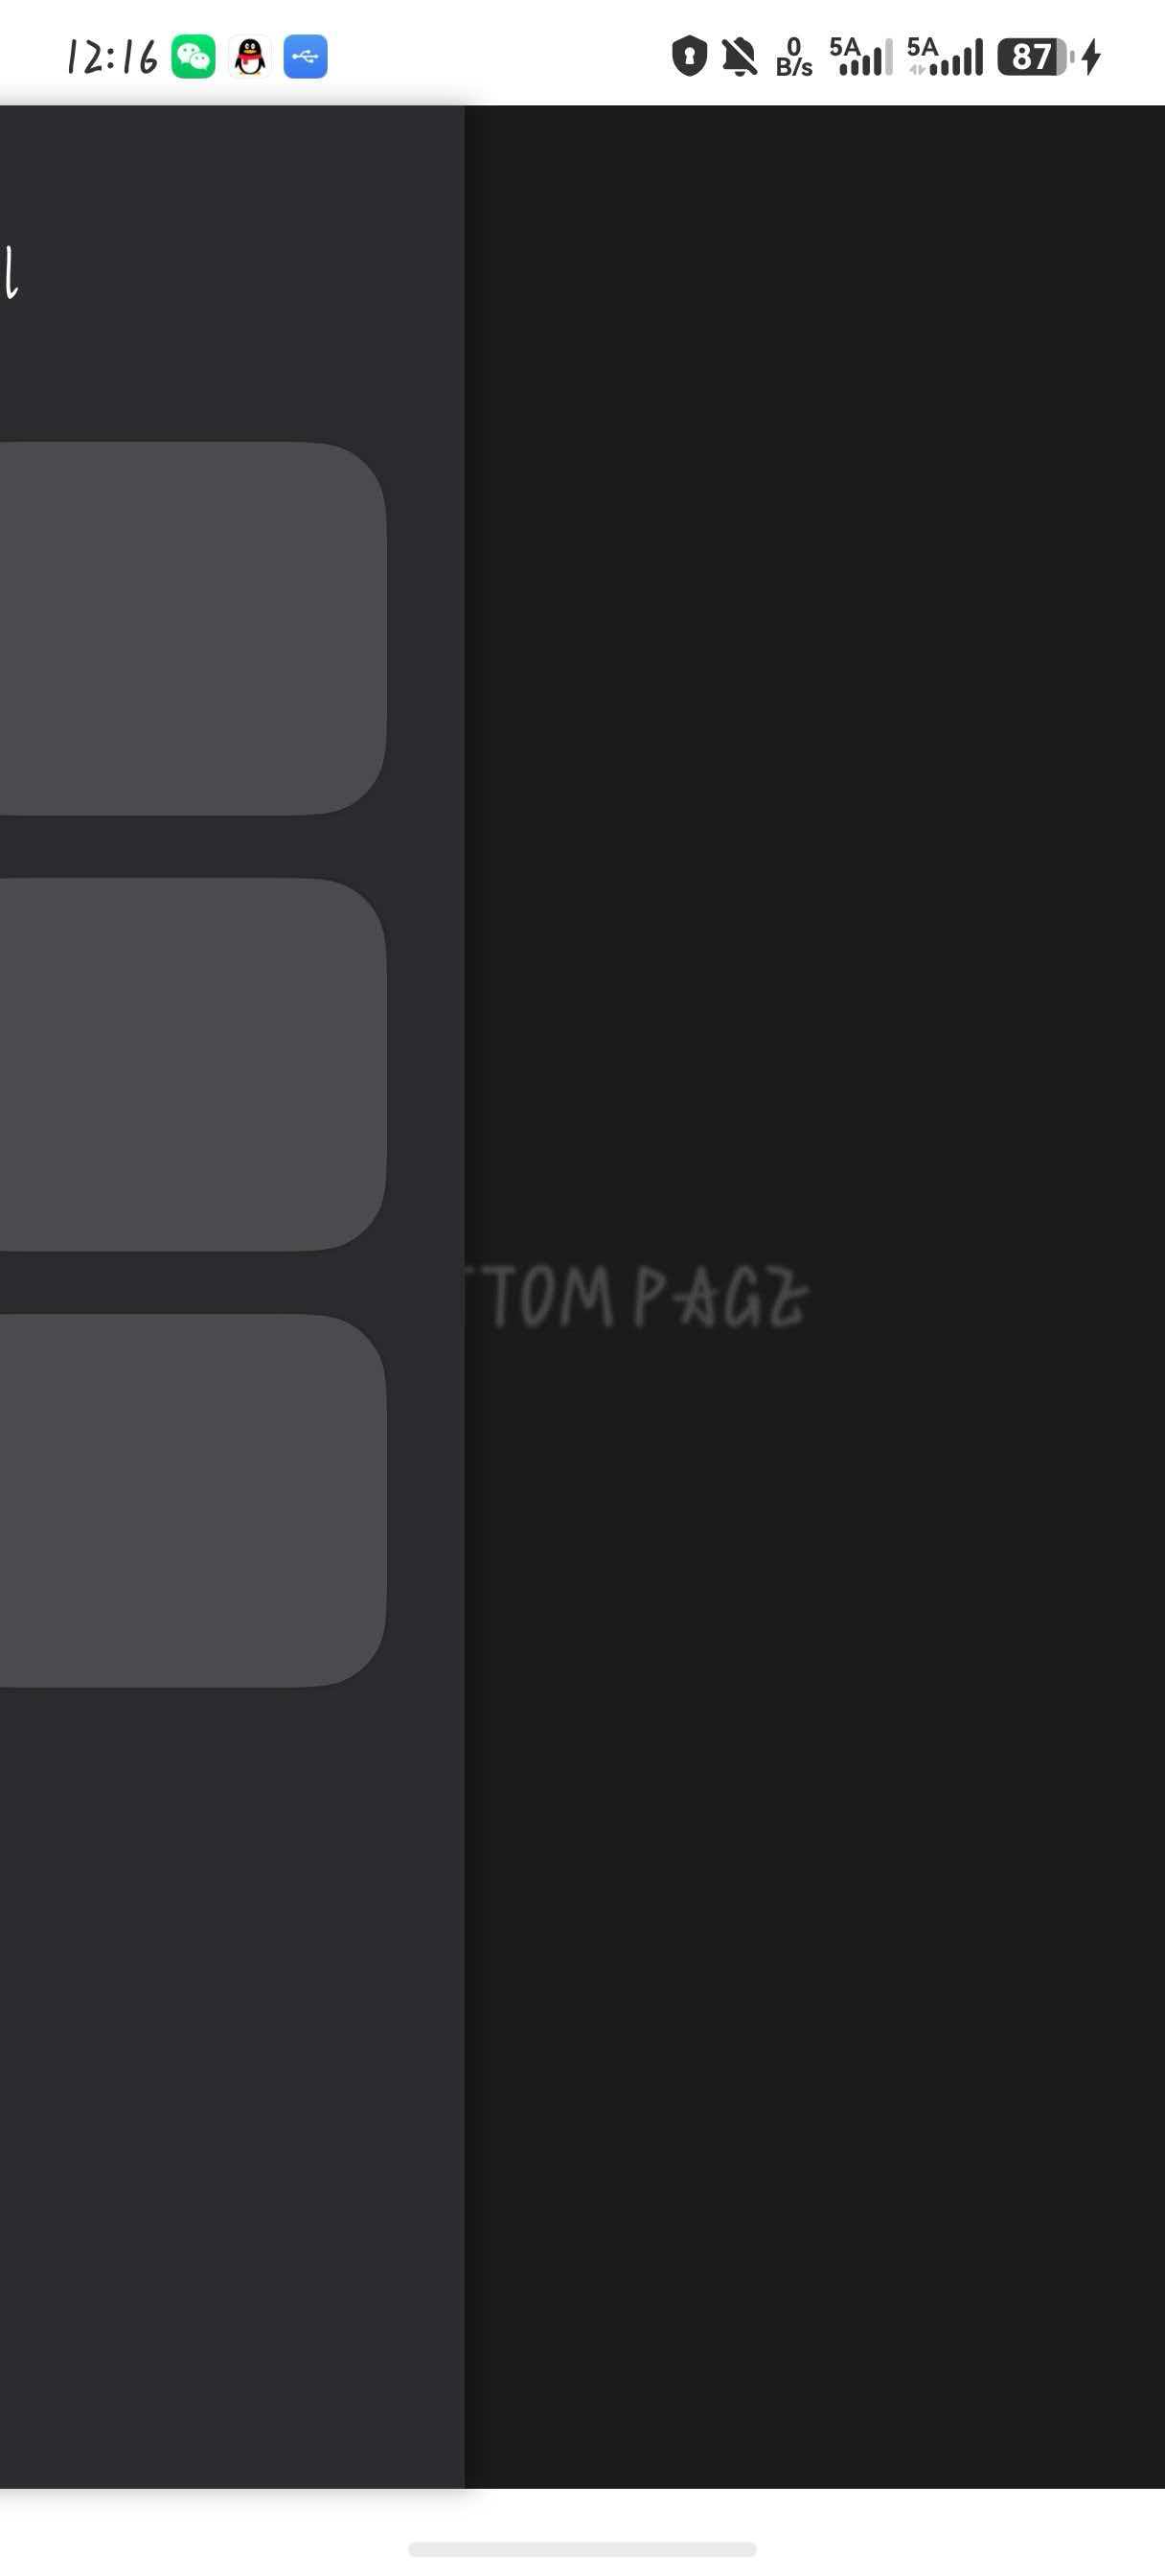
借用了点AI之力做了一个相对满意的版本,给大家参考。通过调整上层背景颜色,还能实现透明效果,可以在内容组件间的间隙看到下层内容。但我不太清楚会不会造成比较大的开销
@Entry
@Component
struct ProfessionalTransition {
  @State screenWidth: number = 375;
  // 修改 1: 初始位置在左侧负值处
  @State offsetX: number = -375;
  @State progress: number = 0;

  private lastX: number = -375;

  // 前50%完成所有视觉变化
  private getVisualProgress(): number {
    return Math.min(this.progress * 2, 1);
  }

  private getBottomScale(): number {
    const visualProgress = this.getVisualProgress();
    // 从 1.0 缩小到 0.85
    return 1 - (visualProgress * 0.15);
  }

  private getBottomOpacity(): number {
    const visualProgress = this.getVisualProgress();
    return 1 - visualProgress;
  }

  private getBottomBlur(): number {
    const visualProgress = this.getVisualProgress();
    return visualProgress * 5;
  }

  build() {
    Stack() {
      // --- 底层页面 (Page A) ---
      // 当 TopPanel 从左向右滑入时,底层页面产生缩放、淡出和模糊
      Column() {
        Column(){
          Text("BOTTOM PAGE")
            .fontSize(30)
            .fontWeight(FontWeight.Bold)
            .fontColor(Color.White)
            .scale({ x: this.getBottomScale(), y: this.getBottomScale() })
        }
        .backgroundColor(Color.Transparent)
        .opacity(this.getBottomOpacity())
        .blur(this.getBottomBlur())
      }
      .width('100%')
      .height('100%')
      .backgroundColor('#1A1A1B')
      .justifyContent(FlexAlign.Center)


      // --- 顶层页面 (Page B) ---
      Column() {
        Text("Top Panel").fontSize(24).fontColor(Color.White).margin(40)

        Flex({ wrap: FlexWrap.Wrap, justifyContent: FlexAlign.SpaceEvenly }) {
          ForEach([1, 2, 3, 4, 5, 6], (item: number) => {
            Column()
              .width('40%')
              .height(120)
              .borderRadius(24)
              .backgroundColor('rgba(255, 255, 255, 0.15)')
              .margin({ bottom: 20 })
              .shadow({ radius: 10, color: 'rgba(0,0,0,0.2)' })
          })
        }
      }
      .width('100%')
      .height('100%')
      .backgroundColor('#2C2C2E') // 给顶层增加背景色以遮盖底层
      .offset({ x: this.offsetX, y: 0 })
      // 增加阴影增强层级感(右侧阴影)
      .shadow({ radius: 20, color: 'rgba(0,0,0,0.3)', offsetX: 10 })

    }
    .width('100%')
    .height('100%')
    .backgroundColor(Color.Black)
    .onAreaChange((oldValue: Area, newValue: Area) => {
      this.screenWidth = newValue.width as number;
      // 修改 2: 初始化时保持在左侧
      if (this.offsetX < 0) {
        this.offsetX = -this.screenWidth;
        this.lastX = -this.screenWidth;
      }
    })
    .gesture(
      PanGesture({ direction: PanDirection.Horizontal })
        .onActionStart(() => {
          this.lastX = this.offsetX;
        })
        .onActionUpdate((event: GestureEvent) => {
          // 修改 3: 目标计算
          let targetX = this.lastX + event.offsetX;
          // 限制范围在 [-screenWidth, 0]
          this.offsetX = Math.min(0, Math.max(-this.screenWidth, targetX));
          // 修改 4: 进度计算 (从 -375 到 0 映射为 0 到 1)
          this.progress = (this.offsetX + this.screenWidth) / this.screenWidth;
        })
        .onActionEnd((event: GestureEvent) => {
          const velocity = event.velocityX;
          const currentX = this.offsetX;
          let finalX = 0;

          // 修改 5: 速度逻辑判定
          if (velocity > 800) {
            // 快速向右划:进入 TopPanel
            finalX = 0;
          } else if (velocity < -800) {
            // 快速向左划:回到 BottomPage
            finalX = -this.screenWidth;
          } else {
            // 位置判定
            finalX = currentX > -this.screenWidth / 2 ? 0 : -this.screenWidth;
          }

          let distance = Math.abs(finalX - currentX);
          let absVelocity = Math.abs(velocity);

          let duration = 350;
          if (absVelocity > 0) {
            duration = (distance / absVelocity) * 1000;
          }
          duration = Math.min(Math.max(duration, 150), 500);

          animateTo({
            duration: duration,
            curve: Curve.EaseOut,
            onFinish: () => {
              this.progress = finalX === 0 ? 1 : 0;
            }
          }, () => {
            this.offsetX = finalX;
            this.progress = (finalX === 0) ? 1 : 0;
          })
        })
    )
  }
}


在HarmonyOS Next中,使用Swiper组件并设置cachedCount为前后各1,通过customAnimation自定义过渡动画:利用animateTo对非当前页面施加Z轴位移、缩放及透明度变换(如缩小0.8、透明度0.7),即可实现类似控制中心的叠层切换效果。详细动画参数可参考TransitionEffect。
