


HarmonyOS鸿蒙Next中Scroll、List等滚动组件可以在item中间添加分隔符吗?
HarmonyOS鸿蒙Next中Scroll、List等滚动组件可以在item中间添加分隔符吗? 比如在不同的年份、月份中间添加一个分隔条组件。
不做数据分组的话,分隔条没有停靠效果是吗?

开发者你好,针对您的问题: 1、可以在 item 中间加分隔符吗? List:可以设置分割线,比如:
List() {
  //...
}
.divider({ color: Color.Blue, strokeWidth: 1 })
Scroll:可以加多个Divider组件。 2、不做数据分组,分隔条没有停靠效果是吗? 是的,不分组(不用 ListItemGroup): List:自定义分隔条随滚动走,不停靠。 Scroll:完全没有原生停靠能力,要停靠就必须分组。
您还可以参考我的这篇实战文章:
通过ListItemGroup实现列表分组展示及吸顶吸底效果
https://developer.huawei.com/consumer/cn/blog/topic/03216343276443038
更多关于HarmonyOS鸿蒙Next中Scroll、List等滚动组件可以在item中间添加分隔符吗?的实战系列教程也可以访问 https://www.itying.com/category-93-b0.html
divider
divider(value: ListDividerOptions | null)
设置ListItem分割线样式,默认无分割线。
List的分割线画在主轴方向两个子组件之间,第一个子组件上方和最后一个子组件下方不会绘制分割线。
多列模式下,ListItem与ListItem之间的分割线起始边距从每一列的交叉轴方向起始边开始计算,单列模式从List交叉轴方向起始边开始计算。
ListItem设置多态样式时,被按压的子组件上下的分割线不绘制。
卡片能力: 从API version 9开始,该接口支持在ArkTS卡片中使用。
元服务API: 从API version 11开始,该接口支持在元服务中使用。
系统能力: SystemCapability.ArkUI.ArkUI.Full
参数:
| 参数名 | 类型 | 必填 | 说明 |
|---|---|---|---|
| value | ListDividerOptions | null |
是 | ListItem分割线样式。 |
默认值:null
分组效果代码:
// xxx.ets
class TimeTableDataSource implements IDataSource {
  private list: TimeTable[] = [];
  constructor(list: TimeTable[]) {
    this.list = list;
  }
  totalCount(): number {
    return this.list.length;
  }
  getData(index: number): TimeTable {
    return this.list[index];
  }
  registerDataChangeListener(listener: DataChangeListener): void {
  }
  unregisterDataChangeListener(listener: DataChangeListener): void {
  }
}
class ProjectsDataSource implements IDataSource {
  private list: string[] = [];
  constructor(list: string[]) {
    this.list = list;
  }
  totalCount(): number {
    return this.list.length;
  }
  getData(index: number): string {
    return this.list[index];
  }
  registerDataChangeListener(listener: DataChangeListener): void {
  }
  unregisterDataChangeListener(listener: DataChangeListener): void {
  }
}
@Entry
@Component
struct ListItemGroupExample {
  private timeTable: TimeTable[] = [
  {
    title: '星期一',
    projects: ['语文', '数学', '英语']
  },
  {
    title: '星期二',
    projects: ['物理', '化学', '生物']
  },
  {
    title: '星期三',
    projects: ['历史', '地理', '政治']
  },
  {
    title: '星期四',
    projects: ['美术', '音乐', '体育']
  }
];
  private scroller: ListScroller = new ListScroller();
  @State listIndexInfo: VisibleListContentInfo = { index: -1 };
  @State mess:string = 'null';
  @State itemBackgroundColorArr: boolean[] = [false];
  @Builder
  itemHead(text: string) {
    Text(text)
      .fontSize(20)
      .backgroundColor(0xAABBCC)
      .width('100%')
      .padding(10)
  }
  @Builder
  itemFoot(num: number) {
    Text('共' + num + '节课')
      .fontSize(16)
      .backgroundColor(0xAABBCC)
      .width('100%')
      .padding(5)
  }
  build() {
    Column() {
      List({ space: 20, scroller: this.scroller}) {
        LazyForEach(new TimeTableDataSource(this.timeTable), (item: TimeTable, index: number) => {
          ListItemGroup({ header: this.itemHead(item.title), footer: this.itemFoot(item.projects.length) }) {
            LazyForEach(new ProjectsDataSource(item.projects), (project: string, subIndex: number) => {
              ListItem() {
                Text(project)
                  .width('100%')
                  .height(100)
                  .fontSize(20)
                  .textAlign(TextAlign.Center)
                  .backgroundColor(this.itemBackgroundColorArr[index * 3 +subIndex] ? 0x68B4FF: 0xFFFFFF)
              }
            }, (item: string) => item)
          }
          .divider({ strokeWidth: 1, color: Color.Blue }) // 每行之间的分界线
        },(item: string) => item)
      }
      .width('90%')
      .sticky(StickyStyle.Header | StickyStyle.Footer)
      .scrollBar(BarState.Off)
      .gesture(
        PanGesture()
          .onActionUpdate((event: GestureEvent) => {
            if (event.fingerList[0] != undefined && event.fingerList[0].localX != undefined && event.fingerList[0].localY != undefined) {
              try {
                this.listIndexInfo =
                  this.scroller.getVisibleListContentInfo(event.fingerList[0].localX, event.fingerList[0].localY);
              } catch (error) {
                console.info('Failed to get visible list content info:', error);
              }
              let itemIndex:string = 'undefined';
              if (this.listIndexInfo.itemIndexInGroup != undefined ) {
                itemIndex = this.listIndexInfo.itemIndexInGroup.toString();
                if (this.listIndexInfo.index != undefined && this.listIndexInfo.index >= 0 &&
                  this.listIndexInfo.itemIndexInGroup >= 0 ) {
                  this.itemBackgroundColorArr[this.listIndexInfo.index * 3 + this.listIndexInfo.itemIndexInGroup] = true;
                }
              }
              this.mess = 'index:' + this.listIndexInfo.index.toString() + ' itemIndex:' + itemIndex;
            }
          }))
      .gesture(
        TapGesture({ count: 1 })
          .onAction((event: GestureEvent) => {
            if (event) {
              this.itemBackgroundColorArr.splice(0,this.itemBackgroundColorArr.length);
            }
          })
      )
      Text('您当前位置Item索引为'+ this.mess)
        .fontColor(Color.Red)
        .height(50)
    }.width('100%').height('90%').backgroundColor(0xDCDCDC).padding({ top: 5 })
  }
}
interface TimeTable {
  title: string;
  projects: string[];
}
效果图:
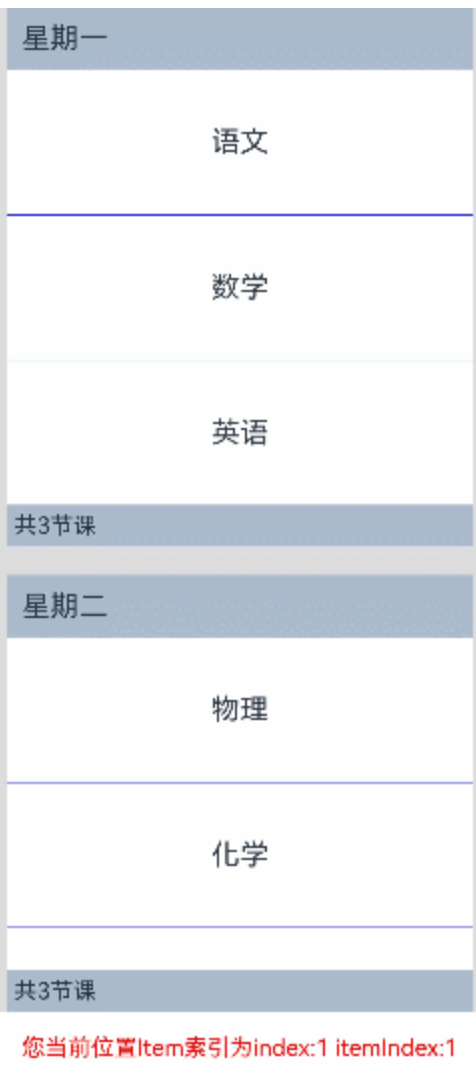

背景知识:
楼主,List有单独的设置分隔线的属性(.divider()),scroll没有单独设置分割线的属性,需要手动判断。
问题解决:
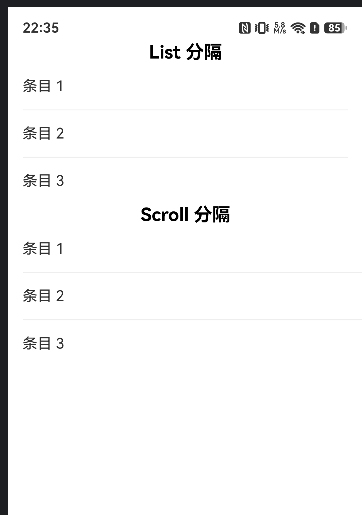
示例代码:
@Builder
function showScrollOrList(){
    Column(){
        Text("List 分隔")
            .fontSize(20)
            .fontColor(Color.Black)
            .fontWeight(FontWeight.Bold)
            .textAlign(TextAlign.Center)
        List() {
            ForEach([1,2,3], (item:number,index:number) => {
                ListItem() {
                    Text('条目 '+ item).padding(16)
                        .width("100%")
                        .fontSize(16)
                }
            })
        }
        .divider({
            strokeWidth: 1,        // 线宽
            color: '#eee',          // 颜色
            startMargin: 16,        // 左边距
            endMargin: 16           // 右边距
        })

        Text("Scroll 分隔")
            .fontSize(20)
            .fontColor(Color.Black)
            .fontWeight(FontWeight.Bold)
            .textAlign(TextAlign.Center)
        Scroll() {
            Column() {
                ForEach([1,2,3], (item:number, index) => {
                    Column() {
                        Text('条目 '+ item).padding(16)
                            .width("100%")
                            .fontSize(16)
                        // 最后一个 item 不画分割线
                        if (index < 2) {
                            Divider()
                                .strokeWidth(1)
                                .color('#eee')
                                .margin({ left: 16 })
                        }
                    }
                })
            }
        }

    }
    .width("100%")
    .height("100%")

}
真机演示:

- 可以在不同的年份、月份中间添加一个分隔条组件。数据做好flag,条件渲染就行。
- 关于停靠效果。
· List还是推荐ListItemGroup+sticky。《示例》
· Scroll和List都可以通过覆盖一个固定组件在顶部,通过监听滚动,根据数据项滚动位置控制覆盖组件的状态和显示。

首先第一个问题肯定可以添加分隔符的,后面我会说2种方式。然后是第二个问题不做数据分组的话,分隔条确实没有停靠效果。
- 简单分割线:使用List的divider属性
List组件内置了divider属性,可以在ListItem之间添加统一的分割线。但这种方式只能添加样式固定的线条,不支持自定义组件,也无法在不同位置显示不同样式的分隔符。
List({ space: 20 }) {
  // ListItem...
}
.divider({ strokeWidth: 1, color: '#EEEEEE', startMargin: 20, endMargin: 20 })
- 自定义分隔条组件:使用ListItemGroup的header/footer
使用ListItemGroup组件,将每个分组的数据包裹在一个ListItemGroup中,通过header属性设置分隔条组件。
// 定义分组数据模型
interface DataGroup {
  title: string;   // 分组标题,如"2024年6月"
  items: string[]; // 该分组下的数据项
}

@Entry
@Component
struct GroupListExample {
  private dataGroups: DataGroup[] = [
    { title: '2024年6月', items: ['事项1', '事项2', '事项3'] },
    { title: '2024年5月', items: ['事项4', '事项5'] },
    { title: '2024年4月', items: ['事项6', '事项7', '事项8', '事项9'] },
  ];

  // 分组分隔条(header)
  @Builder
  groupHeader(title: string) {
    Row() {
      Text(title)
        .fontSize(16)
        .fontColor('#333333')
        .fontWeight(FontWeight.Bold)
    }
    .width('100%')
    .height(40)
    .padding({ left: 16 })
    .backgroundColor('#F5F5F5')
  }

  build() {
    List({ space: 0 }) {
      ForEach(this.dataGroups, (group: DataGroup) => {
        ListItemGroup({ header: this.groupHeader(group.title) }) {
          ForEach(group.items, (item: string) => {
            ListItem() {
              Text(item)
                .width('100%')
                .height(60)
                .fontSize(15)
                .padding({ left: 16 })
            }
          }, (item: string) => item)
        }
        .divider({ strokeWidth: 0.5, color: '#EEEEEE' }) // 组内item之间的分割线
      }, (group: DataGroup) => group.title)
    }
    .width('100%')
    .height('100%')
    .sticky(StickyStyle.Header) // 启用header吸顶
  }
}
可以的。
无论是 Scroll + ForEach 还是 List + ListItem,本质上都可以把分隔条当成一个普通组件插进去,
直接渲染:
ForEach(data, (item) => {
  if (item.type === 'divider') {
    DividerView()
  } else {
    ItemView(item)
  }
})
即可。
但你说的“不做数据分组的话,分隔条没有停靠效果是吗?”
应该是对的。
普通情况下:
Item
Item
Divider
Item
Item
这个 Divider 只是列表里的一个普通元素。
滚过去就滚过去了:
↑
Divider
↓
不会自动吸顶。
如果想实现:
2024年    ← 吸顶
Item
Item
Item
滚到:
2025年    ← 替换2024年吸顶
Item
Item
这种效果,就需要使用 List 的分组能力。
通常会用:
List() {
  ForEach(groups, (group) => {
    ListItemGroup({
      header: HeaderView(group.title)
    }) {
      ...
    }
  })
}
然后开启:
.sticky(StickyStyle.Header)
或者对应的吸顶配置。
这样 Header 才会被系统识别成分组头,实现停靠效果。
所以简单总结:
- 只想显示分隔条 → 直接插组件即可。
- 想要年月分隔并吸顶 → 用
ListItemGroup + Header。 Scroll + ForEach没有原生吸顶能力,需要自己监听滚动实现。List做年月分组场景是官方更推荐的方案。


不做数据分组的话,可以用条件渲染自定义组件,就是没有吸顶的效果,但是支持自定义分隔
interface DataItem {
    id: string;
    month: string;   // 所属月份,用于判断是否需要显示分隔条
    content: string;  // 列表项内容
}

@Entry
@Component
struct TesPage {
    private dataList: DataItem[] = [
        { id: '1',  month: '2026年1月', content: '完成项目立项评审' },
        { id: '2',  month: '2026年1月', content: '需求分析文档定稿' },
        { id: '3',  month: '2026年1月', content: '技术方案评审通过' },
        { id: '4',  month: '2026年2月', content: '核心模块开发完成' },
        { id: '5',  month: '2026年2月', content: '接口联调测试通过' },
        { id: '6',  month: '2026年3月', content: '系统测试完成' },
        { id: '7',  month: '2026年3月', content: '性能优化与安全加固' },
        { id: '8',  month: '2026年3月', content: '正式发布上线' },
        { id: '9',  month: '2026年4月', content: '系统测试完成' },
        { id: '10',  month: '2026年4月', content: '性能优化与安全加固' },
        { id: '11',  month: '2026年4月', content: '正式发布上线' },
        { id: '12',  month: '2026年5月', content: '系统测试完成' },
        { id: '13',  month: '2026年5月', content: '性能优化与安全加固' },
        { id: '14',  month: '2026年6月', content: '正式发布上线' },
        { id: '15',  month: '2026年7月', content: '系统测试完成' },
        { id: '16',  month: '2026年7月', content: '性能优化与安全加固' },
        { id: '17',  month: '2026年8月', content: '正式发布上线' },
        { id: '18',  month: '2026年9月', content: '系统测试完成' },
        { id: '19',  month: '2026年10月', content: '性能优化与安全加固' },
        { id: '20',  month: '2026年10月', content: '正式发布上线' },
    ];

    needSeparator(index: number): boolean {
        if (index === 0) {
            return true;
        }
        return this.dataList[index].month !== this.dataList[index - 1].month;
    }

    build() {
        Column() {
            Text('项目进度')
                .fontSize(20)
                .fontWeight(FontWeight.Bold)
                .margin({ top: 20, bottom: 12 })

            List({ space: 0 }) {
                ForEach(this.dataList, (item: DataItem, index: number) => {
                    ListItem() {
                        Column() {
                            if (this.needSeparator(index)) {
                                Row() {
                                    Text(item.month)
                                        .fontSize(14)
                                        .fontColor('#666666')
                                }
                                .width('100%')
                                .height(36)
                                .padding({ left: 16 })
                                .backgroundColor('#F0F0F0')
                                .justifyContent(FlexAlign.Start)
                                .alignItems(VerticalAlign.Center)
                            }

                            Row() {
                                Text(item.content)
                                    .fontSize(16)
                                    .fontColor('#333333')

                                Blank()

                                Text('>')
                                    .fontSize(14)
                                    .fontColor('#CCCCCC')
                            }
                            .width('100%')
                            .height(56)
                            .padding({ left: 16, right: 16 })
                            .alignItems(VerticalAlign.Center)
                        }
                    }
                }, (item: DataItem) => item.id)
            }
            .divider({ strokeWidth: 0.5, color: '#E0E0E0', startMargin: 16, endMargin: 0 })
            .width('100%')
            .layoutWeight(1)
        }
        .width('100%')
        .height('100%')
        .backgroundColor('#FFFFFF')
    }
}
如果只是普通分隔线,List 里可以用 divider 或手动插入一个 ListItem;Scroll 里也只能手动放分隔组件。若你希望“年份/月”这种分隔条在滚动时有停靠效果,建议从数据层就做分组,用 ListItemGroup 的 header 来承载年月标题。手动插入的分隔条本质上只是普通 item,会跟着内容滚走,不会自动 sticky。Scroll 没有 List 那种分组/停靠语义,除非你自己监听滚动位置,再用一个覆盖层显示当前分组标题。

可以。在HarmonyOS鸿蒙Next中,通过List组件的divider属性设置分隔符样式。Scroll组件可手动在子项间插入Divider组件或自定义分隔线。List配合ListItemGroup时,也可利用itemDivider属性实现。