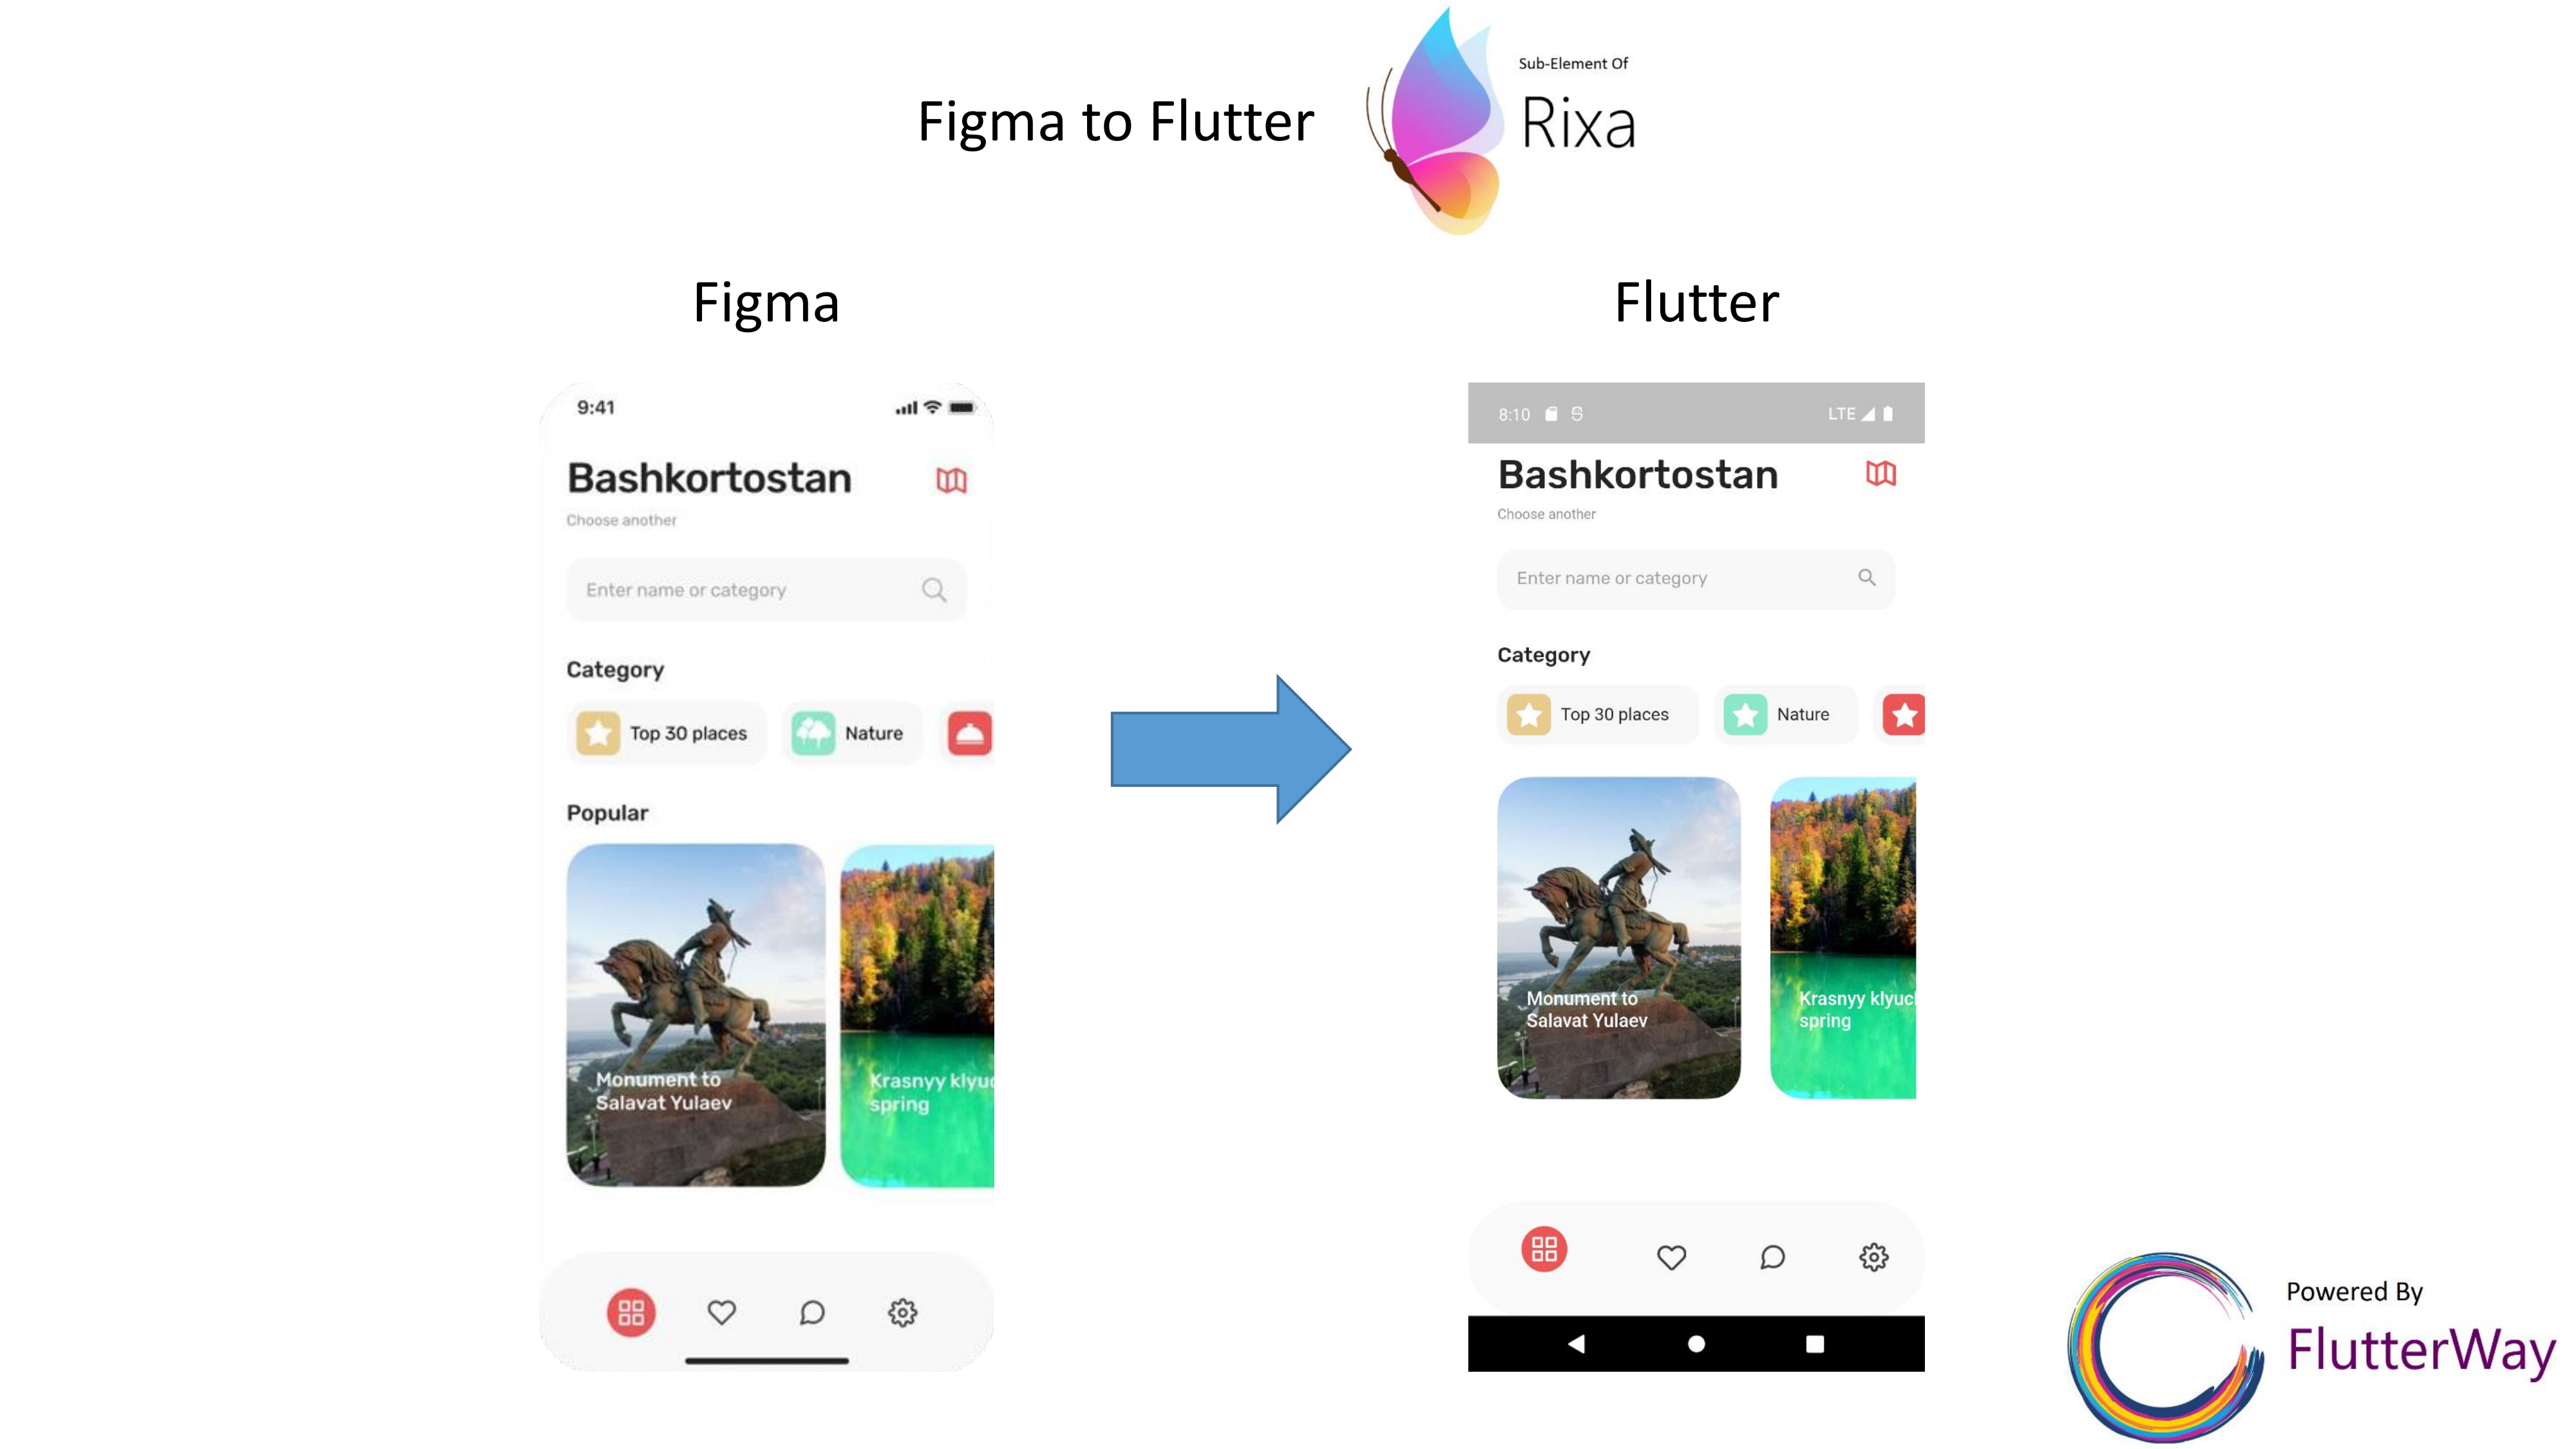
Flutter设计转换插件figma_to_flutter的使用
Flutter设计转换插件figma_to_flutter的使用
简介
figma_to_flutter 插件可以帮助您轻松地将Figma设计转换为Flutter代码,确保在Flutter环境中保留与Figma相同的值。

特性
- 将Figma像素值转换为Flutter像素值。
- 轻松将文本字体转换到Flutter环境。
- 使用诸如
FigmaContainer、FigmaText、FigmaBox等小部件,使工作更加简便。
开始使用
在使用该插件之前,请务必设置设备的测量参数。
void main() {
  // 设置设备宽度和高度
  Figma.setup(deviceWidth: 375, deviceHeight: 812);
  runApp(const TravellApp());
}
转换Figma像素
// 将20像素转换为水平方向上的Flutter像素值
double width20 = Figma.of(context).px(20, Axis.horizontal);

// 将20像素转换为垂直方向上的Flutter像素值
double height20 = Figma.of(context).px(20, Axis.vertical);
Padding(内边距)
有两种方式使用Padding:
作为Columns/Rows的子元素
Column(
    crossAxisAlignment: CrossAxisAlignment.start,
    children: [
      // 垂直方向上添加60像素的空白
      Figma.of(context).spacer(60, Axis.vertical),
      // 其他widget
    ])
Row(
    children: [
      // 水平方向上添加60像素的空白
      Figma.of(context).spacer(60, Axis.horizontal),
      // 其他widget
    ])
使用Padding
// EdgeInsets.only => Figma.of(context).paddingOnly(left: 24)
// EdgeInsets.all => Figma.of(context).paddingAll(24)
// EdgeInsets.symmetric => Figma.of(context).paddingSymmetric(horizontal: 20, vertical: 20)

Padding(
    padding: Figma.of(context).paddingOnly(left: 24),
    child: Column()
)
TextStyle(文本样式)
Text("Bashkortostan",
    style: figma.style(
        googleFont: "Rubik",
        fontSize: 34,
        color: textColor,
        fontWeight: FontWeight.w500))
预制的小部件
FigmaText
将文本转换为Flutter小部件的例子:
FigmaText(
  "Top 30 places",
  height: 20,
  width: 96,
  style: Figma.of(context).style(
      googleFont: "Rubik",
      fontSize: 15,
      color: Colors.black,
      fontWeight: FontWeight.w400),
)
FigmaContainer
将预设大小的盒子转换为Flutter Container的小部件:
FigmaContainer(
  width: 200,
  height: 60,
  padding: figma.paddingAll(8),
  child: Row(),
)
FigmaBox
将预设大小的盒子转换为Flutter SizedBox的小部件:
FigmaBox(
  width: 200,
  height: 60,
  child: Row(),
)
完整示例
以下是一个完整的示例,展示了如何使用 figma_to_flutter 插件:
import 'package:flutter/material.dart';
import 'package:figma_to_flutter/figma_to_flutter.dart';
import 'widgets/my_bottom_navigation_bar.dart';
import 'widgets/view_category.dart';
import 'widgets/view_image.dart';

void main() {
  // 设置设备宽度和高度
  Figma.setup(deviceWidth: 375, deviceHeight: 812);
  runApp(const TravellApp());
}

class TravellApp extends StatelessWidget {
  const TravellApp({super.key});
  [@override](/user/override)
  Widget build(BuildContext context) {
    return MaterialApp(
      theme: ThemeData(
        primarySwatch: Colors.blue,
      ),
      debugShowCheckedModeBanner: false,
      home: const HomeView(),
    );
  }
}

class HomeView extends StatefulWidget {
  const HomeView({super.key});

  [@override](/user/override)
  State<HomeView> createState() => _HomeViewState();
}

class _HomeViewState extends State<HomeView> {
  Color textColor = const Color(0xFF242424);

  [@override](/user/override)
  Widget build(BuildContext context) {
    var figma = Figma.of(context);
    return Scaffold(
        backgroundColor: Colors.white,
        bottomNavigationBar: const MyBottomNavigationBar(),
        body: Padding(
          padding: figma.paddingOnly(left: 24),
          child: Column(
            crossAxisAlignment: CrossAxisAlignment.start,
            children: [
              // 添加垂直方向上的60像素空白
              figma.spacer(60, Axis.vertical),
              FigmaContainer(
                height: 40,
                padding: figma.paddingOnly(right: 24),
                child: Row(
                    mainAxisAlignment: MainAxisAlignment.spaceBetween,
                    children: [
                      Text("Bashkortostan",
                          style: figma.style(
                              googleFont: "Rubik",
                              fontSize: 34,
                              color: textColor,
                              fontWeight: FontWeight.w500)),
                      Image.asset(
                        "assets/icons/map.png",
                        width: figma.px(24, Axis.horizontal), // 将24像素转换为水平方向上的Flutter像素值
                      )
                    ]),
              ),
              figma.spacer(8, Axis.vertical),
              Padding(
                padding: figma.paddingOnly(right: 24),
                child: Text(
                  "Choose another",
                  style: figma.style(
                      fontSize: 12,
                      color: textColor.withOpacity(0.5),
                      fontWeight: FontWeight.w400),
                ),
              ),
              figma.spacer(24, Axis.vertical),
              Padding(
                padding: figma.paddingOnly(right: 24),
                child: FigmaContainer(
                  width: double.infinity,
                  height: 52,
                  decoration: BoxDecoration(
                      color: const Color(0xFFF8F8F8),
                      borderRadius: BorderRadius.circular(16)),
                  child: TextField(
                    textAlignVertical: TextAlignVertical.center,
                    style: figma.style(
                        googleFont: "Rubik",
                        fontSize: 15,
                        color: textColor,
                        fontWeight: FontWeight.w400),
                    decoration: InputDecoration(
                        hintText: "Enter name or category ",
                        hintStyle: figma.style(
                            googleFont: "Rubik",
                            fontSize: 15,
                            color: textColor.withOpacity(0.4),
                            fontWeight: FontWeight.w400),
                        contentPadding: figma.paddingOnly(left: 16),
                        border: InputBorder.none,
                        suffixIcon: Icon(
                          Icons.search,
                          color: textColor.withOpacity(0.4),
                          size: figma.px(20, Axis.horizontal), // 将20像素转换为水平方向上的Flutter像素值
                        )),
                  ),
                ),
              ),
              figma.spacer(28, Axis.vertical),
              Text("Category",
                  style: figma.style(
                      googleFont: "Rubik",
                      fontSize: 18,
                      color: textColor,
                      fontWeight: FontWeight.w500)),
              figma.spacer(16, Axis.vertical),
              FigmaBox(
                height: 52,
                child: ListView(
                  scrollDirection: Axis.horizontal,
                  children: const [
                    ViewCategory(
                        iconBackground: Color(0xFFEACB8E),
                        iconPath: "assets/icons/star.png",
                        text: "Top 30 places"),
                    ViewCategory(
                        iconBackground: Color(0xFF8DE8C7),
                        iconPath: "assets/icons/tree.png",
                        text: "Nature"),
                    ViewCategory(
                        iconBackground: Color(0xFFEB5757),
                        iconPath: "assets/icons/food.png",
                        text: "Gastro"),
                  ],
                ),
              ),
              figma.spacer(28, Axis.vertical),
              FigmaBox(
                height: 280,
                child: ListView(
                  scrollDirection: Axis.horizontal,
                  children: const [
                    ViewImage(
                        imagePath: "assets/images/Salavat Yulaev.png",
                        text: "Monument to Salavat Yulaev"),
                    ViewImage(
                        imagePath: "assets/images/Krasnyy klyuch.png",
                        text: "Krasnyy klyuch spring"),
                  ],
                ),
              ),
              const Spacer()
            ],
          ),
        ));
  }
}
更多关于Flutter设计转换插件figma_to_flutter的使用的实战系列教程也可以访问 https://www.itying.com/category-92-b0.html
更多关于Flutter设计转换插件figma_to_flutter的使用的实战系列教程也可以访问 https://www.itying.com/category-92-b0.html
当然,关于Flutter设计转换插件figma_to_flutter的使用,这里提供一个简单的代码案例来展示其基本用法。需要注意的是,figma_to_flutter这样的插件通常涉及从Figma设计文件自动生成Flutter代码,这个过程可能依赖于特定的插件或工具链,而这些工具可能会随时间变化。以下是一个假设性的示例,具体实现可能需要根据实际使用的插件版本和工具进行调整。
假设性代码案例
1. 安装插件
首先,假设你已经有一个Flutter项目,并且你找到了一个可以使用的figma_to_flutter插件(请注意,实际中可能没有一个官方或广泛认可的名为figma_to_flutter的单一插件,这里仅为示例)。你可能需要在pubspec.yaml文件中添加依赖项(这一步是假设性的,因为具体依赖项名称可能会有所不同):
dependencies:
  flutter:
    sdk: flutter
  # 假设的figma_to_flutter插件依赖项
  figma_to_flutter: ^x.y.z  # 请替换为实际版本号
然后运行flutter pub get来安装依赖。
2. 使用插件转换Figma设计
通常,这类插件会提供一个命令行工具或API来从Figma设计文件生成Flutter代码。以下是一个假设性的命令行使用示例:
# 假设的命令行工具使用方式
figma_to_flutter convert --figma-file=path/to/your/figma/file.fig --output=lib/generated_ui/
这条命令假设figma_to_flutter插件提供了一个convert命令,接受Figma文件路径和输出目录作为参数。
3. 在Flutter项目中使用生成的代码
假设插件成功生成了Flutter代码,你可以在Flutter项目中导入并使用这些生成的代码。例如,如果插件生成了一个名为home_screen.dart的文件,你可以在Flutter项目的其他地方导入并使用它:
import 'package:your_app/generated_ui/home_screen.dart';  # 根据实际生成路径调整

void main() {
  runApp(MyApp());
}

class MyApp extends StatelessWidget {
  @override
  Widget build(BuildContext context) {
    return MaterialApp(
      home: HomeScreen(),  # 使用生成的HomeScreen组件
    );
  }
}
注意事项
- 实际插件可能不同:请注意,上面的示例是基于假设的。实际中,你可能需要找到一个支持从Figma到Flutter转换的第三方工具或插件,并且这些工具的使用方式和命令可能会有所不同。
- 手动调整:自动生成的代码可能需要手动调整以适应你的具体需求或Flutter项目的结构。
- 文档和社区资源:查阅所选插件或工具的官方文档和社区资源,以获取最新的使用指南和最佳实践。
由于figma_to_flutter并不是一个广泛认可的标准插件名称,你可能需要搜索并评估不同的第三方工具或服务,以找到最适合你需求的解决方案。


