HarmonyOS鸿蒙Next中实现设备认证功能示例代码
HarmonyOS鸿蒙Next中实现设备认证功能示例代码
介绍
本示例使用鸿蒙ohos.distributedDeviceManager模块,实现设备间相互认证的能力。
实现设备认证功能源码链接
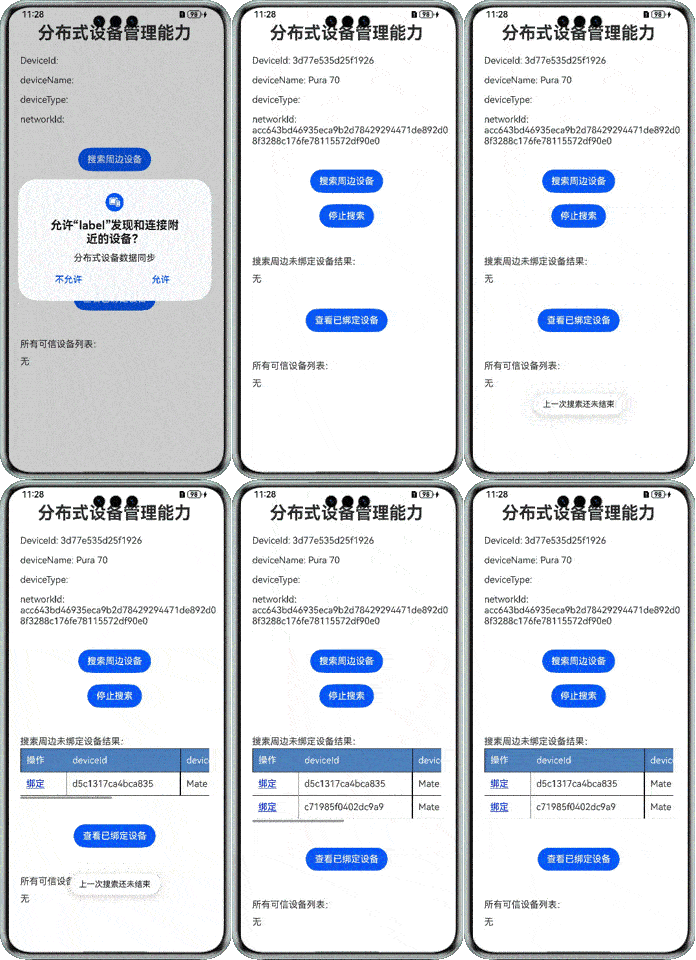
效果预览

使用说明
- 进入应用会出现是否允许应用发现和连接附近设备的弹窗,点击允许,会获取当前设备的信息并显示在应用首页。
- 点击“搜索周边设备”按钮,会搜索周边未绑定设备,并显示结果。
- 点击“查看已绑定设备”按钮,会以列表形式显示所有可信设备。
实现思路
发现和连接附近设备弹窗
向用户申请权限ohos.permission.DISTRIBUTED_DATASYNC,用户允许后,通过@ohos.distributedDeviceManager接口获取分布式设备的基本信息,如设备标识符,设备名称等等。核心代码如下,源码参考
Index.ets
async aboutToAppear(): Promise<void> {
    // 申请权限 ohos.permission.DISTRIBUTED_DATASYNC
    await this.getPermissions('ohos.permission.DISTRIBUTED_DATASYNC')
    // 获取hap信息
    this.bundleInfo = bundleManager.getBundleInfoForSelfSync(bundleManager.BundleFlag.GET_BUNDLE_INFO_DEFAULT | bundleManager.BundleFlag.GET_BUNDLE_INFO_WITH_APPLICATION)

    this.getLocalDeviceInfo()
  }
搜索周边设备
通过DeviceManager接口获取周边未绑定设备的信息,在调用DeviceManager的方法前,需要先通过createDeviceManager构建一个DeviceManager实例dmInstance。将搜索到的设备信息以列表的信息展示。核心代码如下,源码参考
Index.ets
// 注册发现设备成功回调
    this.getDmInstance().on('discoverSuccess', (data) => {
      console.log(TAG, `发现周边设备成功 ${JSON.stringify(data.device)}`)
      let hasSameDeviceId = false
      hasSameDeviceId = this.discoverDeviceList.some(deviceInfo => {
        return deviceInfo.deviceId === data.device.deviceId
      })
      if (!hasSameDeviceId) {
        this.discoverDeviceList.push(data.device)
      }
    })

    // 注册发现设备失败回调
    this.getDmInstance().on('discoverFailure', (data) => {
      console.log(TAG, `发现周边设备失败 ${data.reason}`)
    })

    const discoverParam: Record<string, number> = {
      'discoverTargetType': 1
    }
    const filterOptions: Record<string, number> = {
      'availableStatus': 0 // 仅发现不可信设备
    }

    try {
      this.discoverDeviceList = []
      this.getDmInstance().startDiscovering(discoverParam, filterOptions)
      this.isSearching = true
      console.log(TAG, `开始搜索周边设备`)
    } catch (e) {
      console.error(TAG, `startDiscovering fail ${e.code} ${e.message}`)
    }
  }

  stopSearch () {
    try {
      this.getDmInstance().stopDiscovering()
      console.log(TAG, `停止搜索`)
    } catch (e) {
      console.error(TAG, `停止搜索失败 ${e.code} ${e.message}`)
    }
    this.isSearching = false
  }

  getDmInstance (): deviceManager.DeviceManager {
    if (this.dmInstance) {
      return this.dmInstance
    }
    this.dmInstance = deviceManager.createDeviceManager(this.bundleInfo?.name)
    return this.dmInstance
  }
查看已绑定设备
利用getAvailableDeviceListSync接口同步获取所有可信设备列表。
更多关于HarmonyOS鸿蒙Next中实现设备认证功能示例代码的实战系列教程也可以访问 https://www.itying.com/category-93-b0.html
在HarmonyOS鸿蒙Next中,设备认证功能可以通过使用@ohos.security.deviceAuth模块来实现。以下是一个简单的示例代码,展示如何在鸿蒙Next中实现设备认证功能。
import deviceAuth from '@ohos.security.deviceAuth';

// 初始化设备认证
let auth = new deviceAuth.DeviceAuth();

// 设置认证参数
let authParams = {
    challenge: 'randomChallenge', // 随机挑战值
    timeout: 5000, // 超时时间
    authType: deviceAuth.AuthType.FACE // 认证类型,例如人脸识别
};

// 开始设备认证
auth.authenticate(authParams).then((result) => {
    if (result.resultCode === deviceAuth.ResultCode.SUCCESS) {
        console.log('设备认证成功');
    } else {
        console.log('设备认证失败');
    }
}).catch((error) => {
    console.error('设备认证过程中发生错误:', error);
});在这个示例中,我们首先导入了@ohos.security.deviceAuth模块,并创建了一个DeviceAuth实例。然后,我们设置了认证参数,包括挑战值、超时时间和认证类型。最后,我们调用authenticate方法开始设备认证,并根据返回的结果判断认证是否成功。
请注意,实际使用中需要根据具体需求调整认证参数和处理逻辑。
更多关于HarmonyOS鸿蒙Next中实现设备认证功能示例代码的实战系列教程也可以访问 https://www.itying.com/category-93-b0.html
在HarmonyOS鸿蒙Next中,设备认证功能可以通过ohos.security.deviceauth模块实现。以下是一个简单的示例代码,展示如何使用该模块进行设备认证:
import ohos.security.deviceauth.DeviceAuthManager;
import ohos.security.deviceauth.DeviceAuthCallback;
import ohos.security.deviceauth.DeviceAuthResult;

public class DeviceAuthExample {
    public void startDeviceAuth() {
        DeviceAuthManager manager = DeviceAuthManager.getInstance();
        DeviceAuthCallback callback = new DeviceAuthCallback() {
            @Override
            public void onAuthSuccess(DeviceAuthResult result) {
                // 认证成功处理
                System.out.println("设备认证成功");
            }

            @Override
            public void onAuthFailed(int errorCode) {
                // 认证失败处理
                System.out.println("设备认证失败,错误码:" + errorCode);
            }
        };

        // 发起设备认证
        manager.startDeviceAuth(callback);
    }
}该代码展示了如何初始化DeviceAuthManager并设置回调来处理认证结果。实际应用中,可能需要根据具体需求调整认证参数和处理逻辑。


