


HarmonyOS鸿蒙Next中代码工坊的AI matting示例代码抠图,想要保存带白边的效果如何实现
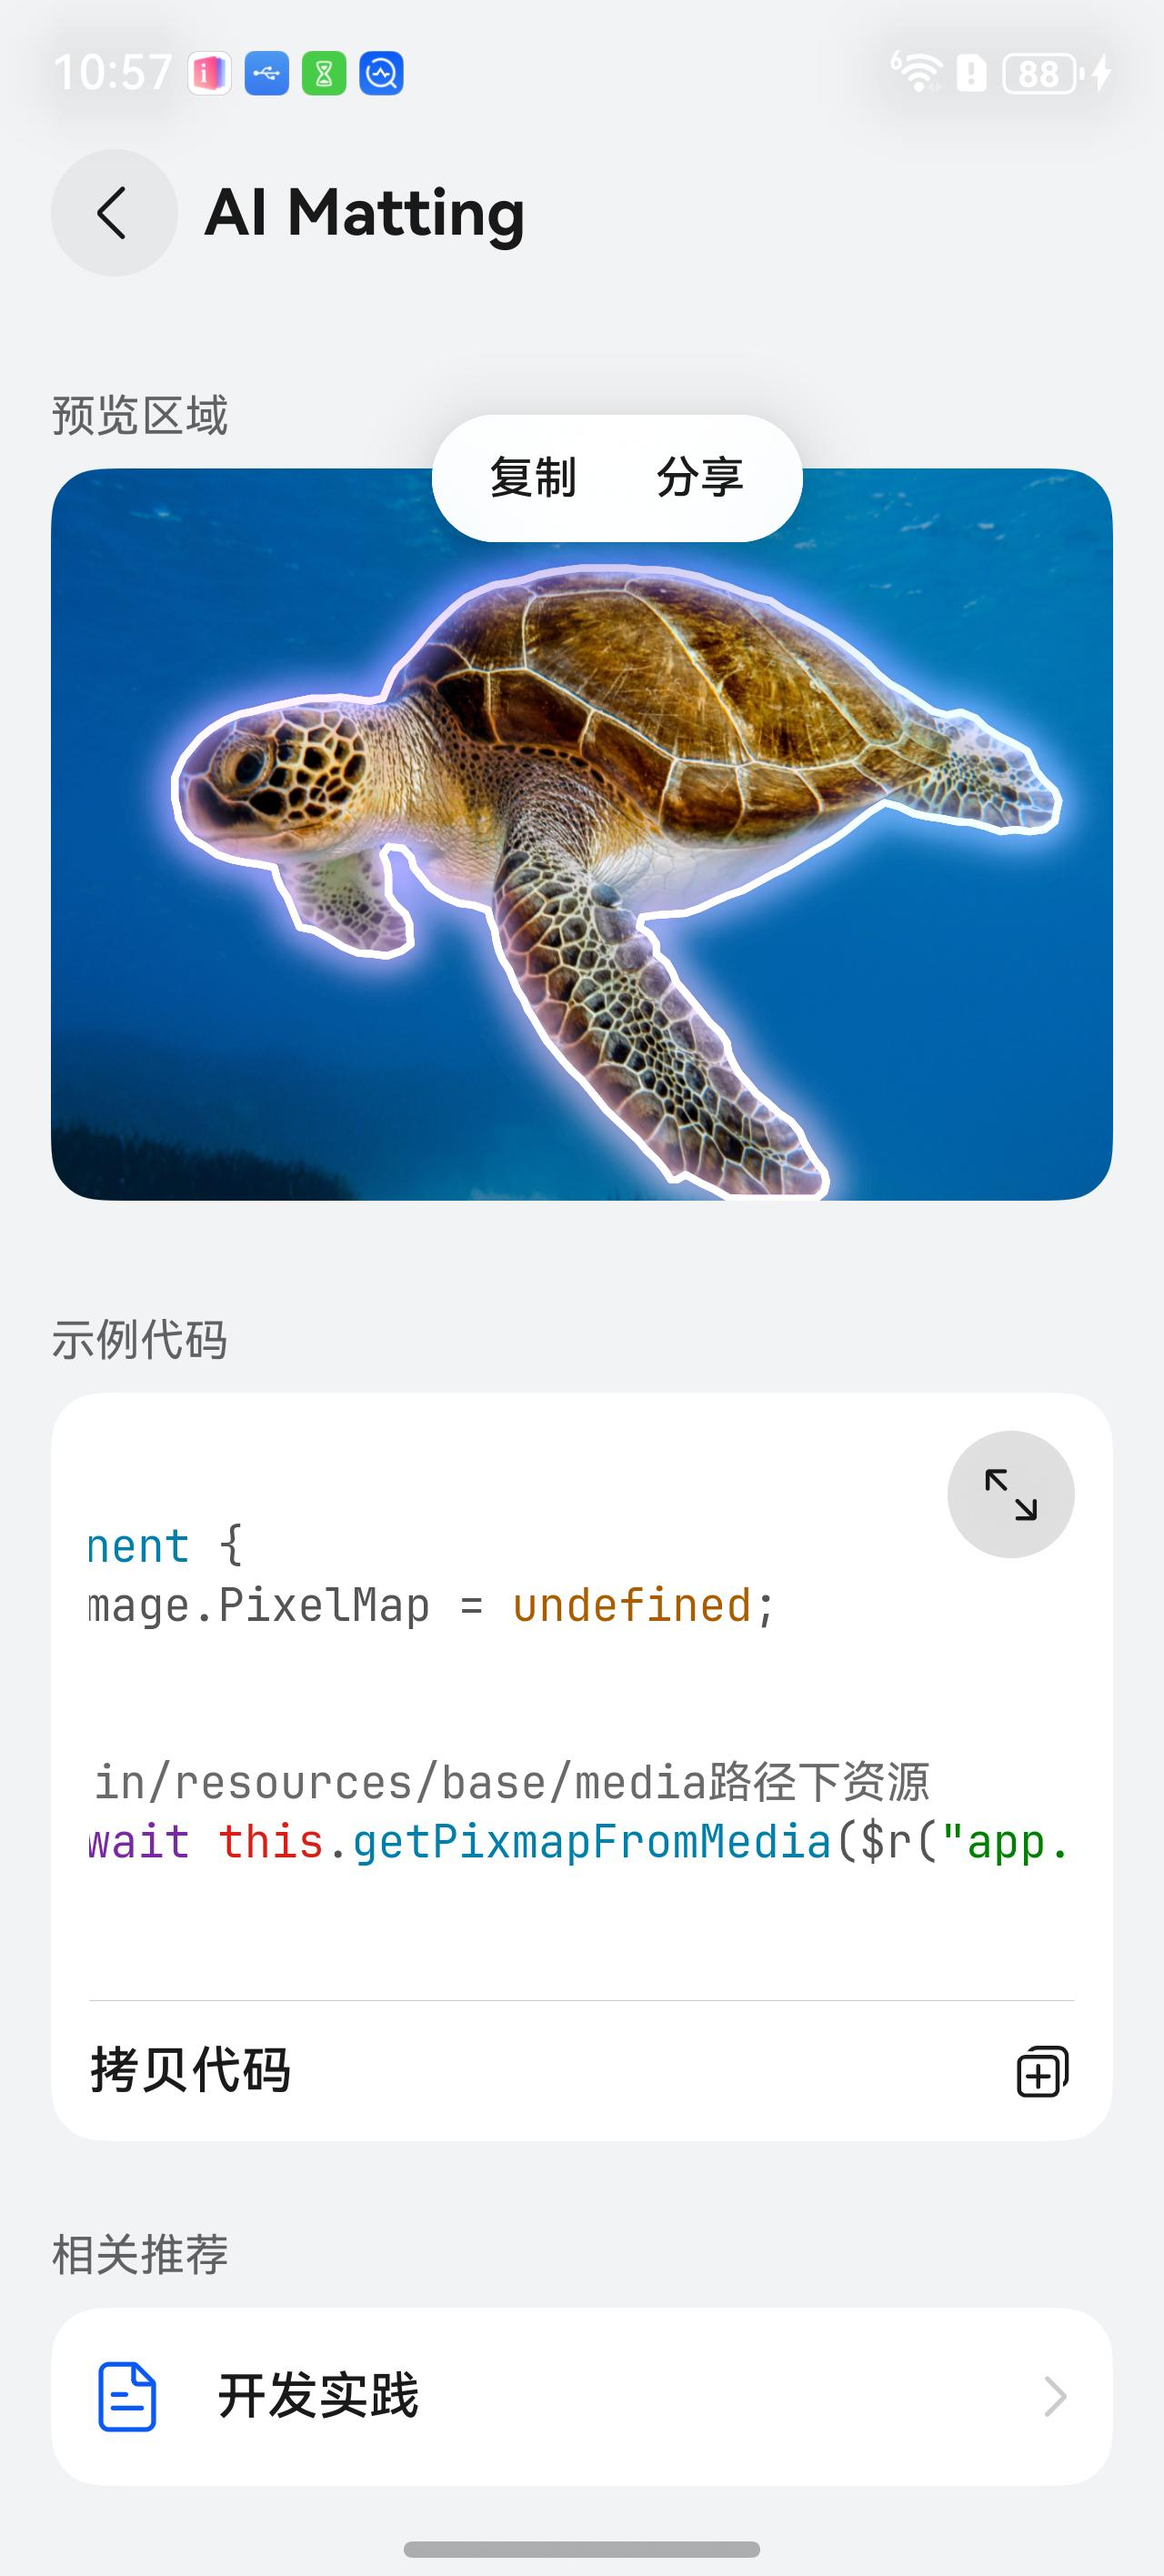
HarmonyOS鸿蒙Next中代码工坊的AI matting示例代码抠图,想要保存带白边的效果如何实现 【问题描述】:参照代码工坊的AI matting示例代码抠图,图片选中之后,周围有一圈白边效果,但是复制之后粘贴就没有白边的效果,我想把抠出来的图片做成贴纸,这个白边效果正好是我想要的,请问如何能保存这个白边的效果,或者是如何给一个图片添加这个白边的效果,有方案实现吗,效果图如下
【问题现象】:
抠图效果
粘贴后的效果

【版本信息】:API20
【复现代码】:不涉及
【尝试解决方案】:不涉及
更多关于HarmonyOS鸿蒙Next中代码工坊的AI matting示例代码抠图,想要保存带白边的效果如何实现的实战教程也可以访问 https://www.itying.com/category-93-b0.html


我用了另外一种方案来实现楼主可以参考,更改为图片加白边
【解决方案】
读取像素:获取扣好图的 PixelMap 数据。
生成白底:遍历所有不透明的像素,在它的周围(由边框宽度决定)填充白色。这就像把主体“放大”了一圈白色。
合成:将原始的主体图片覆盖在这个“白色放大版”上面。
输出:生成一张新的带白边的图片。
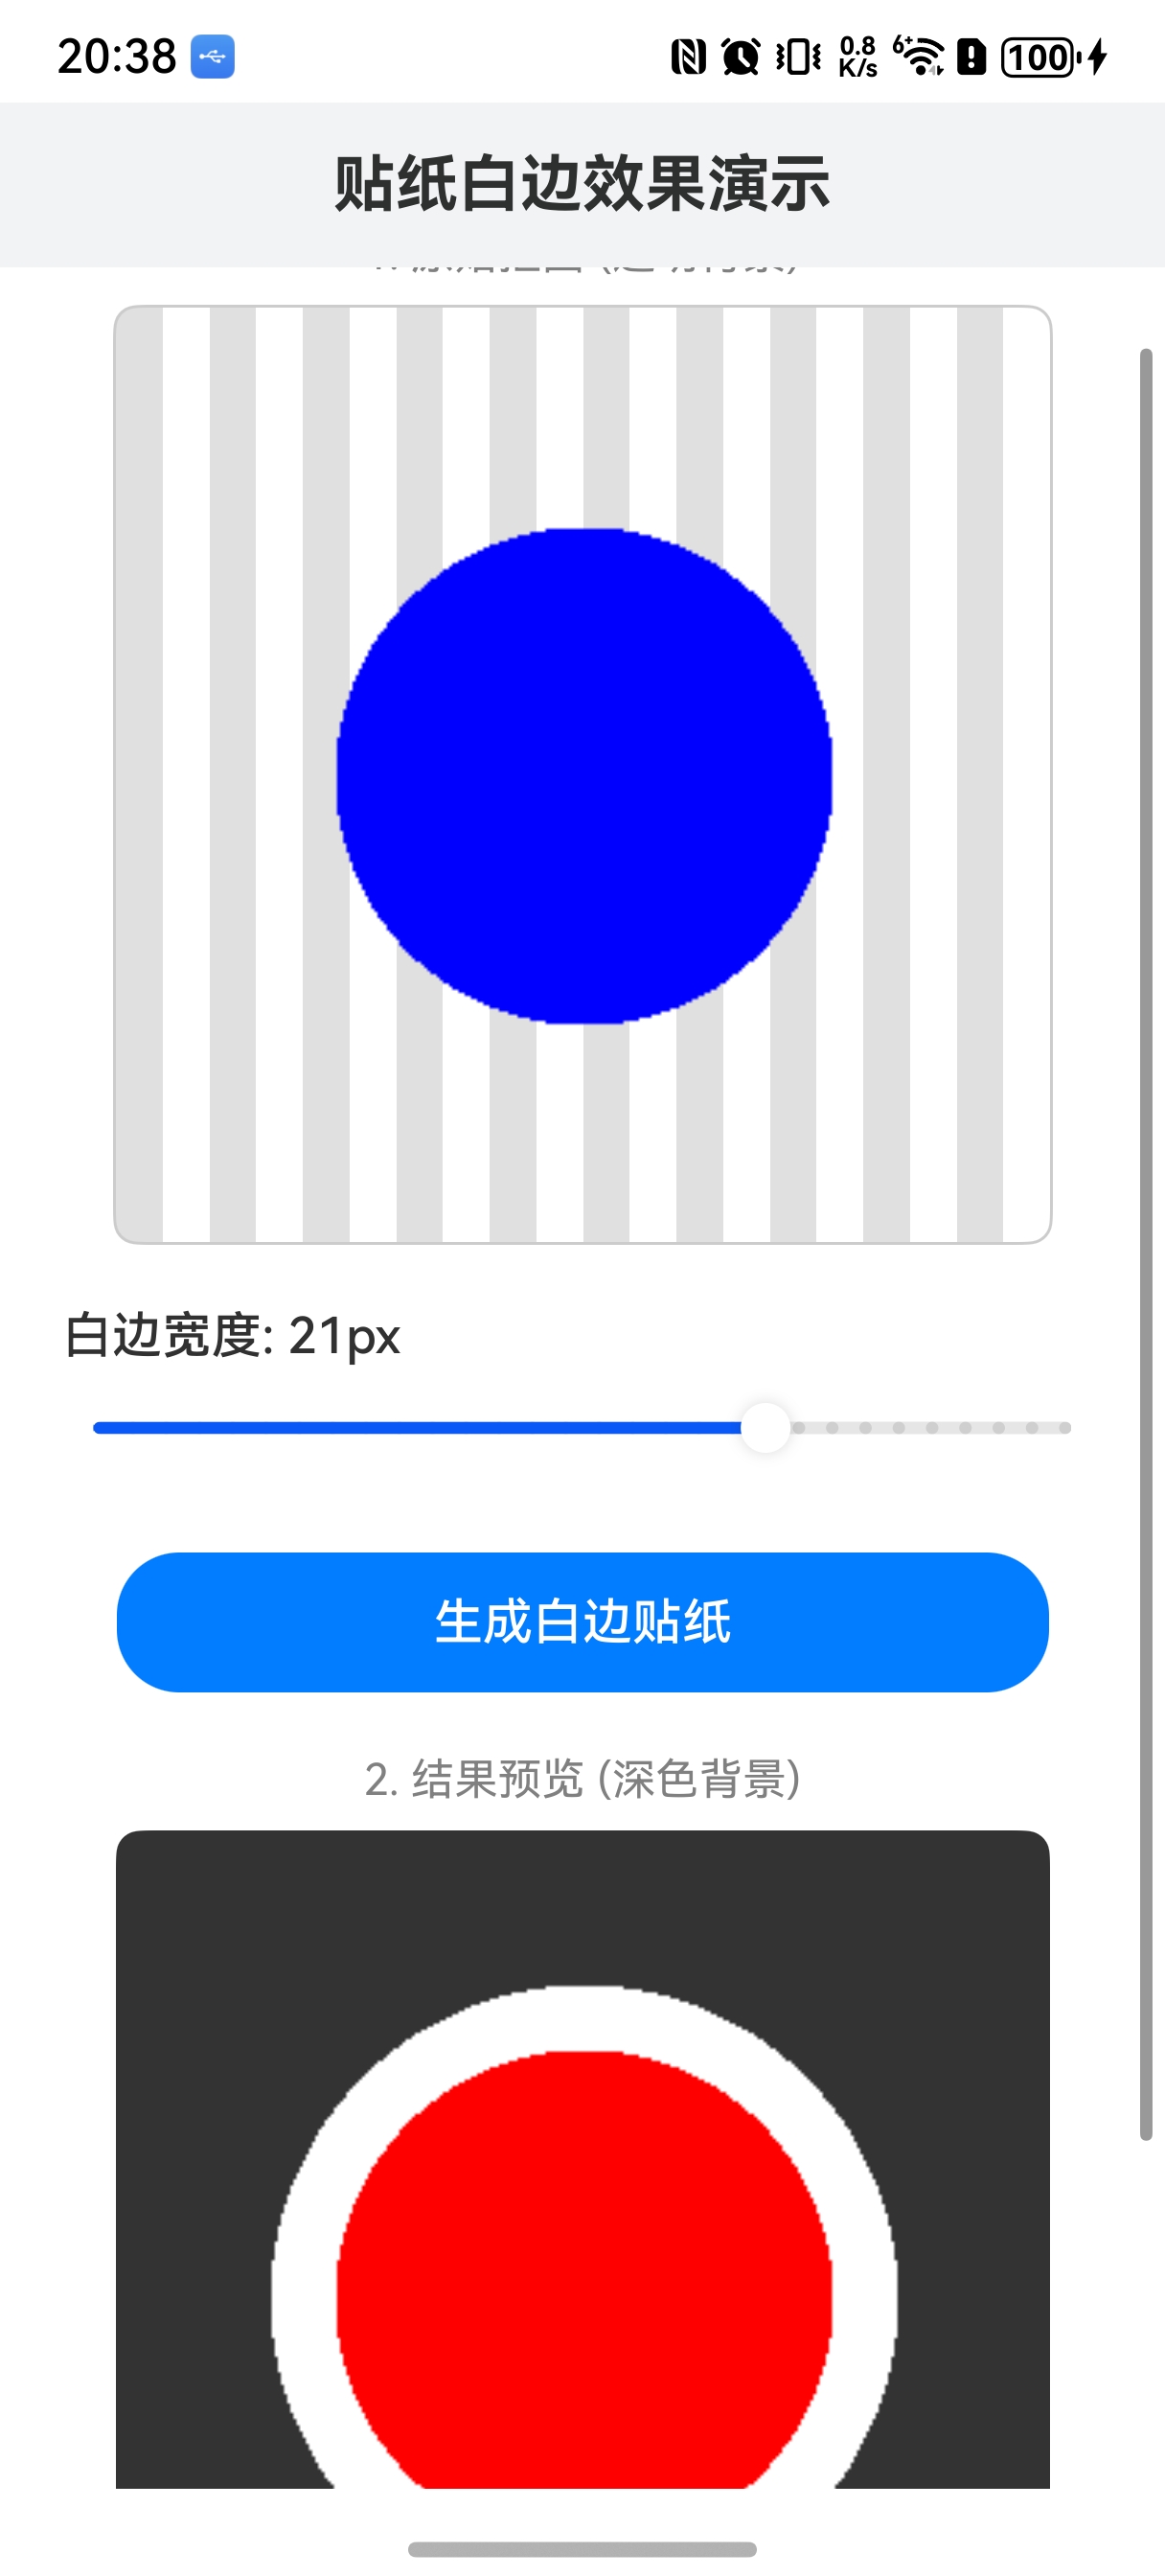
【实现效果】
【demo代码】
import image from '@ohos.multimedia.image';
import promptAction from '@ohos.promptAction';

@Entry
@Component
struct StickerPage {
  @State originalImage: image.PixelMap | null = null;
  @State stickerImage: image.PixelMap | null = null;
  @State isProcessing: boolean = false;
  @State strokeWidth: number = 10; // 默认描边宽度

  // 页面加载时生成一个测试用的透明底图片
  async aboutToAppear() {
    this.originalImage = await this.createMockPixelMap();
  }

  // 创建一个测试图片(透明背景上的红色爱心),模拟抠图结果
  async createMockPixelMap(): Promise<image.PixelMap> {
    const width = 300;
    const height = 300;
    const buffer = new ArrayBuffer(width * height * 4);
    const pixels = new Uint8Array(buffer); // RGBA

    // 简单的算法画一个爱心或者圆形,这里画一个红色的圆作为主体
    const cx = width / 2;
    const cy = height / 2;
    const radius = 80;

    for (let y = 0; y < height; y++) {
      for (let x = 0; x < width; x++) {
        const index = (y * width + x) * 4;

        // 简单的圆形方程
        const dist = Math.sqrt((x - cx) * (x - cx) + (y - cy) * (y - cy));

        if (dist < radius) {
          // 红色主体 (R=255, G=0, B=0, A=255)
          pixels[index] = 255;
          pixels[index + 1] = 0;
          pixels[index + 2] = 0;
          pixels[index + 3] = 255;
        } else {
          // 透明背景
          pixels[index] = 0;
          pixels[index + 1] = 0;
          pixels[index + 2] = 0;
          pixels[index + 3] = 0;
        }
      }
    }

    const opts: image.InitializationOptions = {
      editable: true,
      pixelFormat: image.PixelMapFormat.RGBA_8888,
      size: { height, width }
    };
    return await image.createPixelMap(buffer, opts);
  }

  // 生成贴纸的核心方法
  async generateSticker() {
    if (!this.originalImage) {
      return;
    }

    // 防止重复点击
    if (this.isProcessing) {
      return;
    }

    this.isProcessing = true;
    const startTime = Date.now();

    try {
      // 调用工具类
      // 这里的 strokeWidth 是界面上滑块控制的
      const result = await StickerUtils.addStickerStroke(this.originalImage, this.strokeWidth);

      this.stickerImage = result;

      const duration = Date.now() - startTime;
      promptAction.showToast({ message: `生成完毕,耗时: ${duration}ms` });

    } catch (error) {
      console.error('生成失败:', error);
      promptAction.showToast({ message: '生成失败,请查看日志' });
    } finally {
      this.isProcessing = false;
    }
  }

  build() {
    Column() {
      // 标题栏
      Text('贴纸白边效果演示')
        .fontSize(20)
        .fontWeight(FontWeight.Bold)
        .width('100%')
        .padding(15)
        .backgroundColor('#F1F3F5')
        .textAlign(TextAlign.Center)

      Scroll() {
        Column({ space: 20 }) {

          // 1. 展示原图区域
          Column() {
            Text('1. 原始抠图 (透明背景)')
              .fontSize(14)
              .fontColor(Color.Gray)
              .margin({ bottom: 8 })

            Stack() {
              // 棋盘格背景,用于展示透明效果
              GridRow({ columns: 20 }) {
                ForEach(new Array(400).fill(0), (_: number, index: number) => {
                  GridCol()
                    .height(15)
                    .backgroundColor(index % 2 === 0 ? '#E0E0E0' : '#FFFFFF')
                })
              }
              .width(300)
              .height(300)
              .clip(true)

              if (this.originalImage) {
                Image(this.originalImage)
                  .width(300)
                  .height(300)
                  .objectFit(ImageFit.Contain)
              }
            }
            .borderRadius(8)
            .clip(true)
            .border({ width: 1, color: '#CCCCCC' })
          }

          // 2. 控制区域
          Column() {
            Row() {
              Text(`白边宽度: ${this.strokeWidth.toFixed(0)}px`)
                .fontSize(16)
                .fontWeight(FontWeight.Medium)
            }
            .width('100%')
            .justifyContent(FlexAlign.Start)

            Slider({
              value: this.strokeWidth,
              min: 1,
              max: 30,
              step: 1,
              style: SliderStyle.OutSet
            })
              .showSteps(true)
              .onChange((value: number) => {
                this.strokeWidth = value;
              })
          }
          .padding({ left: 20, right: 20 })
          .width('100%')

          Button(this.isProcessing ? '处理中...' : '生成白边贴纸')
            .width('80%')
            .height(45)
            .backgroundColor(this.isProcessing ? '#CCCCCC' : '#007DFF')
            .onClick(() => {
              this.generateSticker();
            })

          // 3. 展示结果区域
          if (this.stickerImage) {
            Column() {
              Text('2. 结果预览 (深色背景)')
                .fontSize(14)
                .fontColor(Color.Gray)
                .margin({ bottom: 8 })

              Stack() {
                // 深色背景,方便看清白边
                Rect()
                  .width('100%')
                  .height('100%')
                  .fill('#333333')

                Image(this.stickerImage)
                  .width(300)
                  .height(300)
                  .objectFit(ImageFit.Contain)
              }
              .width(300)
              .height(300)
              .borderRadius(8)
              .clip(true)
            }
            .animation({ duration: 300 })
          }
        }
        .padding({ top: 20, bottom: 50 })
        .width('100%')
      }
      .layoutWeight(1)
    }
    .width('100%')
    .height('100%')
    .backgroundColor('#FFFFFF')
  }
}


export class StickerUtils {
  /**
   * 给图片添加白色描边效果(制作贴纸)
   * @param sourcePixelMap 原始图片 (必须是背景透明的)
   * @param strokeWidth 描边宽度 (像素单位,建议 5-20)
   * @returns 处理后的 PixelMap
   */
  public static async addStickerStroke(sourcePixelMap: image.PixelMap,
    strokeWidth: number = 10): Promise<image.PixelMap> {
    const imageInfo = await sourcePixelMap.getImageInfo();
    const width = imageInfo.size.width;
    const height = imageInfo.size.height;

    // 1. 读取原始像素数据
    const bufferData = new ArrayBuffer(sourcePixelMap.getPixelBytesNumber());
    await sourcePixelMap.readPixelsToBuffer(bufferData);

    // 使用 Uint8Array 操作字节,或者是 Int32Array 操作像素点 (RGBA)
    // 这里使用 Uint32Array 方便处理整个像素颜色,但在 ArkTS 中需注意大小端问题
    // 为兼容性,我们操作 Uint8Array: [R, G, B, A, R, G, B, A...]
    const srcPixels = new Uint8Array(bufferData);

    // 2. 创建一个新的 Buffer 用于存放结果
    // 结果图大小不变(如果主体太大贴边,描边可能会被切掉,建议输入图主体周围留有余白)
    const dstPixels = new Uint8Array(bufferData.byteLength);

    // 预设白色 (R=255, G=255, B=255, A=255)
    // 注意:PixelMap 默认格式通常是 RGBA_8888

    // 3. 算法核心:膨胀 (Dilation) 生成白底
    // 这是一个高强度的计算,为了性能,我们通过判断“当前点是否不透明”来向四周扩散

    // 优化:我们不需要遍历每一个点去画圆,而是遍历原图,如果原图某点有像素,
    // 就在目标图对应位置及周围画白。

    // 为了防止计算量过大卡顿,这里使用简单的“方框+圆形”逻辑
    const w = width;
    const h = height;
    const dist = Math.ceil(strokeWidth);
    const distSq = dist * dist;

    // 填充 0 (全透明)
    dstPixels.fill(0);

    for (let y = 0; y < h; y++) {
      for (let x = 0; x < w; x++) {
        const idx = (y * w + x) * 4;
        const alpha = srcPixels[idx + 3]; // 获取 Alpha 通道

        // 如果当前像素不是透明的 (阈值设为 10 过滤杂边)
        if (alpha > 10) {
          // 在目标图上,以 (x,y) 为中心,dist 为半径画白色
          // 优化循环范围,只遍历由于描边宽度影响到的区域
          const startY = Math.max(0, y - dist);
          const endY = Math.min(h - 1, y + dist);
          const startX = Math.max(0, x - dist);
          const endX = Math.min(w - 1, x + dist);

          for (let dy = startY; dy <= endY; dy++) {
            for (let dx = startX; dx <= endX; dx++) {
              // 检查距离是否在圆内 (制作圆角描边)
              const deltaX = dx - x;
              const deltaY = dy - y;
              if (deltaX * deltaX + deltaY * deltaY <= distSq) {
                const dstIdx = (dy * w + dx) * 4;
                // 设置为白色不透明
                dstPixels[dstIdx] = 255; // R
                dstPixels[dstIdx + 1] = 255; // G
                dstPixels[dstIdx + 2] = 255; // B
                dstPixels[dstIdx + 3] = 255; // A
              }
            }
          }
        }
      }
    }

    // 4. 将原始图片覆盖在白底之上
    for (let i = 0; i < srcPixels.length; i += 4) {
      const srcA = srcPixels[i + 3];
      if (srcA > 0) {
        // 简单的 Alpha 混合:如果原图有像素,直接覆盖
        // (更严谨的做法是做 alpha blending,但对于贴纸,直接覆盖通常效果最好)
        dstPixels[i] = srcPixels[i]; // R
        dstPixels[i + 1] = srcPixels[i + 1]; // G
        dstPixels[i + 2] = srcPixels[i + 2]; // B
        dstPixels[i + 3] = srcPixels[i + 3]; // A
      }
    }

    // 5. 创建新的 PixelMap
    const opts: image.InitializationOptions = {
      editable: true,
      pixelFormat: image.PixelMapFormat.RGBA_8888,
      size: { height: height, width: width }
    };

    const newPixelMap = await image.createPixelMap(dstPixels.buffer, opts);
    return newPixelMap;
  }
}


在HarmonyOS Next中,AI Matting示例代码生成的抠图结果(Alpha遮罩)默认是透明背景。您看到的“白边”效果实际上是UI组件(如Image)在透明区域叠加的视觉边框,并非图像数据的一部分。要实现保存带白边的贴纸效果,需要对抠图结果进行后处理。
核心方案是:获取抠图结果的Alpha通道,创建一个新图像,在透明区域(Alpha值较低的区域)填充白色,然后将处理后的图像保存到文件。
以下是基于@kit.ArkGraphics2D(2D图形库)的关键实现步骤:
- 获取图像数据:从AI Matting的输出结果(通常是一个包含RGBA数据的
PixelMap对象)中获取原始的像素数据。 - 处理Alpha通道:遍历每个像素的Alpha值。您可以设定一个阈值(例如,Alpha < 10)。对于低于此阈值的像素(即原图中完全透明或接近透明的区域),将其RGB通道的值设置为白色(255, 255, 255),同时将Alpha通道设置为不透明(255)。对于Alpha值较高的像素(主体部分),保留其原有的RGB颜色和Alpha值。
- 创建并保存新图像:将处理后的像素数据重新封装为
PixelMap,然后使用image组件的packing方法或相关API将其编码为PNG等格式保存到应用沙箱路径。
示例代码片段:
import { image } from '@kit.ArkGraphics2D';
import { BusinessError } from '@kit.BasicServicesKit';

// 假设 mattingResultPixelMap 是AI Matting后得到的 PixelMap 对象
async function addWhiteBorderAndSave(mattingResultPixelMap: image.PixelMap): Promise<void> {
  const imageInfo: image.InitializationOptions = mattingResultPixelMap.getImageInfo();
  const buffer: ArrayBuffer = await mattingResultPixelMap.getPixelBytesBuffer();

  // 获取像素数据(假设为RGBA_8888格式)
  const pixelArray = new Uint8Array(buffer);
  const alphaThreshold = 10; // 透明度阈值,可调整

  for (let i = 0; i < pixelArray.length; i += 4) {
    const alpha = pixelArray[i + 3];
    if (alpha < alphaThreshold) {
      // 透明区域填充为白色不透明
      pixelArray[i] = 255;     // R
      pixelArray[i + 1] = 255; // G
      pixelArray[i + 2] = 255; // B
      pixelArray[i + 3] = 255; // A
    }
    // 非透明区域保留原色
  }

  // 创建新的PixelMap
  const newPixelMap: image.PixelMap = await image.createPixelMap(pixelArray.buffer, imageInfo);

  // 保存为PNG文件到应用沙箱
  const packOpts: image.PackingOption = {
    format: "image/png",
    quality: 100
  };
  const filePath = '您的沙箱路径/贴纸_with_border.png'; // 替换为实际路径
  await image.packing(newPixelMap, filePath, packOpts);

  // 释放资源
  newPixelMap.release();
}
注意事项:
- 确保已申请必要的文件读写权限(
ohos.permission.READ_MEDIA,ohos.permission.WRITE_MEDIA)。 - 处理完成后及时调用
release()释放PixelMap资源,避免内存泄漏。 - 阈值
alphaThreshold可根据实际视觉效果调整,以控制白边的“硬度”。
此方法直接修改图像数据,保存后的文件将永久包含白色边框,适合用于创建贴纸等素材。