Flutter弹出卡片动画插件flutter_popup_card的使用
Flutter弹出卡片动画插件 flutter_popup_card 的使用
flutter_popup_card 是一个轻量级的插件,用于在您的主应用之上创建一个可以弹出的卡片或自定义小部件。这个插件类似于Flutter内置的showDialog函数,但提供了更多的灵活性和动画效果。
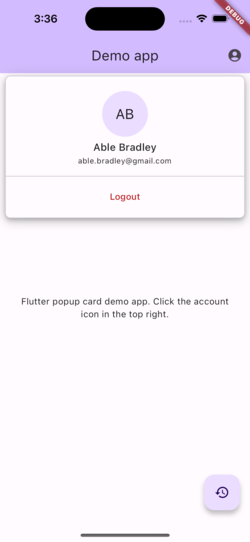
示例展示


使用方法
基本用法
要显示一个弹出卡片,请使用showPopupCard函数,并传入必要的参数。下面是一个简单的示例,展示了如何显示一个黄色背景的弹出卡片:
showPopupCard(
  context: context,
  builder: (context) {
    return PopupCard(
      elevation: 8,
      color: Colors.yellow,
      shape: RoundedRectangleBorder(
        borderRadius: BorderRadius.circular(12.0),
      ),
      child: const Padding(
        padding: EdgeInsets.all(16.0),
        child: Text('This is a popup card'),
      ),
    );
  },
  offset: const Offset(-16, 70),
  alignment: Alignment.topRight,
  useSafeArea: true,
  dimBackground: true,
);
完整示例代码
以下是一个更完整的示例,包括了一个带有用户信息和注销按钮的弹出卡片:
import 'dart:math' as math;
import 'package:flutter/material.dart';
import 'package:flutter_popup_card/flutter_popup_card.dart';

void main() {
  runApp(const MyApp());
}

class MyApp extends StatelessWidget {
  const MyApp({super.key});

  @override
  Widget build(BuildContext context) {
    return MaterialApp(
      title: 'Demo app',
      theme: ThemeData(),
      darkTheme: ThemeData.dark(),
      home: const MyHomePage(title: 'Demo app'),
    );
  }
}

class MyHomePage extends StatefulWidget {
  const MyHomePage({
    required this.title,
    super.key,
  });

  final String title;

  @override
  State<MyHomePage> createState() => _MyHomePageState();
}

class _MyHomePageState extends State<MyHomePage> {
  late String message;

  @override
  void initState() {
    super.initState();
    message = 'Flutter popup card demo app. Click the account icon in the top right.';
  }

  Future<void> _accountClicked() async {
    final result = await showPopupCard<String>(
      context: context,
      builder: (context) {
        return PopupCard(
          shape: RoundedRectangleBorder(
            borderRadius: BorderRadius.circular(8.0),
            side: BorderSide(
              color: Theme.of(context).colorScheme.outlineVariant,
            ),
          ),
          child: const PopupCardDetails(),
        );
      },
      offset: const Offset(-8, 60),
      alignment: Alignment.topRight,
      useSafeArea: true,
      dimBackground: true,
    );
    if (result == null) return;
    setState(() {
      message = result;
    });
  }

  @override
  Widget build(BuildContext context) {
    return Scaffold(
      appBar: AppBar(
        backgroundColor: Theme.of(context).colorScheme.inversePrimary,
        title: Text(widget.title),
        actions: [
          IconButton(
            onPressed: _accountClicked,
            icon: const Icon(Icons.account_circle_rounded),
          ),
        ],
      ),
      body: Center(
        child: Padding(
          padding: const EdgeInsets.all(32.0),
          child: Text(
            message,
            textAlign: TextAlign.center,
          ),
        ),
      ),
      floatingActionButton: FloatingActionButton(
        onPressed: () {
          setState(() {
            message = 'Reset.';
          });
        },
        child: const Icon(Icons.restore),
      ),
    );
  }
}

class PopupCardDetails extends StatelessWidget {
  const PopupCardDetails({super.key});

  void _logoutPressed(BuildContext context) {
    Navigator.of(context).pop('Logout pressed');
  }

  @override
  Widget build(BuildContext context) {
    return ConstrainedBox(
      constraints: BoxConstraints(
        maxWidth: math.min(450, MediaQuery.sizeOf(context).width - 16.0),
      ),
      child: Column(
        mainAxisSize: MainAxisSize.min,
        children: [
          const SizedBox(height: 24.0),
          CircleAvatar(
            backgroundColor: Theme.of(context).colorScheme.primaryContainer,
            radius: 36,
            foregroundColor: Theme.of(context).colorScheme.onPrimaryContainer,
            child: Text(
              'AB',
              style: Theme.of(context).textTheme.titleLarge,
            ),
          ),
          const SizedBox(height: 4.0),
          Padding(
            padding: const EdgeInsets.symmetric(horizontal: 16.0),
            child: Text(
              'Able Bradley',
              style: Theme.of(context).textTheme.titleMedium,
            ),
          ),
          const SizedBox(height: 2.0),
          Padding(
            padding: const EdgeInsets.symmetric(horizontal: 16.0),
            child: Text(
              'able.bradley@gmail.com',
              style: Theme.of(context).textTheme.bodySmall,
            ),
          ),
          const SizedBox(height: 8.0),
          const Divider(),
          TextButton(
            onPressed: () => _logoutPressed(context),
            style: TextButton.styleFrom(
              foregroundColor: Theme.of(context).colorScheme.error,
            ),
            child: const Text('Logout'),
          ),
          const SizedBox(height: 10.0),
        ],
      ),
    );
  }
}
以上代码演示了如何集成和使用flutter_popup_card插件来创建一个具有动画效果的弹出卡片。您可以根据需要调整卡片的设计和内容。完整示例可以在GitHub仓库中找到。
更多关于Flutter弹出卡片动画插件flutter_popup_card的使用的实战系列教程也可以访问 https://www.itying.com/category-92-b0.html
更多关于Flutter弹出卡片动画插件flutter_popup_card的使用的实战系列教程也可以访问 https://www.itying.com/category-92-b0.html
当然,以下是如何在Flutter中使用flutter_popup_card插件来创建弹出卡片动画的示例代码。这个插件允许你创建具有动画效果的弹出卡片,非常适合用于显示提示信息、菜单项或任何需要用户注意的内容。
首先,确保你已经在pubspec.yaml文件中添加了flutter_popup_card依赖:
dependencies:
  flutter:
    sdk: flutter
  flutter_popup_card: ^latest_version  # 替换为最新版本号
然后,运行flutter pub get来安装依赖。
接下来,是一个完整的示例代码,展示如何使用flutter_popup_card插件:
import 'package:flutter/material.dart';
import 'package:flutter_popup_card/flutter_popup_card.dart';

void main() {
  runApp(MyApp());
}

class MyApp extends StatelessWidget {
  @override
  Widget build(BuildContext context) {
    return MaterialApp(
      title: 'Flutter Popup Card Demo',
      theme: ThemeData(
        primarySwatch: Colors.blue,
      ),
      home: MyHomePage(),
    );
  }
}

class MyHomePage extends StatefulWidget {
  @override
  _MyHomePageState createState() => _MyHomePageState();
}

class _MyHomePageState extends State<MyHomePage> with SingleTickerProviderStateMixin {
  late PopupController _popupController;

  @override
  void initState() {
    super.initState();
    _popupController = PopupController();
  }

  @override
  Widget build(BuildContext context) {
    return Scaffold(
      appBar: AppBar(
        title: Text('Flutter Popup Card Demo'),
      ),
      body: Center(
        child: Column(
          mainAxisAlignment: MainAxisAlignment.center,
          children: <Widget>[
            ElevatedButton(
              onPressed: () {
                _showPopupCard();
              },
              child: Text('Show Popup Card'),
            ),
          ],
        ),
      ),
    );
  }

  void _showPopupCard() {
    showPopupCard(
      context: context,
      controller: _popupController,
      position: PopupPosition.bottom,
      shape: RoundedRectangleBorder(
        borderRadius: BorderRadius.circular(16),
      ),
      child: Card(
        color: Colors.white,
        elevation: 8,
        child: Padding(
          padding: const EdgeInsets.all(16.0),
          child: Column(
            mainAxisSize: MainAxisSize.min,
            children: <Widget>[
              Text(
                'This is a popup card!',
                style: TextStyle(fontSize: 20),
              ),
              SizedBox(height: 16),
              ElevatedButton(
                onPressed: () {
                  _popupController.dismiss();
                },
                child: Text('Close'),
              ),
            ],
          ),
        ),
      ),
    );
  }
}
在这个示例中,我们创建了一个简单的Flutter应用,其中包含一个按钮,点击按钮时会显示一个弹出卡片。卡片的内容是一个简单的文本和一个关闭按钮。
关键部分解释:
- PopupController:用于控制弹出卡片的显示和隐藏。
- showPopupCard:用于显示弹出卡片的方法。你可以指定卡片的位置(如
PopupPosition.bottom)、形状和子组件。 - Card:作为弹出卡片的内容容器,你可以根据需要自定义其内容。
确保你已经正确安装了flutter_popup_card插件,并且Flutter环境配置正确。运行上述代码,点击按钮就可以看到带有动画效果的弹出卡片了。


